I did try that link earlier, but I was in a hurry and the one manual that I opened did not include schematics, I have now found the schematics on all their other products. Thanks!
As I am very new to acoustics, would someone mind explaining to me the differences between "focus[ing] radiation" and a "column"? And perhaps the differences between the stepped and angled mouth deflectors?
Btw, thank you all for your help! I realize it can be frustrating trying to convey ideas to someone (like me 🙄 )who has little knowledge about a subject...
It's all about the characteristics & shaping of the wavefront. The curved front / focused design does exactly what it says on the tin: it focuses the radiation onto a specific point in space. The flat fronted enclosure does not; the wavefront is more analogous to that of a line array, and in the low frequencies, will be in a form closer to that of a cylinder or column. Not an exact analogy, but fairly close.
Regarding differences between the stepped or angled deflectors, there basically aren't any in practice.
Regarding differences between the stepped or angled deflectors, there basically aren't any in practice.
Line array or MTM?
Hmm, the stepped plates cause HF 'shearing' (spurious HF reflections) and why in some cases it's beneficial to cover them with felt, so I recommend trying them both ways to decide if there's an audibly better choice.
GM
Hmm, the stepped plates cause HF 'shearing' (spurious HF reflections) and why in some cases it's beneficial to cover them with felt, so I recommend trying them both ways to decide if there's an audibly better choice.
GM
As in the flat-front boxes? Bit of both I reckon Greg, with a leaning toward the MTM.
Re the plates, good point. I'd forgotten that, although in terms of output from the waveguides, they're pretty much done by 150Hz, so there shouldn't in theory (famous last words huh? 😉) be much HF to be scattered.
Re the plates, good point. I'd forgotten that, although in terms of output from the waveguides, they're pretty much done by 150Hz, so there shouldn't in theory (famous last words huh? 😉) be much HF to be scattered.
Right, my limited experience with W-bins turned upright had a strong, bottom heavy MTM presentation, though obviously down low they were omni.
I'm not referring to the vent's BW, but the shearing action of the wavefront on rarefaction creating its own HF noise.
GM
I'm not referring to the vent's BW, but the shearing action of the wavefront on rarefaction creating its own HF noise.
GM
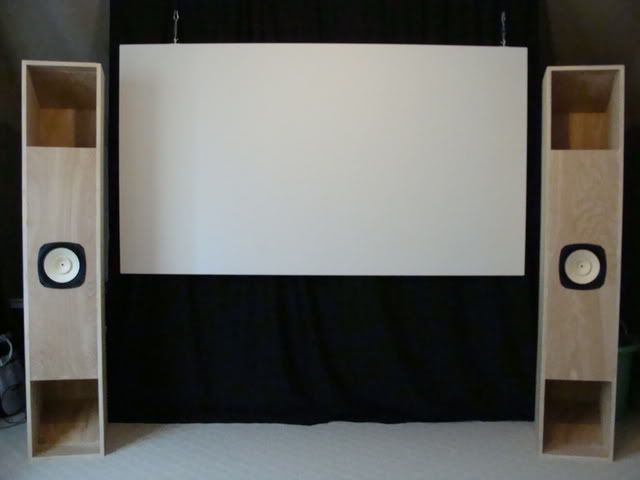
Well, I'm glad to say I got to fire up my Sanchiko's with the Fostex 206e last night. At first I was really worried because they sounded extremely thin but later found out that polarity was wrong. Everything is sounding good now. I'm still playing around a little bit with placement, right now I have them about 7 feet apart toed in about 10 degrees. They are on either side of my projection screen which probably is not ideal but I'm a little limited on places to put them.
Have a couple of questions. Is silicone sealant a good material to seal the speaker chamber?
And
Are most people just using a piece of wool behind the magnet as the only sound absorbent? What is a good source for wool and how thick does it need to be?
Have a couple of questions. Is silicone sealant a good material to seal the speaker chamber?
And
Are most people just using a piece of wool behind the magnet as the only sound absorbent? What is a good source for wool and how thick does it need to be?
I'll chime in on placement....very critical with both the Sachiko and the Saburo in my experience. Getting them away from the front wall and out into the room opens up the sound. Anywhere near the front wall in my room compresses them. Compared to many speakers I've owned, the double horns are extremely placement sensitive. When dialed in, they are absolutely incredible. Take lots of time and move them an inch at a time until you find the magic.
I have mine pointed straight at the listening position, but this may be subjective. I'm not sure what the confines of your room are, but listening distance and speaker distance from the front wall all play quite a large role in the end user satisfaction in my experience. Every room is different, so my placement might be completely different than yours and the only way to nail it is to experiment an inch at a time. A lot of time and effort, but so worth it.
Thanks for the response. I would say that mine sound really good right now. There is definately imaging there. I just wish I could hear someone's setup that was correct so I had something to base my calibrations on.
GM said:I'm not referring to the vent's BW, but the shearing action of the wavefront on rarefaction creating its own HF noise.
GM
Ah, got you. Yes, that makes sense. Be interesting to run some tests, as you say.
curvy gabriels?
another newb straggler to these mind-numbing threads...
after 3 days of reading these things, i'm stuck wondering if there is/might be a curvy gabriel (or curvy chang or kimchi for the smaller drivers, depending on how people think of it).
the front and back loading from ron's handiwork seems to bring a bit higher efficiency (i think? or am i seeing that wrong) as well as cool aesthetics and general acclaim.
i can use every dB i can get. if there are better ideas/options, i'm open. but kinda like the 126's and 127's...
fwiw, another 2a3 that squeaks about 4300 milliwatts of chest-thumping power...about a 15 ft square room. Definitely not head-banging.
my dream would actually be something like isobarik (parallel wired) curvy gabriels because my outies are 5k so i have the inductance to ratio-down the load and the extra dB's would be sweet 😉
anybody?
thanks for any input and thanks for all the incredibly interesting designs!
Re: curvy gabriels?
Our build for one of these is in the queue, the details are still in limbo... i figure more boxes for the FE127 is a good thing.
dave
grindstone said:is/might be a curvy gabriel
Our build for one of these is in the queue, the details are still in limbo... i figure more boxes for the FE127 is a good thing.
dave
Here is a pic of my completed Sachiko's. (minus a finish) Anyone have comments on placement? I've been toying with them for hours and now have a pretty good center image and it is relatively difficult to dicern any left right imbalance on "centered" media. Dynamics are amazing. (For the obsessive compulsive people, the screen appears off center because it is centered with the room and that's where the studs are.)
Hats off to the designers and contributors of this project.
Hats off to the designers and contributors of this project.
My Sachikos are nearly finished.
I'm planning a satin black front and interior, and a shellac finish to the sides, top and back. This will hide the plywood edge.
Then a thin strip of acoustic transparent cloth down the front, perhaps with a hardwood frame on it.
Will post pics.
I'm planning a satin black front and interior, and a shellac finish to the sides, top and back. This will hide the plywood edge.
Then a thin strip of acoustic transparent cloth down the front, perhaps with a hardwood frame on it.
Will post pics.
Thanks, I'm thinking about doing a full frontal dust shield to hide the plywood edge and just going over it with some satin minwax water based urethane.
Perhaps someone can give me some advice. During soft periods of music I have beautiful imaging, everything sounds effortless and the speakers are very difficult to localize. As the volume increases the soundstage continues to degrade and the sound becomes more localized to the speaker cones. Keep in mind that I am only running the AMP at 30% volume (A Super T Amp). Is this what has been defined as shoutiness that tends to dissappear over time or is it something else? Any suggestions would be appreciated. I also haven't done anything in the way of damping yet as I don't really know what needs to be added.
G'day Marsfrogie,
Try the following:
Parts list:
- Scotch Magic Tape (19mm)
- Duct tape (PVC)
- Cutting knife or blade
- Cutting Mat
- Ruler
Instructions
1. Lay strips of Scotch Magic tape sticky side down on a cutting mat
2. Lay a strip of duct tape sticky side down also on the cutting mat
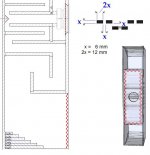
3. Using a blade, cut the duct tape into 12mm x 6mm rectangles (blocks)
4. Pick the blocks off the cutting mat using the blade
5. Lay the blocks on top of the Magic tape EXACTLY as per the pattern pictured below
6. Peel up the Magic tape with attached blocks
7. Stick onto the baffle and inside each horn mouth on all four sides (see pic)
Do one speaker first, then listen to them in stereo and see if you can hear any changes.
Then do the other side and listen to both again.
Cheers,
Alex
Try the following:
Parts list:
- Scotch Magic Tape (19mm)
- Duct tape (PVC)
- Cutting knife or blade
- Cutting Mat
- Ruler
Instructions
1. Lay strips of Scotch Magic tape sticky side down on a cutting mat
2. Lay a strip of duct tape sticky side down also on the cutting mat
3. Using a blade, cut the duct tape into 12mm x 6mm rectangles (blocks)
4. Pick the blocks off the cutting mat using the blade
5. Lay the blocks on top of the Magic tape EXACTLY as per the pattern pictured below
6. Peel up the Magic tape with attached blocks
7. Stick onto the baffle and inside each horn mouth on all four sides (see pic)
Do one speaker first, then listen to them in stereo and see if you can hear any changes.
Then do the other side and listen to both again.
Cheers,
Alex
Attachments
For those who want a fairly inexpensive and easy way to cover up the plywood edges on the front of the Sachiko & Saburo, take a look at the 3M adhesive backed veneer from woodworking outlets, such as Rockler. You peel the backing off and stick it down. Then trim it with a razor blade style trimmer (cheap) or a power handheld trimmer. Use a sealant on the bare wood and let it dry before applying the veneer. (poly or varnish) Do not apply it to bare wood. This isn't made real clear in the directions. Also, obviously, make sure the front is sanded down so all panels are flush with one another.
Spawns Rule! 😀
Spawns Rule! 😀
- Home
- Loudspeakers
- Full Range
- Spawn of Frugel-Horn