I don't know which would fail. IT's odd that none of the emitter resistors failed.
Straighten them so they don't resist coming out (with gravity). With them bent, they will sort of wedge themselves into the through holes.
If the solder doesn't have flux, you need to apply some. I'd use a larger solder if you have it. If not, use what you have.
Straighten them so they don't resist coming out (with gravity). With them bent, they will sort of wedge themselves into the through holes.
If the solder doesn't have flux, you need to apply some. I'd use a larger solder if you have it. If not, use what you have.
So I have .015 and .050 diameter. I feel I need something in the middle. Ill buy the one you recommend.
Last edited:
The solder I'd recommend would be Kester 44. I used the larger 0.093 for desoldering. The 0.062 is a good middle of the road solder. I used the 0.039 for soldering the new parts in. Use octopart to find the cheapest distributor. I had the solder that you showed (0.015) but rarely ever used it. If you have to work through more than 100 solder connections on a single amp and did a couple a day, you need something more significant. That 0.015 goes fast on anything other than SMD parts.
https://octopart.com/search?q=Kester+24-6040¤cy=USD&specs=0
https://octopart.com/search?q=Kester+24-6040¤cy=USD&specs=0
Want to tackle this project with the best tools I can afford. Im thinking of buying some kester 44 solder in .05 diameter 63/37 but in small quantities from ebay. Also found good deals on a weller wes51 and wlc100. Also found an budget minded option. Circuit Specialists Station 60.
Last edited:
The price of solder is a crime. I used to buy 1lb rolls of Kester for $17.
I used the WES51 for many years. They are good irons but don't buy tips except from authorized distributors. Tips generally last for many months (some over a year, with daily use). Some I got on ebay lasted less than a month.
The WLC is variable, not temperature controlled. I'm not a fan of amazon but they provide a good service of reviews. Look at the following iron and the reviews.
https://www.amazon.com/Weller-Digital-Soldering-Station-WE1010NA/dp/B077JDGY1J?th=1
Why 63/37? Some people will tell you're an idiot if you use anything else but I used 6040 for 30+ years with no problems. Don't spend more for the 63/37 unless you're planning on soldering while riding down a rough road in an old Dodge Power Wagon (or something similar). .
As a side note, the Weller and many other tips are clad (over a copper core). Don't let anything impact them (like the floor) and don't grind them. If they get oxidized or otherwise un-tinnable (will likely only happen if yuo try to melt plastic with it) use Ammonium Chloride (sal ammoniac) tip cleaner to clean them up.
That’s a nice Weller but over my budget and I guess too new of a model to find any good deals on ebay. Im going for 63/37 because it’s what I found on ebay for a good price. Talking tips… any particular type or size you recommend? I noticed the barevids youtuber uses a bevel tip. Most irons come with a conical tip. I use this tip cleaner. https://a.co/d/9sQhvrS
Btw check this amazing deal on a well reviewed iron:
https://a.co/d/254d16T
Btw check this amazing deal on a well reviewed iron:
https://a.co/d/254d16T
Last edited:
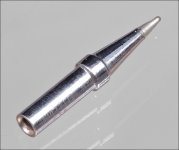
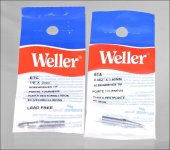
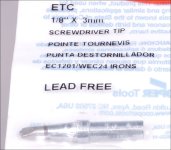
Tips with sharp edges can damage the board. I used the 'screwdriver' tips but they have rounded edges. Look at the ETC tips below. The bump on the tip is nothing more than solder from when it was tinned.
With beveled tips, it's sometimes difficult to get enough surface area in contact with the solder joint, even with additional solder. Of course, it's all about personal preference.
Conical tips with a sharp point have the same problem as beveled tips. The ETA tip in the photo is the finest point I used. I generally used the ETB or ETC tips (mostly the ETC), even for SMD work.
That looks like the right cleaner but the stuff I had was beige. Look up the MSDS for it. It will tell you what you have.
Attachments
Santa came early. I bought an iron. What temp do you recommend for the job? I have decided to use the .05 60/40 rosin core solder I already have.
That's going to depend on a lot of things. I used mine at 850 or whatever was the highest setting but set it lower when I was working on low quality boards or sensitive ICs (like reinstalling class D driver ICs). It's not all about the temperature. It's a factor of tenperature and time heating, for any situation.
You also have to prevent pushing on the board/pads when working at high heat. Let the solder make the connection.
Maybe others who are a bit more conservative (have better judgement) can say what they use.
You also have to prevent pushing on the board/pads when working at high heat. Let the solder make the connection.
Maybe others who are a bit more conservative (have better judgement) can say what they use.
Woah that is high. I set mine to 700 with a tip like your ETC and it worked well. Not 5secs but fast! I think I did pretty good.
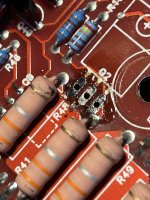
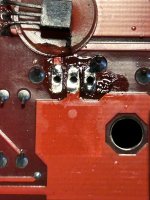
A strange thing happened after I removed the first one, Q2. The base and collector pins are no longer shorted on the board for Q2-Q6, but also the removed transistor is not shorted. For kicks I reinsterted the Q2 transistor snug but without solder and I no longer detect any shorts on Q2-Q6. Could the short have been caused by the heatsink?
A strange thing happened after I removed the first one, Q2. The base and collector pins are no longer shorted on the board for Q2-Q6, but also the removed transistor is not shorted. For kicks I reinsterted the Q2 transistor snug but without solder and I no longer detect any shorts on Q2-Q6. Could the short have been caused by the heatsink?
Attachments
Last edited:
Not by the heatsink but it could have had a strand of wire that was bridging the two terminals that was moved/lost when you worked on the board.
Any testing I can do with it off the heatsink or do I solder the transistor, put it back on the heatsink and bench test it? Do I apply any thermal paste? Is there a spec for how tight the heatsink screws should be tightened?
It's risky to test off the heatsink. It's done all the time but you have to be very observant/careful to ensure that none of the heatsink mounted components overheat.
You need to remove all of the old compound and replace it.
Just use good judgement on the screws. Use a nutdriver, not a ratchet. The screw will stop turning fairly suddenly. Just snug it a bit more after that.
You need to remove all of the old compound and replace it.
Just use good judgement on the screws. Use a nutdriver, not a ratchet. The screw will stop turning fairly suddenly. Just snug it a bit more after that.
What type of compound do you recommend? Also do I need to clean the contacts or pcb with something prior to resoldering?
What's on the board that needs cleaning? If it's dirty, cotton swabs and acetone will get it clean. You need to use those after soldering to remove flux so you can make sure the solder joints are good.
I used Dow Corning 340. It's widely available.
I used Dow Corning 340. It's widely available.
Do I also use acetone to remove the old paste from the transistors and the plastic on the heatsink?
Use dry paper towels to get it off. That should be good enough. All you need to do is get it clean enough to ensure that there is nothing that could prevent the transistors from laying down perfectly onto the insulator. You need get the transistors clean enough to make sure that there are no strands of wire hiding in the compound.
Common sense is your friend.
Common sense is your friend.
I decided to bench test it with a low power supply and without the heatsink and without any signal on the input. To be safe I installed 5amp fuses and only connected it for no more than 1min to avoid overheating. The right channel still has 33V DC. The strange thing is that before doing the test Q2-Q6 were not shorted. Now after the test they returned to having the base and collector pins shorted. What could be causing this intermittent shorting and DC voltage in the right channel?
I don't know. Try pulling the same transistor that cleared the short the first time.
As far as the heating is concerned... The semiconductors can heat up in a few seconds, even with a current draw that won't blow the 5A fuse. Watch the temperature as long as it's off the sink and the amp is powered up.
As far as the heating is concerned... The semiconductors can heat up in a few seconds, even with a current draw that won't blow the 5A fuse. Watch the temperature as long as it's off the sink and the amp is powered up.
Im so stumped here. Immediately before starting I reconfirmed the shorts in Q2-Q6. I then proceeded to remove Q2 and the shorts are again gone on Q2-Q6. I checked Q2 and there are no shorts on it. I again installed it snugly but without soldering. Enough for the legs to have contact with the pads and still no shorts. Where do I go from here? I feel like leaving Q2 snugly in place and applying low power without the heatsink.
- Home
- General Interest
- Car Audio
- Soundstream Rubicon 502 with DC voltage in right channel