Hi All,
I’m probably a couple days away from a first listen on a new build so I thought I’d post some random photos so everyone can tell me all the things I did wrong that I can’t undo 😱
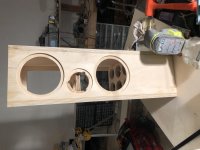
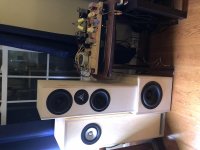
As per the title this is Troels’ SBA 16 MTM. My priority is midrange clarity so, after some discussion in the forums here and a quick double check with Troels I decided to go sealed and reduce the size a bit for ~.7 qtc with a -3db at 60ish hertz. Parts are from Jantzen (naturally).
I’m quite a poor carpenter so box building is typically one disaster after another. This build has been no different but I’m confident I’ll get to the finish line this weekend. I just have to make the crossover, glue in the back, make an access door for the crossover, and mount the drivers. They won’t be pretty unless I try my hands at veneering down the road. Frankly this project has been dragging on since Christmas so I have full tunnel vision on getting them hooked up in my living room regardless of what they look like. I’ll start uploading pictures in my next post.
Brian
I’m probably a couple days away from a first listen on a new build so I thought I’d post some random photos so everyone can tell me all the things I did wrong that I can’t undo 😱
As per the title this is Troels’ SBA 16 MTM. My priority is midrange clarity so, after some discussion in the forums here and a quick double check with Troels I decided to go sealed and reduce the size a bit for ~.7 qtc with a -3db at 60ish hertz. Parts are from Jantzen (naturally).
I’m quite a poor carpenter so box building is typically one disaster after another. This build has been no different but I’m confident I’ll get to the finish line this weekend. I just have to make the crossover, glue in the back, make an access door for the crossover, and mount the drivers. They won’t be pretty unless I try my hands at veneering down the road. Frankly this project has been dragging on since Christmas so I have full tunnel vision on getting them hooked up in my living room regardless of what they look like. I’ll start uploading pictures in my next post.
Brian


Your woodworking looks advanced to me.
The box looks good, biscuits for strength.
Sealed box MTM nice.
The box looks good, biscuits for strength.
Sealed box MTM nice.
Your woodwork looks great, you must have high standard if you think this looks disasteres.
Tall cabinets can have severe pipe resonance or standing waves inside, how do you deal with this?
Tall cabinets can have severe pipe resonance or standing waves inside, how do you deal with this?
Thanks for the kind words.
Admittedly I do put a lot of pressure on myself. This build has been a lot more trouble than the subs I built a few month back. Lots of issues with board warp and fit, chip out like I’ve never dealt with before, it took 2 days and 5 starter boards to make front baffles, and when I got done with glue up I found that the boxes were out of square by enough to keep the backs from fitting. Had to change directions a couple times.
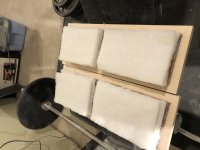
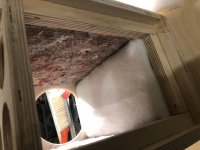
I’m following Troels’ design on internal absorption: 8mm felt on all internal surfaces, Acoustilux stacks behind the woofers and top/bottom. I’m a little worried about my decision to put the crossover in the bottom of the enclosure as i will now need to stack the absorption on top of it, but I’m thinking it won’t make much difference. Perhaps the irregular shape of the crossover parts will actually provide a small benefit in terms of disruption.
Your woodwork looks great, you must have high standard if you think this looks disasteres.
Admittedly I do put a lot of pressure on myself. This build has been a lot more trouble than the subs I built a few month back. Lots of issues with board warp and fit, chip out like I’ve never dealt with before, it took 2 days and 5 starter boards to make front baffles, and when I got done with glue up I found that the boxes were out of square by enough to keep the backs from fitting. Had to change directions a couple times.
Tall cabinets can have severe pipe resonance or standing waves inside, how do you deal with this?
I’m following Troels’ design on internal absorption: 8mm felt on all internal surfaces, Acoustilux stacks behind the woofers and top/bottom. I’m a little worried about my decision to put the crossover in the bottom of the enclosure as i will now need to stack the absorption on top of it, but I’m thinking it won’t make much difference. Perhaps the irregular shape of the crossover parts will actually provide a small benefit in terms of disruption.
I don't think you need to glue on the back. There is plenty of frame material that you can screw the back into and still get a tight fit. That way you can easily get to the inside for access to the crossover and stuffing material if needed.
Your woodworking looks advanced to me.
The box looks good, biscuits for strength.
Sealed box MTM nice.
Actually various stress tests have shown that biscuits add very little strength to a joint.
In fact, in some cases they actually weaken the joint. Here is video about that:
YouTube
Biscuits can serve to help align joints, but only if you are very precise in making the cuts. If you tilt the biscuit cutter even a little bit, the joint will not close up properly.
I moved away from biscuits and have gone to doweling with a precision jig instead. Much stronger and more precise alignment.
I moved away from biscuits and have gone to doweling with a precision jig instead. Much stronger and more precise alignment.
CNC experts.....Are most CNC machines capable of drilling precision doweling holes for edge-edge construction?
------------
With a THICK multi-board front baffle as built for large radius quarter rounds or deep Avalon-style bevels, the bottom board can be cut to the inside box dimensions to provide both side-panel alignment and a greater gluing area.
I would think it would have to be a very poor machine to not do better than a human. My career started as a CNC milling tech in a machine shop. Those tools would hold a few tenths of a thousandth of an inch across their whole travel. You’re probably talking about the more ubiquitous wood routers that you can buy or build for home. Depending on the lead screw type and grade you could have a couple thousandths per foot or a few tens of thousandths error.... poor alignment or backlash compensation and things deteriorate from there.
Actually various stress tests have shown that biscuits add very little strength to a joint.
Indeed. I have used them because of alignment support. However, on these last couple projects they are proving to be more of a liability. I think it’s time to move on to a different method.
I don't think you need to glue on the back. There is plenty of frame material that you can screw the back into and still get a tight fit. That way you can easily get to the inside for access to the crossover and stuffing material if needed.
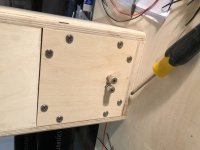
I had already clamped one up by the time I read your post. I did design the box to have the whole back panel removable. The switch to glue was due to fitment (or lack thereof) - I figure by treating the back as two parts it would be easier to get each piece in. The one I need to open is removable, the upper portion is glued in.
Thanks for the kind words.
Admittedly I do put a lot of pressure on myself. This build has been a lot more trouble than the subs I built a few month back. Lots of issues with board warp and fit, chip out like I’ve never dealt with before, it took 2 days and 5 starter boards to make front baffles, and when I got done with glue up I found that the boxes were out of square by enough to keep the backs from fitting. Had to change directions a couple times.
Couldn't tell for sure from the pictures, but it looks like you're using regular grade plywood rather than Baltic Birch. If that's the case it might explain the warpage. It's very unusual to get warpage or chip out with BB plywood.
Best way to cut backs for future reference is to lay the back of the completed case onto an oversize piece of the back material. Then reach in through the front driver cutouts with a pencil and trace the exact shape of the back opening onto the material. Cut along the pencil lines and you will end up with a perfect fitting back regardless of how square the case is itself.
Also, if you decide you want to go the veneer route here is an excellent video on specifically how to veneer speaker cabinets:
YouTube
It's rather long, 1:13 hours, but very informative from a pro.
Last edited:
Touch a 1.5V cell onto the woofer terminals. The cone should move outward when the polarity is correct.I think I managed to get phase wired right despite no indicators on the woofers (!).
Couldn't tell for sure from the pictures, but it looks like you're using regular grade plywood rather than Baltic Birch. If that's the case it might explain the warpage. It's very unusual to get warpage or chip out with BB plywood.
Best way to cut backs for future reference is to lay the back of the completed case onto an oversize piece of the back material. Then reach in through the front driver cutouts with a pencil and trace the exact shape of the back opening onto the material. Cut along the pencil lines and you will end up with a perfect fitting back regardless of how square the case is itself.
Also, if you decide you want to go the veneer route here is an excellent video on specifically how to veneer speaker cabinets:
YouTube
It's rather long, 1:13 hours, but very informative from a pro.
Nice trick. Cut for fit, not for size - a lesson I’m learning.
It is void free 13 ply BB, 18mm. Bought from the same shop as the tower and sub in the picture used. I get it ripped to size because I don’t have a table saw yet.
Also, if you decide you want to go the veneer route here is an excellent video on specifically how to veneer speaker cabinets:
YouTube
It's rather long, 1:13 hours, but very informative from a pro.
I've only dipped into this so far, but at first sight it looks like an excellent resource. Great timing for my own project to find this, actually...
Alex
Ya that’s a great instruction video. It’s funny, the part that I’d be most scared about is the trim routing. That’s the part he makes look the easiest.
Ya that’s a great instruction video. It’s funny, the part that I’d be most scared about is the trim routing. That’s the part he makes look the easiest.
Well, he is a pro with lots of experience. But you don't need to use a router to trim the edges. Manual veneer trimmers work just as well and are a lot safer.
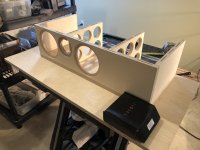
Getting real close now. Both crossovers are made and glued up - just waiting a few more hours for the loctite power grab to shed its solvents before closing up the boxes. Pics below of the rear access panel with gaskets.
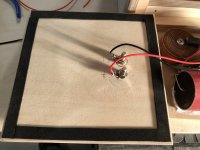
My experiments with Velcro to hold the crossovers in place failed as the wood doesn’t seem to provide a good bond. No matter, they can just sit inside for now. I cut some felt and acoustilux to stuff on top.
I did some sweeps of the unit that was built up last night and things looked normal despite my room being untreated. If the second one measure well I’ll put the last few screws in the drivers and call this functionally complete.
Attachments
- Home
- Loudspeakers
- Multi-Way
- SBA 16 MTM Sealed Variation Build