I was not aware of this rule. Salas please take down my post if you feel you need to.
I made them into attachments. There is a direction to use attachments not very big than linking big from pic host services. Jason will have to find a way of auto resize possibly. Attachments stay on DIYA server when some links expire and the threads look empty after some time. And they show up fast without changing the frame size.
Very nice, I've got a couple of dcb1 buffers, maybe I should take a look at building a balanced pair?
How much extra work would that be?
How much extra work would that be?
merlin2069er,
The majority of the work is in extra buffer, which you already have. You will need to double your spec for the tx or use two like I did. If using a volume control it needs to be a 4 channel, I’m not including a volume in my build, I will either build a stand alone unit or work on a digital solution, paying attention for matched impedances for balanced advantage.
The majority of the work is in extra buffer, which you already have. You will need to double your spec for the tx or use two like I did. If using a volume control it needs to be a 4 channel, I’m not including a volume in my build, I will either build a stand alone unit or work on a digital solution, paying attention for matched impedances for balanced advantage.
That's great, I do have the extra transformer. But I have no idea how to wire these up as balanced input / outputs.
Are there any schematics available?
Are there any schematics available?
Here is a diagram;
http://www.diyaudio.com/forums/anal...hotrodded-blue-dcb1-build-84.html#post2508566
Changes I have made from this this diagram are as follows;
1) I’ve dropped the volume pots altogether.
2) XLR pin 1 on I/O ties to chassis only.
3) Both signal grounds on each board are referenced to chassis ground via a ground loop breaker.
balanced dcb1
I've got a CD player with balanced outputs. Would I need a amp with balanced inputs if I were to add the balanced dcb1 buffer to the mix?
I've got a CD player with balanced outputs. Would I need a amp with balanced inputs if I were to add the balanced dcb1 buffer to the mix?
I've got a CD player with balanced outputs. Would I need a amp with balanced inputs if I were to add the balanced dcb1 buffer to the mix?
I would think to take full advantage you would.
I am too cheap for that myself.😀
Up and running! Here are the results.
Board 1.
All LEDs working.
Relay clicks.
Across 3.3ohm resistors 1.938v & 1.688v
Output 10.28V & 10.28V
Offset -0.7mV and 0.6mV
Board 2.
All LEDs working.
Relay clicks.
Across 3.3ohm resistors 1.904v & 1.690v
Output 10.29V & 10.27V
Offset -1.3mV and 0.1mV
My mills 3,3 R resistors are getting pretty hot!
Everything else heats up nicely, nothing too hot atm.
So I’m around 360mA with 3.3ohm, a fair way of my desired 600mA.
Is there a problem?
Why about 360mA?
First board: 1.938/3.3 ~587mA and 1.688/3.3 ~512mA.
Second board: 576mA and 512mA. But this depends on the Mills resistor value, 3 Led string and the first mosfet, as well.
First board: 1.938/3.3 ~587mA and 1.688/3.3 ~512mA.
Second board: 576mA and 512mA. But this depends on the Mills resistor value, 3 Led string and the first mosfet, as well.
mravinsky, my calculations are all wrong, I blame a late night and too much coffee.
It appears my build is in fine working order.
Balanced signal ground connection to chassis
I connected signal ground to a ground loop breaker (10Ω 5W resistor in parallel with a 0.1µF capacitor) and then to chassis ground.
This shorts everything... all mosfet legs, diodes to chassis ground @ 10Ω continuity. I did not off course power up in this state and I’m unsure whether this would work.
Right now signal ground on both boards is left floating, but I need to reference it according to ranes notes, any help would be appreciated.
Thanks for a great project.
What do you mean shorts? Is it connected only to the 0V GND line or not? Because if it shorts anything with voltage on it, its bye bye happiness.
Salas,
Yes, connected only from the 0V GND on each board.
Once I make this connection, my mosfet legs, diodes do not become isolated, I read a continuity of 10Ω to chassis ground through the ground loop breaker.
As I say I have not powered up in this state...
Yes, connected only from the 0V GND on each board.
Once I make this connection, my mosfet legs, diodes do not become isolated, I read a continuity of 10Ω to chassis ground through the ground loop breaker.
As I say I have not powered up in this state...
There are Mosfet legs that should go to ground and others that don't. The output Mosfets drains should. Disconnect the transformers and see with the DVM in Ohm, if only things that show connection to a ground see 10 Ohm to chassis. The diagram is on post #4 in this thread also.
Thanks Salas, that explains the reason, I will confirm with the diagram to be sure.
As for temperature measured under pcb between mosfets on each board I read 34°C after 2 hours.
The 3.3R resistors have measured 91°C. The spec sheet from Mills states a temperature range from ambient -65°C - 125°C. (10,000hrs @ 125°C).
Still very hot imo...
As for temperature measured under pcb between mosfets on each board I read 34°C after 2 hours.
The 3.3R resistors have measured 91°C. The spec sheet from Mills states a temperature range from ambient -65°C - 125°C. (10,000hrs @ 125°C).
Still very hot imo...
Hum, on this photo i see 1 Ohm resistors are replaced with wire:
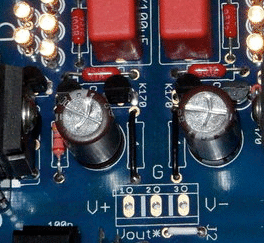
.. or, i should leave 1 ohm i soldered already ?
.
.. or, i should leave 1 ohm i soldered already ?
.
1.938V and 3r3 is ~1.1W, yes they will run hot.Across 3.3ohm resistors 1.938v & 1.688v
My mills 3,3 R resistors are getting pretty hot!
1.938V & 10r ~376mW, yes a 10r 600mW will run hot. Three 10r give your total CCS current. Fine tune with a 4th resistor.
Or start with 15r 600mW resistors for cooler running.
Thanks Andrew for this info,
Although concerned at first the resistors installed do meet or exceed MIL-PRF-26H spec, the temp recorded after 2 hours is well within operating tolerances.
Although concerned at first the resistors installed do meet or exceed MIL-PRF-26H spec, the temp recorded after 2 hours is well within operating tolerances.
You would need dead on matched FETS to near 0mV, but up to 5mV is OK for the F5 which will not multiply it much due to its a low gain amp. The general disclaimer that when mating a DC preamp/buffer to a DC amp without any output DC sensor protection, your speakers are in danger in case of any failures in the future still stands. Nobody cares and most mate an F5, but anyway.😀
OK, i changed JFETS, and now i have:
on R10-1: 2,037V / 279.8mA
on R10-2: 1.813V / 241.0mA
on Shunt output i have:
+9.85V / 196.4mA
-9.86V / 171.9mA
on LOUT i have: -0.8mV
on ROUT i have: -1.5mV
Also ma matched all LEDS on 1.848V and triplets on 1.850V !
What else i should do, or this is good enough ?
- Home
- Source & Line
- Analog Line Level
- Salas hotrodded blue DCB1 build