Maybe you can save the shipping costs and disassembly and assembly costs, if he accepts to just send him the bobbins. The wire is glued on the former. Its tedious and error prone to unwind. Takes hands on experience.
P.S.
Photo negative film, its a good material to wind on too, for low power speakers.
P.S.
Photo negative film, its a good material to wind on too, for low power speakers.
That's a good tip Salas about photo negatives - I need to weigh the whole former when I take it out & ensure the same weight goes back in - is this right?
I took your suggestion & emailed him about sending just bobbin (is this what former & coil is called?)
I took your suggestion & emailed him about sending just bobbin (is this what former & coil is called?)
jkeny said:That's a good tip Salas about photo negatives - I need to weigh the whole former when I take it out & ensure the same weight goes back in - is this right?
I took your suggestion & emailed him about sending just bobbin (is this what former & coil is called?)
Yes, the total mass, the height of the bobbin, the wire diam and the number of turns, must be very close to the originals.
Yes with bobbin, I mean the former and coil.
Thanks salas,
You seem to have some experience in this area - have you repaired or built many speakers in the past?
You seem to have some experience in this area - have you repaired or built many speakers in the past?
I have designed and built maybe 50 types of DIY speakers both Hi-Fi and pro, worked in Pro Audio Speaker makers, I have serviced many as well. I have seen very many drivers apart, and getting repaired. I have a 'wizard' speaker repair friend too that he had shown me stuff.
Best of luck with your mini adventure. I hope that man agrees to provide you with expert wound coils, since LS3/5A is peculiar and better have expert parts.
Best of luck with your mini adventure. I hope that man agrees to provide you with expert wound coils, since LS3/5A is peculiar and better have expert parts.
Well, I started the repair myself after sending a few emails to Michael Noble from RA Technolgy who offered a "special subsidised price of £120 per dirver" with £38 per hour disassembly from the cabinets!!
I emailed asking if he would consider repairing the Voicecoile/former if I sent it to him but got no reply.
So, Here's the start of my dis-assembly of the speakers
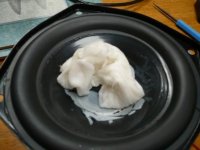
- Using a rolled wet tissue around the dustcap makes it far easier to remove (whitens the glue,which goes back to clear after drying) - Picture 1
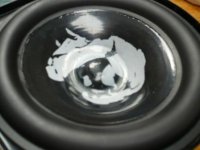
- I started to unstick the cone from the rubber surround but saw some minor cracking in the rubber where it meets the cone so I stopped & realised that it would be easier to unglue the rubber surround from the basket (thicker rubber here also)- Picture 2
- Now I'm at the stage where I need to unglue the spider from the
basket to take out the whole (cone+rubber surround+spider) so I can unglue the voice coil from the cone
- This step is proving to be a problem - can't seem to loosen the glue holding the spider to the basket - have applied water as solvent and left for a number of hours but no shift - will leave overnight but I imagine it's not a water soluble glue
- Any suggestions that might dissolve the glue but not the spider
which seems to be a fine mesh of some corrugated material, not paper!
- I still haven't found any nomex to rewind the voicecoil onto
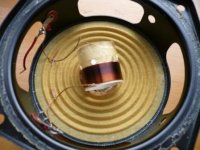
- The voicecoil measures OK 6.? ohms for both sides but I can see some browning of the former & browning of the wires - Picture 3
I emailed asking if he would consider repairing the Voicecoile/former if I sent it to him but got no reply.
So, Here's the start of my dis-assembly of the speakers
- Using a rolled wet tissue around the dustcap makes it far easier to remove (whitens the glue,which goes back to clear after drying) - Picture 1
- I started to unstick the cone from the rubber surround but saw some minor cracking in the rubber where it meets the cone so I stopped & realised that it would be easier to unglue the rubber surround from the basket (thicker rubber here also)- Picture 2
- Now I'm at the stage where I need to unglue the spider from the
basket to take out the whole (cone+rubber surround+spider) so I can unglue the voice coil from the cone
- This step is proving to be a problem - can't seem to loosen the glue holding the spider to the basket - have applied water as solvent and left for a number of hours but no shift - will leave overnight but I imagine it's not a water soluble glue
- Any suggestions that might dissolve the glue but not the spider
which seems to be a fine mesh of some corrugated material, not paper!
- I still haven't found any nomex to rewind the voicecoil onto
- The voicecoil measures OK 6.? ohms for both sides but I can see some browning of the former & browning of the wires - Picture 3
Attachments

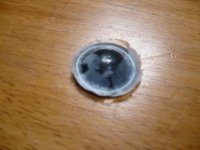
Dustcap removed showing the voiceCoil damage - former is browned & wiring is also but no shorts - measures 6.5 ohm on both speakers
Yep, salas,
That's the problem! Here's two more shots
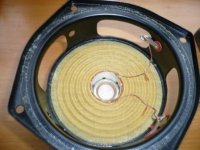
- Cone removed
- Voicecoil Removed
I don't see any obvious deforamation of Voicecoil but if it's an overall swelling it wouldn't be visible, I guess
One thing that occurs/worries me is even though these are very fine wires a wire from the bottom of the coil has to be routed to the top (to make contact with the teminal wires) - if the tolerances are so tight this wire can't overlap the coil? So how is this done? my wire on this coil disappeared in the removal process so I can't see the vestiges even!
That's the problem! Here's two more shots
- Cone removed
- Voicecoil Removed
I don't see any obvious deforamation of Voicecoil but if it's an overall swelling it wouldn't be visible, I guess
One thing that occurs/worries me is even though these are very fine wires a wire from the bottom of the coil has to be routed to the top (to make contact with the teminal wires) - if the tolerances are so tight this wire can't overlap the coil? So how is this done? my wire on this coil disappeared in the removal process so I can't see the vestiges even!
Attachments
I guess its time for the film negatives. As for the wire question, I cant picture it in my mind. Is there a possibility of a macro shot?
I can't get a close shot of the voice coil but what I mean is - there is a wire from both ends of the coil (a single layer of wire) - how is the one from the bottom of the coil routed to the top of the coil (where it has to be located) without overlapping accross all the wires of the coil?
Secondly, can you explain - could the coil expand uniformely due to the heat produced? Don't know if it's clear in the photo but there's a small gap in the former - caused by heat?
If the former has expanded how do I know what diameter to make the new former?
Secondly, can you explain - could the coil expand uniformely due to the heat produced? Don't know if it's clear in the photo but there's a small gap in the former - caused by heat?
If the former has expanded how do I know what diameter to make the new former?
Attachments

jkeny said:I can't get a close shot of the voice coil but what I mean is - there is a wire from both ends of the coil (a single layer of wire) - how is the one from the bottom of the coil routed to the top of the coil (where it has to be located) without overlapping accross all the wires of the coil?
Secondly, can you explain - could the coil expand uniformely due to the heat produced? Don't know if it's clear in the photo but there's a small gap in the former - caused by heat?
If the former has expanded how do I know what diameter to make the new former?
It could go up through a channel (a little gap before the folded former cylinder side ends meet) in some old voice coil constructions.
It can expand evenly yes. The gap is the one I was talking about in the former paragraph, but it has widened now, from overheating most probably.
The diameter must be such, so the new voice coil centers in the magnetic gap exactly, and moves freely too.
Ah thanks sala,
That's where I thought the wire must run but as I said this wire is gone from this bobbin, however in the attached photo there is no sign of any wire. This photo was taken before voicecoil removed so all wires still in place & continuity showing 6.5ohm!
Edit: I'll take off the dustcap on the other speaker & take a macro photo (just found out how to change camera to macro)
Attachments
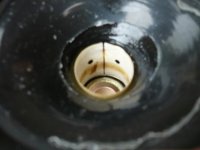
Found a KEF site with a picture of this bobbin showing the gap - so it's standard & not the result of mine expanding. I also imagine this is the natural place to channel the wire from the bottom of the coil to the top where it connects to a driver post.
On the seond driver, I'm going to try detaching the spider from the basket with the bobbin intact - I need to take some measurements of the bobbin placement on the spider - I did this with the other driver but I'm dubious about the spider to bobbin gluing not being correct
Guess I'll try white spirit first to dissolve the glue attaching spider to the basket without affecting the spider's structure! Acetone will be next if this doesn't work!

Yep, put DC through them, Doh!
I forgot to attach KEF site to last post http://www.hifiloudspeakers.info/Anatomy/KEFDocuments/KEFEarlyDriversLeaflet/HiFiDriveUnitsp1.html
I forgot to attach KEF site to last post http://www.hifiloudspeakers.info/Anatomy/KEFDocuments/KEFEarlyDriversLeaflet/HiFiDriveUnitsp1.html
- Status
- Not open for further replies.
- Home
- Loudspeakers
- Multi-Way
- Rogers LS3/5a speakers just blown