Your image links are not image files. In fact they don't even resolve to anything. Can you get the links in another way?
Yes, I know it's weird, right click and 'see image' or 'open in a new window". Maybe that's the reason I got no replies about the knob set screws, cause nobody could watch the images.
So I'll try to do it better. Let's see.
Before and after...
So I'll try to do it better. Let's see.
Before and after...
Attachments
I replaced mine with a 275VAC 0.01uF X2. This:
An externally hosted image should be here but it was not working when we last tested it.
You won't have problems finding them.
Thank you kindly Koji888
i cant open image though
and why would i need 2 of them ? in parallel?
I replaced mine with a 275VAC 0.01uF X2. <snip>
and why would i need 2 of them ? in parallel?
The capacitor is an X2 type safety capacitor for across line use in a value of 0.01uF. You can use any 0.01uF X cap with an AC voltage rating of 275VAC or greater in this location.
I replaced mine with a 275VAC 0.01uF X2. This:
An externally hosted image should be here but it was not working when we last tested it.
You won't have problems finding them.
Thank you kindly Koji888
i cant open image though
and why would i need 2 of them ? in parallel?
click on the link with the mouse right button and select "see image".
Only 1 per turntable. I wrote "them" cause you said you need 2.
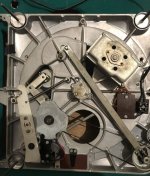
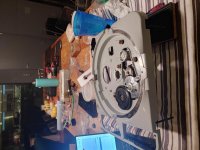
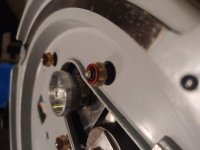
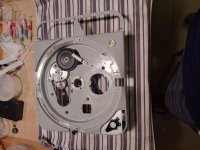
Been working a bit more on the tt past weeks. Wanted to solve problems between the stepped pulley and idler wheel (was not running at 16rpm, for instance). So disassembled and oiled the bracket. The worst thing was removing the cam follower set screws (had to drill one out). Out of the question the biggest problems I had while doing the whole maintenance have been the screws. Old stuck screws that don't come out not even with the best screwdriver. A nightmare with the knob and the cam follower ones. BTW, if someone has trouble (like I had, only found them in china) looking for replacements for the critical 3,5mm diameter set screws in the main on/off/speed knob, the set screws on the CAM are the same size (and at least in my tt they don't seem to be that important...)
In the end, after cleaning and lubing the idler wheel bracket and adjusting the height, it works perfect at every speed. Adjusted the eddy brake too and replaced motor and main axis ball bearings with Si3N4 ones. Also I'm checking conical springs vs the gel pads I had for the motor suspension.
And last but not least important I got an external vintage transformer. Testing the table at 190V and 200V, it runs much cooler and now adjusting the brake the speed is perfect and not too fast as before. Still hot after 1 hour but now I can keep my hand on the motor (I couldn't before).
I have to say I'm very happy about how deadly silent the 124 is running right now. Still haven't done any listening cause my amp is under heavy maintenance at the moment, but can't wait.
Only need to order some feet for the plinth (probably isoacoustics iso-pucks) and decide between the two tonearms I have, a Fidelity Research FR-24 and the ESL 1000 gyro arm that came with the thorens.
Well, the lid arrived so this is finished by now. I'll leave the 2nd tonearm for the future (thinking about modifying the ESL gyro1000 to 12 inches).
Lots of hours spent on this thing, I think I've worked on absolutely every part in the guts of the thorens. That would have been impossible without the info shared in threads like this one, so thanks to everyone who contributed to it.
And it's been worth. Once my amp came back to life fully upgraded, I've done direct comparisons between the thorens with a Fr-24 mkii tonearm and a Empire 4000/d3 cartridge and my Sota star sapphire equipped with Sumiko FT-3 premier and Denon DL-S1, same phono preamp. The Sota sounds great but the Thorens is absolutely better in every aspect. Even with the ESL tonearm and a generic Shure cart the Thorens sounds better. I'm really impressed. Would love to try the Denon DL-S1 on the thorens, but with the iron platter it seems a bit risky...
Finally I left the conical springs on the motor suspenssion instead of DIY gel ones, but I didn't find any audible difference. Deadly silent with both.
If someone tries iglide iglidur J for the main bearing bushings, or the M ones, instead of syntered bronze, I'd like to hear their comments. I jumped from Nylon to iglide J, and I'm very happy with them, but would like to hear from someone who tested these against oilite bushings.
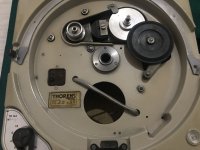
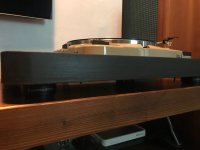
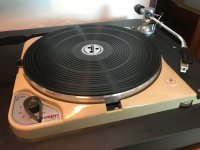
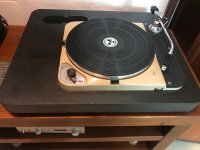
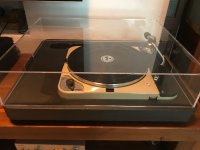
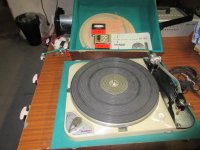
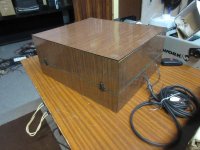
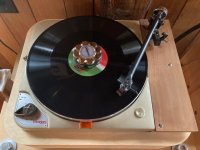
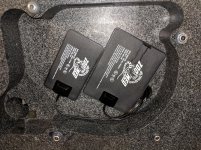
Finally some pictures. The first 3 just before collecting the Thorens. I only paid 300€ for that box, but spent much more on upgrading it. The hollow area at the rear is for a second tonearm i'll install one day. The last one is from the cute transformer I'm using with the Thorens. I'm running it at 205 volts.
Lots of hours spent on this thing, I think I've worked on absolutely every part in the guts of the thorens. That would have been impossible without the info shared in threads like this one, so thanks to everyone who contributed to it.
And it's been worth. Once my amp came back to life fully upgraded, I've done direct comparisons between the thorens with a Fr-24 mkii tonearm and a Empire 4000/d3 cartridge and my Sota star sapphire equipped with Sumiko FT-3 premier and Denon DL-S1, same phono preamp. The Sota sounds great but the Thorens is absolutely better in every aspect. Even with the ESL tonearm and a generic Shure cart the Thorens sounds better. I'm really impressed. Would love to try the Denon DL-S1 on the thorens, but with the iron platter it seems a bit risky...
Finally I left the conical springs on the motor suspenssion instead of DIY gel ones, but I didn't find any audible difference. Deadly silent with both.
If someone tries iglide iglidur J for the main bearing bushings, or the M ones, instead of syntered bronze, I'd like to hear their comments. I jumped from Nylon to iglide J, and I'm very happy with them, but would like to hear from someone who tested these against oilite bushings.
Finally some pictures. The first 3 just before collecting the Thorens. I only paid 300€ for that box, but spent much more on upgrading it. The hollow area at the rear is for a second tonearm i'll install one day. The last one is from the cute transformer I'm using with the Thorens. I'm running it at 205 volts.
Attachments


All,
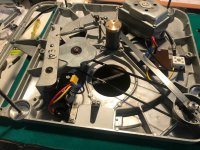
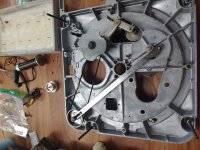
I have been slowly working to restore this TD-124 and I was happily interrupted by my Aleph J build which I completed between tearing the TD-124 down and polishing / cleaning and rebuilding the table. I was hoping for a little advice regarding the motor mounting.
I have attached some pictures below of both my progress and of the motor mounting in question. When I took the table apart I don't remember the metal triangle being so loose and there being as much play in general with the motor assembly. Also, there were three additional brown washers in my parts bag with the rest of the motor mount stuff and I wasn't sure what they may be used for. Any advice here would be great!
Attachments

The metal triangle being loose is totally normal don't worry about it, it only acts as a shield. The adittional washers you found in your bag could be the ones that come with the table as spare parts.
Gotcha, I am wondering if it will vibrate with the motor turning though. Do you think the setup I picture above looks correct?
The three washers you mentioned probably should go between the bushings and the E-clips (aka C-clips) that retain the motor to the chassis. (I see you have some)
I recommend the Hanze Hi-Fi spring suspension kit for your MKII - I have them on both tables and they are good for about a 10dB reduction in coupling between the motor and chassis. Jaap of Hanze Hi-Fi is Vulcan here.
I recommend the Hanze Hi-Fi spring suspension kit for your MKII - I have them on both tables and they are good for about a 10dB reduction in coupling between the motor and chassis. Jaap of Hanze Hi-Fi is Vulcan here.
I already have a set of the washers between the bushings and the E-clips so the other three remain a mystery. I am wondering if maybe I should place them between the motor and the triangle shield.
Last edited:
Hi,
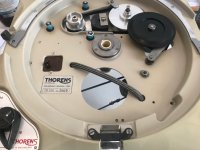
It has been too long but here is an update on my TD124. As you can see. I am still not finished although it has been in use for about a year.
I ended up sending my main bearing to Woodsong for a rebuild. It was not a cost that I had considered when buying the TT. But it needed to be done and Chris did an amazing job. I highly recommend if you need any work done.
All the other work has been done by myself with all knowledge gained from both this thread and The Analog Dept. Thank you.
Now here is my million-dollar question. I rebuilt my motor with new parts from Audio-silente. I think I did an ok job. But it takes 90 minutes to come up to speed and stay put?! Could it be the low temp of the room? Does anybody have any idea what could cause it other than my motor needs to be done again?
Thanks,
m
Attachments
Did you align the motor after assembly to minimize friction and noise?
What lubricant did you use on the motor bearings? (Main bearing?)
I've found MKII motors can take much longer to come up to full speed, than the earlier motors do.
Before I switched to a papst aussenlaffeur motor in the older 124 the original motor would take about 1 - 2 minutes to come fully up to speed, while the motor in the MKII has never taken less than 10 minutes to do so, and in cold winter weather takes even longer.
Line voltage, temperature, and loading (Brake adjusted correctly) all affect the speed since it is an induction motor.
I'd say you need to do a tear down, clean, relubricate and re-align the bearings/motor housing. 90 minutes is far too long. The older motors if running correctly come up to speed quickly. I've more or less given up on the MKII motor.
Hi Kevinkr,
I did the rebuild following instructions on the The Analog Dept site. I used 3 in 1 motor oil for the motor bearings. The main spindle came loaded with appropriate oil from Woodsong Audio. I have never opened up the main bearing but my run down time on that is not great either. About 1 minute last time I timed it. I remember it being longer when I first got it back. More like 2 minutes.
I think my brake is adjusted well. When it is up to speed. It stays put with very little adjusting. I sometimes think that the stylus slows it down a bit though.
m
My Td-124 sits in a granite plinth and is located in a chilly basement. I reduced the warm up time by installing a couple of reptile cage heaters in the stone chassis right under the bearing and motor areas. These stay plugged in all the time. Now after a few minutes the speed is spot on.
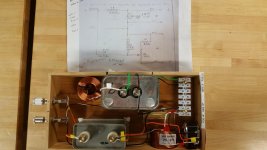
Sorry about the crossover pic. I don't know how to delete that
Sorry about the crossover pic. I don't know how to delete that
Attachments
I'd start with the motor and disassemble, inspect the bearings and shafts add some 3 in 1 (20wt electric motor oil), make sure the felts are well lubricated. Put back together and align for the quietest and smoothest running.
How are the bearings on the intermediate pulley? Does it use dual bushings pressed into the chassis or the single bearing mounted in the top of the intermediate pulley?
What belt are you using?
Main bearing spin down time isn't necessarily indicative of an issue, the lubricant weight might be heavier than standard. I'd talk to Chris Harban for advice on the main bearing since it is one of his.
- Home
- Source & Line
- Analogue Source
- Restoring and Improving A Thorens TD-124 MKII