It is an amazing job you guys did, I am definitely getting the LCD as well.
For the encoder or anything else actually, i like beefyness. We better pick some nice push buttons and an encoder with flat shaft for better knob selection.
For the encoder or anything else actually, i like beefyness. We better pick some nice push buttons and an encoder with flat shaft for better knob selection.
Hi Paolo,
We are having so much fun designing and re-designing that we may continue forever. I will setup a wiki later today.
Craig is going to wait to make sure people like his schematic layout before starting the difficult layou process.
My board is pretty easy, except that Craig still wants it to have a front panel layout. My mechanical skills are horrible.
Here is what we will have, so if someone better than me wants to help out, GREAT!!!!
Here is the LCD display.
LCD PDF
There are 3 switches, plus the encoder (volume and switch for UI)
The switches could be those cheapo TACT switches. The encoder is a nice optical Grayhill 61C (has a nice feel and 1M operations).
Plus, we will need a place for the IR light to come in.
Best Regards,
Dale
Nope wasn’t taking it at all personally,
just embarrassed that I wasn’t paying attention.
I think most of us have been quite impressed with your attention to detail and meeting individual needs.
BTW congratulations on the contest.
just embarrassed that I wasn’t paying attention.
I think most of us have been quite impressed with your attention to detail and meeting individual needs.
BTW congratulations on the contest.
Dale/ Craig,
I don't know what you guys are thinking for the switches, I don't dislike the momentary switches that DIGIKEY sells, the EG17XXX-ND series. I am sure there must be much better offerings from EAO.
A switch with the LED on the lefthand side of the lcd panel side could be actuating a big relay coil for power up/down. The big relay would be outside your domain though but the turnon off could be remote controlled, or could it?
I would like to have a connector in the back panel that connects to a switch box on the floor somewhere hidden away. Basically I would like the whole system to come up using my remote control instead of spending 10 min turning on components like I do now. Sorry if I am repeating a point someone else covered before.
Here are the switches that we are currently using, but they do not have a tactile feedback.
C&K 8500
We are planning on having 4 uncommitted outputs. These can sink/source 25mA max. You could power an SSR (solid state relay) or some external driver for a big mechanical relay.
Basically, we could have this unit on all of the time (draws little power) and we could power other components via the remote.
I would rather not add a button.
Does this work or should we add a relay drive circuit?
Dale
P.S. My wife says that I am obsessed with this project...
Also, thanks for the congrats on the contest. Now I have to write an article for the Circuit Cellar magazine. Craig is documenting the USB-CAN board and I am going to write about the motion controller.
Layout
I guess I can live with your proposal, but...
I think the mute-button should be next to volume.
Arne K
I guess I can live with your proposal, but...
I think the mute-button should be next to volume.
Arne K
Hi Arne,
To be perfectly honest, I just plopped them down.
Does anyone disagree with Arne (I don't)
I will update...
Dale
To be perfectly honest, I just plopped them down.
Does anyone disagree with Arne (I don't)
I will update...
Dale
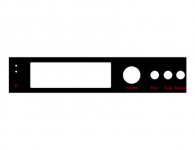
here are the panel I thought of, the scale is way off, and I have forgotten the bypass and mute, two more buttons for my daugther to push 😉
I like to have either encoders for both selection and volume or push buttons, a stylistic choice. I see that you have only one input button... so you just keep cycling through the inputs I guess.
I like to have either encoders for both selection and volume or push buttons, a stylistic choice. I see that you have only one input button... so you just keep cycling through the inputs I guess.
Attachments

Yep, right, that's about what I had in mind. Maybe just a little more homey- rustic looking. Whatever I am able to produce with my 12V craftsman battery drill.
Ok guys,
Here are your choices:
Right now, I have 4 uncommitted I/O pins.
If you don't need/want the IR active indication, I could have 5 I/O.
So, what do I do with these connections:
1) Provide the volume Up/Down via buttons - 2
2) Make the input select bi-directional - 1
3) Add a power input switch (controls an external relay) - 2
4) Add another encoder (not sure that I want to ) - 2
) - 2
5) Leave the I/O uncommitted for future expansion.
There are tradeoffs.
Dale
Here are your choices:
Right now, I have 4 uncommitted I/O pins.
If you don't need/want the IR active indication, I could have 5 I/O.
So, what do I do with these connections:
1) Provide the volume Up/Down via buttons - 2
2) Make the input select bi-directional - 1
3) Add a power input switch (controls an external relay) - 2
4) Add another encoder (not sure that I want to
) - 25) Leave the I/O uncommitted for future expansion.
There are tradeoffs.
Dale
uncommitted I/O
You may leave them "for future upgrades" (wich is the advertising "holy-grail" nowadays...).
Or make them user-selectable thru different "pre-made" software versions?
Arne K
You may leave them "for future upgrades" (wich is the advertising "holy-grail" nowadays...).
Or make them user-selectable thru different "pre-made" software versions?
Arne K
Dale and Craig,
A rotary encoder works much better than up and down controls. See Pass , Levinson and Ayre products. The power switch could be on the back. One of the i/o lines could used to provide a 12 v trigger to turn on remote amplifiers this could also toggle the display to turn on or off.( A red led on the front panel may light up when the display is off, when activated the led goes off). The unit should be powered at all times for best sonics if an internal buffer or gain stage is used.
Let's not try to clutter the front panel with obscure functions that can be handled with the remote.
Regards,
Jam
jam said:Dale and Craig,
A rotary encoder works much better than up and down controls.
is that an opinion or a fact?
For as many of the product you cited I am sure that there are as many other that use up/down switch. Right now Spectral DMA30 comes to mind.
The power switch could be on the back.
Maybe the 0/1 switch could be on the back, the on/standby should be on the front. For those with a rack and relatively hard to reach back panel.
The mute button is more useless than a stdby button. It can be safely assumed that you need to mute quickly from a remote rather than having to get up and walk to the front panel.
One of the i/o lines could used to provide a 12 v trigger to turn on remote amplifiers this could also toggle the display to turn on or off.( A red led on the front panel may light up when the display is off, when activated the led goes off). The unit should be powered at all times for best sonics if an internal buffer or gain stage is used.
how about a two-color led red means stdby and green means on?
Let's not try to clutter the front panel with obscure functions that can be handled with the remote.
Ok chief 😉
Grataku,
Reason why I like the rorary encoder ...well it's like comparing a digital to analog watch. Most people ended up using an anolog watch....why you might ask..because most people are happier with a relative point of reference than an absolute one.
The mute could be the standby button if you did not kill the display.
Why would you need a two color LED if the display lit would mean that the unit was on.
There is a certain elegance in simplicity. Unlike most Japanese products that have a zillion different buttons and controls. 😉
Regards,
Jam
Lots of "good food for thought". Certainly a good diversion from "Bush, the war mongrol"
I think that Craig and I will make a final decision tomorrow.
I think that Craig and I will make a final decision tomorrow.

- Status
- Not open for further replies.