Hi,
I agree, the short term overload capability of transformers is enormous, two to three times rated power is possible until the enamel burns.
Something is wrong with the SOA currents quoted.
15003/4 can take 250w at 55v (from memory the knee is about this voltage), 21193/4 can take 250w upto about 70v 1302 & 4302 are near their knee @ 55v so both will take max DC power 200w & 230w so all 250w devices will take 4.54A at Tc=25degC. and the L's a bit less.
Vrail fuses before the filter capacitors will give a latching cut-off to prevent extreme heatsink temps and should save your devices from exceeding SOA temp derating.
regards Andrew T.
LBHajdu ,
Its sad you did not find that thread interesting ,
Your calculations are wrong again ,
Assume that there is proper current sharing and equal voltage drop
across all the 0.47 ohm resistors ,
1, 0.6/100 =0.006
2, 330/5=66
3, 66x0.006=0.396v voltage across the 330 ohm resistor
4,0.396+0.6=0.996v voltage across the 0.47 ohm resistor
5,0.996/0.47=2.12A
The current of each op device will be 2.12A
Jens
Please give the following details that you took into account while
calculating the resistor values for the protection ckt in your version with 5
pairs of op devices.
1, voltage across the 100 ohm resistor,
2,Output power and speaker impedance ,
3, safety margin to avoid premature shutdown .
4, supply voltage , also mention transformer sec voltage .
I am making the same amp with 11pairs of op devices and would like to
fine tune the protection ckt hence I am asking so many questions and if
any one could help I will be greatful . My present values are 270ohm from
base to ground of the protection tr and 820 ohms ( calculated value
785ohms )from the 0.5 ohm emitter resistor . Speaker imp 2 ohms and
62-0-62 v transformer . op trs 2SC-5200 and 2SA-1943 . Transformer
sec voltage could go up when mains is 240v , present voltage is from pri
220v .
Rajeev
Hello,
1, voltage across the 100 ohm resistor,
0.6V
2,Output power and speaker impedance ,
down to 2 ohm, see 4
3, safety margin to avoid premature shutdown .
Short circuit test for an hour with my 500VA transformer and used heatsink => all was fine
4, supply voltage , also mention transformer sec voltage .
+-55V
\Jens
I think I just may end up going with your values Jens, as you have tested it and it’s know to work. If it can drive a dead short for an hour it must be working OK. By the way did you run the test with the MJL21193 and MJL21194 or MJL3281A and MJL1302A?
If you make the BE resistor 120 ohm instead of 100 ohm and the 2.2k should be 3.9k the effect of the circuit kicks in faster..... I made a mistake from my notes, just saw that the BE resistor is 120 ohm in my test setup
Depending on what type transistor you use you must adjust this value.... I used the MJL21xxx types for the test
\Jens
Depending on what type transistor you use you must adjust this value.... I used the MJL21xxx types for the test
\Jens
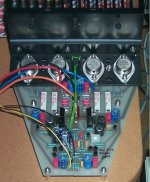
After reading through the thread TO-3 v.s. TO-264 again, this solution found in links on the Leach site seems to work just fine. Transistors on the circuit board, very short wiring, etc.
But this an old idea and still gotta drill 4 holes for each transistor tho.
Details here:
http://home.swipnet.se/malman/LeachAmp.html
Prosit
But this an old idea and still gotta drill 4 holes for each transistor tho.
Details here:
http://home.swipnet.se/malman/LeachAmp.html
Prosit
Attachments
I think this is probably on-topic enough to ask here...
Would anyone find it useful to have a TO-3 drill guide jig? I was thinking of making some. Probably plastic or aluminum with hardened drill guides for the four holes (proper size) and two drill bits. The idea would be to just clamp and drill, no need for a drill press. Sound useful? Is there one out there?
-b
I'd take one...
Needs to be tight, it has to be useful in channeled heatsinks, typically clearance is on the order of 1/2", each side...
If you get the pattern right it would save me a lot of cursing, I don't even mind using a single drill bit, just having pilots in the correct spot would be great...
Stuart
Needs to be tight, it has to be useful in channeled heatsinks, typically clearance is on the order of 1/2", each side...
If you get the pattern right it would save me a lot of cursing, I don't even mind using a single drill bit, just having pilots in the correct spot would be great...
Stuart
Oh, me, me, me, I want one.
Now that is a marvelous idea. My old metal template for center punching before drilling the holes on the press is wearing out and I could use a new cool tool.
Prosit
Now that is a marvelous idea. My old metal template for center punching before drilling the holes on the press is wearing out and I could use a new cool tool.
Prosit
Making it only slightly larger than the TO3 would be pretty easy. The jig would really just be a holder of the guides, so there wouldn't be any torque or other forces put on it (or there shouldn't be anyway).
Perhaps the drill bits could be a two-step design like those using in pocket screw jigs. First stange would provide a pilot hole only, second stage is full size. This would allow custom hole sizing for tapping etc.
I also think there would be two layouts: straight, where the screw holes are on the center-line of the jig, and offset, where the pin holes are on the center-line (perhaps there would four pin holes so the offset version would also have the pin hole perpendicular to the centerline).
new thread?
Done right it's a great idea, but it has a wider applicability and audience. If you'd consider making a lot of them you should open a new thread, there are lots of people not reading this one that would love the idea...
Stuart
Done right it's a great idea, but it has a wider applicability and audience. If you'd consider making a lot of them you should open a new thread, there are lots of people not reading this one that would love the idea...
Stuart
I was really looking for: "Oh, you can get that at DigiKey and everyone has one."
It sounds like that is not the case. So I will make one and see if it works, then offer them up to the wider audience.
thanks-
b
PS: Part of it is convincing a partner to do it.
It sounds like that is not the case. So I will make one and see if it works, then offer them up to the wider audience.
thanks-
b
PS: Part of it is convincing a partner to do it.
Jens
Thanks for the info,
How do you calculate the voltage across the output device at po max , I
assume that your amp at +/- 55v would deliver about 575w at 2 ohms ,
and the power each device is dissepating will be 40% of 575w/10
devices = 230/10 = 23w per device , I would like to know that what is the
voltage across collector / emitter of the device when dissepating 23w ?
Hi,
I am not sure I understand your question.
But here goes. The simplified version below does not take account of Vrail ripple nor voltage lost across Remitter and any other series resistances. Vrail is the loaded voltage not the idling voltage but should be checked at max mains input voltage as well as nominal AC input.
At peak output voltage, the device voltage = Vrail- Vpk
At zero output voltage, the device voltage =Vrail-0
At -ve peak output voltage, the device voltage =Vrail-(-Vpk)=Vrail+Vpk
These voltages will occur repeatedly throughout the AC cycle.
These combinations will not give maximum dissipation in the output devices but you can substitute Vpk/2 to give close to maximum dissipation. The max power dissipation occurs twice in each cycle for each half of the push pull stage.
regards Andrew T.
Andrew T ,
Thanks maximum you mean close to maximum dissipation will beVpk/2 .
In my post 222 I had given the values of resistors in the protection ckt for
my amp , are they ok ?
Thanks maximum you mean close to maximum dissipation will beVpk/2 .
In my post 222 I had given the values of resistors in the protection ckt for
my amp , are they ok ?
Jens,
So according to [rajeev luthra] calculations your tests where done with a limit of 2.12A on MJL21xxx types, so does this mean that for your personal opinion you recommend about .5*SOA as a guideline to set the safety circuit to?
Leve
So according to [rajeev luthra] calculations your tests where done with a limit of 2.12A on MJL21xxx types, so does this mean that for your personal opinion you recommend about .5*SOA as a guideline to set the safety circuit to?
Leve
Regarding the SOA the resistor from the basis to ground through a diode must also be taken into account.
The current of 2.12A is the limiting current no matter what the output voltage might be. The problem is that the SOA curve allows for more current at 0V CE then at 60V CE. Therefore a resistor to ground is needed to make sure that the current is depending on the output voltage and thus the V CE voltage.
The ratio of the TO-3 case to the TO-247 is difficult. I would say that you need 3 TO-247 types for every 2 TO-3. But I believe that it is also a matter of the amount of heat sinking you have available, and definitely the part you choose.
I have seen some amps running at +-68V with 3 parallel TO-247 transistors with no problem at all. This lead me to the design with 5 parallel devises to ensure that the amp would play into 4 ohm and at a little higher rail voltage.
\Jens
I was in the process of collecting data sheets for all the parts, even the trivial ones when I noticed something. This amp uses both 1N4004 and 1N4007 according to the data sheets these diodes are exactly identical except for there max rated voltage. They are all group together on one data sheet.
Is it possible to replace all the 1N4004 with 1N4007. It removes one item for my parts list which is already approaching 100 items.
The price is not that much higher, all these small diodes are cheap. One can buy 500 1N4007’s for $8 (us). That should keep anyone in stock for some time. I know it’s only a small detail. However it would eliminate one item, making the project just a little bit more appealing.
Leve
Hi,
I only use the 1N4007 type, since this has a higher reverse voltage.
You can replace the 1N4004 with 1N4007 in all positions.
\Jens
I only use the 1N4007 type, since this has a higher reverse voltage.
You can replace the 1N4004 with 1N4007 in all positions.
\Jens
This looks like a good time to ask this. A Soundcraftsmen amp I am trying to repair has 1N4005 diodes. Can I replace those with 1N4007? Any detriment or benefit to using the 1N4007 in place of the 1N4005? Are they interchangeable?
Thanks, Terry
Thanks, Terry
- Status
- Not open for further replies.
- Home
- Amplifiers
- Solid State
- redesign of leach amp pcb for integrated TO-247 output devices