Hi Y'all,
Here is the final version of the box drawings 3E. I added center bracing to the top and bottom boards, and increased the duct height in these areas respectively. I moved the driver closer to the mouth, about as far as it will go, as that seems to very slightly improve the smoothness of the SPL response. This one, or 3D - your choice. 🙂 Please, pick through it for errors.
Regards,
Attachments
Hi Y'all,
Here is the final version of the box drawings 3E. I added center bracing to the top and bottom boards, and increased the duct height in these areas respectively. I moved the driver closer to the mouth, about as far as it will go, as that seems to very slightly improve the smoothness of the SPL response. This one, or 3D - your choice. 🙂 Please, pick through it for errors.
Regards,
Tb46
You are quick.
Thanks
Finish


I did not test it yet but i played it a little. I am very surprise how this little box sound.It sound very full. I heard some funny sound coming from the driver, I don't know what it is but i will do some investigating tomorrow .
I did not test it yet but i played it a little. I am very surprise how this little box sound.It sound very full. I heard some funny sound coming from the driver, I don't know what it is but i will do some investigating tomorrow .
Last edited:
Hi Y'all,
Here is the final version of the box drawings 3E. I added center bracing to the top and bottom boards, and increased the duct height in these areas respectively. I moved the driver closer to the mouth, about as far as it will go, as that seems to very slightly improve the smoothness of the SPL response. This one, or 3D - your choice. 🙂 Please, pick through it for errors.
Regards,
Tb46
Everything looks good over here.

View attachment 454577
View attachment 454578
I did not test it yet but i played it a little. I am very surprise how this little box sound.It sound very full. I heard some funny sound coming from the driver, I don't know what it is but i will do some investigating tomorrow .
You are fast! Looks very cool. I like the look and how it turned out. You made sure the cone isn't going to hit the magnet on the other driver right? It has a mean look to it. Bet it sounds nice. I hope that strange sound isn't the wired asymmetric cone motion I saw in the sims.

1214d QWP layout
Hi Everyone
Here here is a picture of the 1214d QWP layout

@ Tb46 is this the way the cleats and bracings must be added to the cabinet. I am trying to get a better visual and understanding on how to apply the cleats and bracings.

Please see attached pic.
Hi Everyone
Here here is a picture of the 1214d QWP layout
@ Tb46 is this the way the cleats and bracings must be added to the cabinet. I am trying to get a better visual and understanding on how to apply the cleats and bracings.
Please see attached pic.
Last edited:
Hi lawbiding,
I assume, that is from another enclosure, but, yes that is the basic idea.
Regards,
I assume, that is from another enclosure, but, yes that is the basic idea.
Regards,


Hi lawbiding,
You need magnet cutouts in the boards behind the GTO 1214, or the magnet will not fit!
Regards,
You need magnet cutouts in the boards behind the GTO 1214, or the magnet will not fit!
Regards,
Hi lawbiding,
You need magnet cutouts in the boards behind the GTO 1214, or the magnet will not fit!
Regards,
I will fix that tomorrow.
Hi, just thought you'd like to know. 🙂
Thanks Tb46
I was rushing to get some work done because my girl friend ask me to go get some gift wrapping paper.
Lol
Tb46
What would be the area cutout for the T-qwp mouth opening if I want to put the mouth at the side or at the front of the cabinet.

Thanks
What would be the area cutout for the T-qwp mouth opening if I want to put the mouth at the side or at the front of the cabinet.
Thanks
Hi lawbiding,
The mouth can be moved around from the bottom as drawn to the side(s), just maintain the same total area.
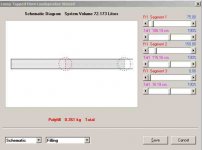
I'll attach a schematic w/ filling from the Hornresp Wizard, as always, this is only a starting point, you can add more or less to shape the response. The pictures has the total filling material weight: divide by 3, and use 1/3 between S1 and S2, and 2/3 between S2 and S3. Fluff up evenly, and keep it away from the cone.
Regards,
The mouth can be moved around from the bottom as drawn to the side(s), just maintain the same total area.
I'll attach a schematic w/ filling from the Hornresp Wizard, as always, this is only a starting point, you can add more or less to shape the response. The pictures has the total filling material weight: divide by 3, and use 1/3 between S1 and S2, and 2/3 between S2 and S3. Fluff up evenly, and keep it away from the cone.
Regards,
Attachments
Last edited:
Hi lawbiding,
The mouth can be moved around from the bottom as drawn to the side(s), just maintain the same total area.
I'll attach a schematic w/ filling from the Hornresp Wizard, as always, this is only a starting point, you can add more or less to shape the response. The pictures has the total filling material weight: divide by 3, and use 1/3 between S1 and S2, and 2/3 between S2 and S3. Fluff up evenly, and keep it away from the cone.
Regards,[/QUOTE
Tb46
Honest I don't understand none of this ( The pictures has the total filling material weight: divide by 3, and use 1/3 between S1 and S2, and 2/3 between S2 and S3. Fluff up evenly, and keep it away from the cone) but I try to figure it out.
The area for mouth opening is 4 x 12 9/16 right.
Thanks
Correction of round port diameter.
Hi lawbiding,
Last night I was told to cut it short. 🙂 The diameter for the round hole is obviously larger ~ 7-3/4"Dia. Here is the most obvious way to get the port to the side, just turn the box. Let me know if you need anything else.
Regards,
Hi lawbiding,
Last night I was told to cut it short. 🙂 The diameter for the round hole is obviously larger ~ 7-3/4"Dia. Here is the most obvious way to get the port to the side, just turn the box. Let me know if you need anything else.
Regards,
Attachments
Last edited:
- Home
- Loudspeakers
- Subwoofers
- PP Slot Loaded Sub with Alpine SWR 12D2