Hi lawbiding,
Post #57: "...wouldn't that change some of the measurements..."
Yes, it would. There are a number of ways of doing this, the simplest is to just widen the box by 1/2". Push left and right box away from the center line by 1/4" each. I like that method. But you'll still have to make sure that you can mount the drivers, i.e.: make a simple mockup.
My driver drawing is not a drawing of the actual item. The outside is an overlay of the factory drawing to the factory dimensions. I'm guessing at the position and shape of the cone. That's only a starting point, you'll have to verify that it fits.
Regards,
Tb46
Thank for the suggestion. I will give it a shoot.
Attachments
Last edited:
Looks great. You may consider moving centerline of driver cutouts out towards front an inch or so to increase driver clearance. Don't forget braces in vent and in main rear chambers.
Looks great. You may consider moving centerline of driver cutouts out towards front an inch or so to increase driver clearance. Don't forget braces in vent and in main rear chambers.
Xrk971
Is this the way the bracing should place.

Is the 2x4 to take up volume? Use a larger section of ply remnant like 6in wide (with holey cutouts) x depth or height and brace both directions. Recall that the vent CSA assumes that you will use two sections of 3/4in x 11in over both 11 in sections to reduce vent CSA down from 13.5in x 1.0in to 12in x 1.0in. Line the walls inside with some grey open cell foam or poly batting. Denim carpet padding works too. This sub is quite powerful given the high SPL's achievable - it can use all the bracing you can afford to put in.
Last edited:
Is the 2x4 to take up volume? Use a larger section of ply remnant like 6in wide (with holey cutouts) x depth or height and brace both directions. Recall that the vent CSA assumes that you will use two sections of 3/4in x 11in over both 11 in sections to reduce vent CSA down from 13.5in x 1.0in to 12in x 1.0in. Line the walls inside with some grey open cell foam or poly batting. Denim carpet padding works too. This sub is quite powerful given the high SPL's achievable - it can use all the bracing you can afford to put in.
The 2x4 is to take up volume.
I don't understand none of this(Use a larger section of ply remnant like 6in wide (with holey cutouts) x depth or height and brace both directions. Recall that the vent CSA assumes that you will use two sections of 3/4in x 11in over both 11 in sections to reduce vent CSA down from 13.5in x 1.0in to 12in x 1.0in.). I am lost. 😕
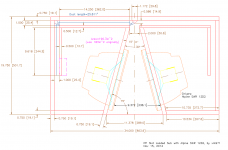
Instead of a stick brace I am saying use a piece of plywood with holes cut out of it. About 12in long x 6in wide x 0.75in thick. Try to brace top to bottom and front to back directions. Of course, the chamber with the driver basket in it will require you to place the brace in such a way not to interfere with basket.
For the 1in vent channels, use two long braces along the entire length of the vent. The braces can be made of 3/4in ply cut to 1.0in thick x 11in long x 2 pieces spaced in the vent at about 3 in apart. Since each vent is two 11in long channels, you will need Qnty 4 of these braces per vent.
For the 1in vent channels, use two long braces along the entire length of the vent. The braces can be made of 3/4in ply cut to 1.0in thick x 11in long x 2 pieces spaced in the vent at about 3 in apart. Since each vent is two 11in long channels, you will need Qnty 4 of these braces per vent.
Hi lawbiding,
Here is a quick example for bracing. In the ducts use solid wood as described by X, and in the chamber use "holey" braces:
Regards,
The solid brace in the vent may likely change Fb. If the brace is going to be implemented as shown, the alignment should be re-simmed accordingly.
Hi lawbiding,
Here is a quick example for bracing. In the ducts use solid wood as described by X, and in the chamber use "holey" braces:
Regards,
Tb46,
Thanks for the sketch - perfect.
We make a good team 🙂
X
Instead of a stick brace I am saying use a piece of plywood with holes cut out of it. About 12in long x 6in wide x 0.75in thick. Try to brace top to bottom and front to back directions. Of course, the chamber with the driver basket in it will require you to place the brace in such a way not to interfere with basket.
For the 1in vent channels, use two long braces along the entire length of the vent. The braces can be made of 3/4in ply cut to 1.0in thick x 11in long x 2 pieces spaced in the vent at about 3 in apart. Since each vent is two 11in long channels, you will need Qnty 4 of these braces per vent.
Xrk971,
Like this.Hope am close to what you suggest.

Last edited:
Hi lawbiding,
Here is a quick example for bracing. In the ducts use solid wood as described by X, and in the chamber use "holey" braces:
Regards,
Tb46,
Your example for bracing looks easier. I like it.
Thanks
The solid brace in the vent may likely change Fb. If the brace is going to be implemented as shown, the alignment should be re-simmed accordingly.
The sim assumed a solid brace for an equivalent vent CSA of 12in tall x 1.0in wide x 24in long.
This is why I reminded the OP to add the brace...
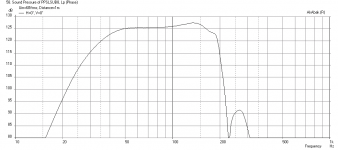
Seems like a nice wide bandwidth sub suitable for integration with tops as high as 175Hz. Here is the max output without the seat duct, driven to xmax of 20mm with a -24dB/oct HPF at 25Hz HPF and a -48dB/oct LPF at 150Hz. For the open waveguide case, I extended the vent length to 26in x 1.0in wide. Note that I had a typo in my earlier sims - I had corner loading accidentally turned on so subtract 6dB from previous sims. Below is correct max SPL in 2pi space. About 125.4dB and -3dB point is 41.5Hz.

@Lawabiding: The plans you have so far from Tb46 are fine - go with it. I am just playing with the vent length for the non-ducted case and trying to see if I can make a more general PA sub using the SWR 12D2's which seem to have a very nice max power and xmax spec for the price. $138 is a great value for this kind of performance.
Amazon.com : Alpine SWR-12D2 Type-R 12" Subwoofer with Dual 2-ohm Voice Coils : Vehicle Subwoofers : Car Electronics
Attachments
Last edited:
Seems like a nice wide bandwidth sub suitable for integration with tops as high as 175Hz. Here is the max output without the seat duct, driven to xmax of 20mm with a -24dB/oct HPF at 25Hz HPF and a -48dB/oct LPF at 150Hz. For the open waveguide case, I extended the vent length to 26in x 1.0in wide. Note that I had a typo in my earlier sims - I had corner loading accidentally turned on so subtract 6dB from previous sims. Below is correct max SPL in 2pi space. About 125.4dB and -3dB point is 41.5Hz.
@Lawabiding: The plans you have so far from Tb46 are fine - go with it. I am just playing with the vent length for the non-ducted case and trying to see if I can make a more general PA sub using the SWR 12D2's which seem to have a very nice max power and xmax spec for the price. $138 is a great value for this kind of performance.
Amazon.com : Alpine SWR-12D2 Type-R 12" Subwoofer with Dual 2-ohm Voice Coils : Vehicle Subwoofers : Car Electronics
An externally hosted image should be here but it was not working when we last tested it.
Thanks guys. I am off next week, so I will use that time to build the box. Once again Xrk971 and Tb46 thanks.
Should i extend my vent length to 26".
Only extend if you plan on using it primarily without the external duct.
Ok get it.
Hi lawbiding,
Just some questions about the final dimensions:
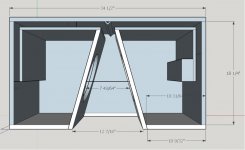
In Post #62 you opend the slot to 12-7/16" at the front, did you maintain the 30° angle?
The new outside dimensions look like W=34.5" and D=19-3/4", is H still 15"?
I hope to find the time to make a final drawing for my files.
Regards,
Just some questions about the final dimensions:
In Post #62 you opend the slot to 12-7/16" at the front, did you maintain the 30° angle?
The new outside dimensions look like W=34.5" and D=19-3/4", is H still 15"?
I hope to find the time to make a final drawing for my files.
Regards,
Hi lawbiding,
Just some questions about the final dimensions:
In Post #62 you opend the slot to 12-7/16" at the front, did you maintain the 30° angle?
The new outside dimensions look like W=34.5" and D=19-3/4", is H still 15"?
I hope to find the time to make a final drawing for my files.
Regards,
Tb46,
I don't know how to make angle cut in sketchup as yet. I just go by the measurements that are on the drawing.
- Home
- Loudspeakers
- Subwoofers
- PP Slot Loaded Sub with Alpine SWR 12D2