Hi peppenní, I'm from Bari, you're more Southern than me! I often look at your beautiful builds, congrats! Hope you'll give me an hand with some tips when I'll build the Iron Pre from @Zenmod. I'm waiting for the kit to be available, but it's taking sooo long... Can't wait!
Cheers from Santa's town!
Gaetano.
Cheers from Santa's town!
Gaetano.
Ciao @peppennino e ciao @ghitus so far it seems I am the only Italian here who can barely handle a DMM, having trouble with my F4, need to bias it and to adjust DC offset, in need of a second DMM to try and perform the fine tuning, also need to substitute the front led as it blew :-(
Se we all from the South??? Gaetano I am as skilled with electronics as I am with Chinese, with the help of the guys in my thread about the F4 I am at least learning how to check the bias and other little things, my hope is to make so the F4 can amplify the whole input signal as it's now running with about 120mV rather than 200+mV (I might push it further as the chassis sure allows enough cooling but don't feel the need to do so until I can tell if, once running fine, it does well for my speakers) and also to adjust the DC offset, maybe I will come ask for your help in the (very) near future.
Hi
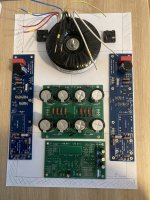
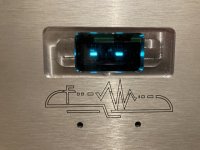
Here are pictures of an M2x with B1 Nutube Preamp, 1st as rough sheet for components placement, then components in a laser cut cardboard mimicking the inside of a Mini-Dissipante 4U, last the final product in the real chassis.
It is as "planned" but i did a few mistakes which could have translated into the components not fitting.
= the front panel is in fact bigger (higher/taller) than the heatsink and i didn't notice it from the 2D given by Moduloshop. I should have been more careful. But i played to quickly with my own made 3D...
So
a. bottom left, the ALPS pot of the B1 Nutube Preamp is just 2mm above the bottom metallic plate holding the component inside
b. on top, the preamp board is very close to the top cover. Hence output wires may touch the cover depending on the angle = i will do something to minimise future potential issues.
c. the holes to have access to the preamp potentiometer are well placed, but my screwdriver is not long enough... have to find a thin and long one!
If i had to do it again, i would have put the volume control bottom left 5 or 10mm above (same for the switch) & preamp with nutube 10mm below, put bigger holes for access to the preamp pot.
That's it.
Maybe it will give ideas to others who would avoid my mistakes.
Attachments
-
 M2X-B1_NuTube_Preamp-1.jpg597.8 KB · Views: 608
 -
 M2X-B1_NuTube_Preamp-5.jpg358.9 KB · Views: 571
 -
 M2X-B1_NuTube_Preamp-4.jpg319.9 KB · Views: 549
 -
 M2X-B1_NuTube_Preamp-6.jpg529.6 KB · Views: 592
 -
 M2X-B1_NuTube_Preamp-8.jpg477.1 KB · Views: 596
 -
 M2X-B1_NuTube_Preamp-9.jpg441 KB · Views: 607
 -
 M2X-B1_NuTube_Preamp-10.jpg440.9 KB · Views: 627

Very neat! Is there a way to bypass the korg in case you want to run a different preamp? Typically, you would put all of your signal related stuff in the back and the transformer to the front. But the tube peeking out of the front does look cool 🙂
Hi
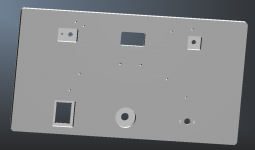
1) To Mikerodrig27 :
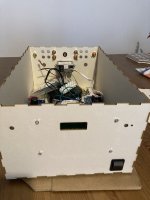
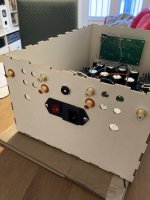
a. i planned to have the back panel with threads to put a Noir preamp (which i had), a B1 Korg Nutube preamp (pictures, main intend) and wanted provision for others, like ACP+ & Wayne stage
Yet, those wouldn't fit due to size (ACP+) and bad interaction with Noir/Nutube thread & holes for switches
So i simplified. See final back renderings of the panels made
b. there is provision for headphone jack (if Noir were to be used or something else placed inside later)
c. There are holes in the back to have RCA connections going directly to the power amp (to be used with an external preamp)
And others holes to have RCA connection going to the front preamp ( then inside to the power amp.)
[rat's nest! i have to do a bit of cable management]
2) To SRMMcGee :
a. With the Noir preamp, it sounded nice for all music except some rock/hard rock (very much compressed...)
b. With the B1 Nutube preamp, it is much better sounding to me and more of the rock/hard rock is enjoyable. (before i could only listen to those through tube headphones)
But everything is way better than previous Marantz PM6004.
More versatile than a tube amp i have and as nice
Other have discussed preamp / amps in the forum a. & b. are the only thing i can comment on.
Take care
[edit: Moutain View inputs for the time being]
1) To Mikerodrig27 :
a. i planned to have the back panel with threads to put a Noir preamp (which i had), a B1 Korg Nutube preamp (pictures, main intend) and wanted provision for others, like ACP+ & Wayne stage
Yet, those wouldn't fit due to size (ACP+) and bad interaction with Noir/Nutube thread & holes for switches
So i simplified. See final back renderings of the panels made
b. there is provision for headphone jack (if Noir were to be used or something else placed inside later)
c. There are holes in the back to have RCA connections going directly to the power amp (to be used with an external preamp)
And others holes to have RCA connection going to the front preamp ( then inside to the power amp.)
[rat's nest! i have to do a bit of cable management]
2) To SRMMcGee :
a. With the Noir preamp, it sounded nice for all music except some rock/hard rock (very much compressed...)
b. With the B1 Nutube preamp, it is much better sounding to me and more of the rock/hard rock is enjoyable. (before i could only listen to those through tube headphones)
But everything is way better than previous Marantz PM6004.
More versatile than a tube amp i have and as nice
Other have discussed preamp / amps in the forum a. & b. are the only thing i can comment on.
Take care
[edit: Moutain View inputs for the time being]
Attachments
Last edited:
Just so that those interested can re-used and modify to their linking (bear in mind that i mentionned the NuTube preamp is a bit too high and the location for the potentiometer is a bit too low, post above) and to use the forum as an archive, here are the Schaeffer Front Panel Design files for front and back panels
Hope it can be useful to some.
Hope it can be useful to some.
Attachments
Hi,
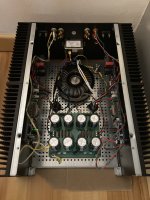
Almost finish with my Aleph 1.2
I started the projekt 13 years ago! Now I only have to power them up for the very first time, but i'm not in a hurry.
They messured L680xW480xH400mm and the weight about 65kg.
I have Pass design i mind when I made the front, its made of 20+25mm aluminium plates, just for design.
kk-pcb.net and sjostromaudio.com have delivered the pcb's, other ones are DIY like VU-meter pcb, DC protection, T-toggle for switch.
The cooling fins from heatsinkusa.com, and I choose the 10.080" 16 inch tall x 10pcs. I split two of them so each side are made of 2½pc.
The picture with the set up contains a look a like HPA-1, but is also made by me with Whammy inlet. Comming up soon🙂
The speakers are mostly Dynaudio element and the front speaker are the Dynaudio model "Finale" but with upgraded element.
Missing in the set up are my Aleph 1.7 who are almost finnished on the building table. (Sorry for misspelled).
I hope you will enjoy the pics below.
Best regards, Mikael from Sweden.
Hi,
Upgrade proposal🤣, yeah, almost necessary! I mounted them on place...
The mosfet's are mounted on the heatsinks and connected to the amp, but not shown in pictures.
Its 12pcs of IFRP244 a' sink x 4 in total.
And yes, the Jantzen coils are for choke's for power supply filtering.
Upgrade proposal🤣, yeah, almost necessary! I mounted them on place...
The mosfet's are mounted on the heatsinks and connected to the amp, but not shown in pictures.
Its 12pcs of IFRP244 a' sink x 4 in total.
And yes, the Jantzen coils are for choke's for power supply filtering.
Lets say that I hope not to run around with these monoblocks...
About the "handles" I do not think Its a good idea, they are quite sharp edges for the heavy lifting.
Better to use straps around the heatsinks, and ask a friend for lifting helps. And a fresh pair of new underwear to hands🤣
About the "handles" I do not think Its a good idea, they are quite sharp edges for the heavy lifting.
Better to use straps around the heatsinks, and ask a friend for lifting helps. And a fresh pair of new underwear to hands🤣
Besides the amps, I also like the look of the preamp in the background. How did you make the chassis? Was it all done using custom CNC?
Hi,
Almost finish with my Aleph 1.2
@Giovanni1968 I like that build, despite the already mentioned shortcomings.
What strike me is that there seems to be RG174 signal-wire? Are they good performers?
What strike me is that there seems to be RG174 signal-wire? Are they good performers?
Last edited:
Hi,
Almost finish with my Aleph 1.2
I started the projekt 13 years ago! Now I only have to power them up for the very first time, but i'm not in a hurry.
They messured L680xW480xH400mm and the weight about 65kg.
I have Pass design i mind when I made the front, its made of 20+25mm aluminium plates, just for design.
kk-pcb.net and sjostromaudio.com have delivered the pcb's, other ones are DIY like VU-meter pcb, DC protection, T-toggle for switch.
The cooling fins from heatsinkusa.com, and I choose the 10.080" 16 inch tall x 10pcs. I split two of them so each side are made of 2½pc.
The picture with the set up contains a look a like HPA-1, but is also made by me with Whammy inlet. Comming up soon🙂
The speakers are mostly Dynaudio element and the front speaker are the Dynaudio model "Finale" but with upgraded element.
Missing in the set up are my Aleph 1.7 who are almost finnished on the building table. (Sorry for misspelled).
I hope you will enjoy the pics below.
Best regards, Mikael from Sweden.
View attachment 1152672
Very impressive DIY work Mikael, congratulations! 🙂
- Home
- Amplifiers
- Pass Labs
- Pictures of your diy Pass amplifier