Thank you everyone.
MASantos,
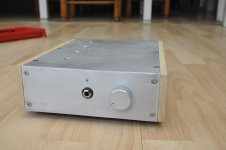
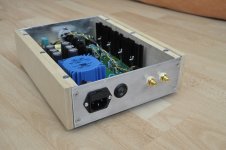
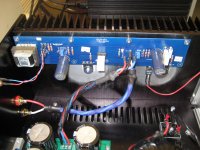
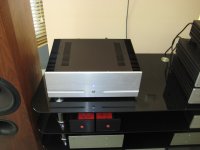
The Chassis is a Hi-Fi 2000 from the diyAudio store but heavily modified, literally. I added so much aluminum and some copper heat spreaders that I can hardly lift the thing.
Eric,
thank you,
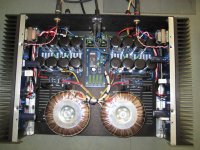
I worked real hard on minimizing the number of wires and hid all that I could. Most of the wires are exiting the back side of the boards.
Nelson Pass,
I have been listening to your design all afternoon and I am amazed. How can a simple 2 gain stage amp with so few parts sound so wonderful?
MASantos,
The Chassis is a Hi-Fi 2000 from the diyAudio store but heavily modified, literally. I added so much aluminum and some copper heat spreaders that I can hardly lift the thing.
Eric,
thank you,
I worked real hard on minimizing the number of wires and hid all that I could. Most of the wires are exiting the back side of the boards.
Nelson Pass,
I have been listening to your design all afternoon and I am amazed. How can a simple 2 gain stage amp with so few parts sound so wonderful?


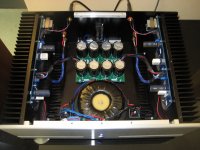
Very nice build, clean and symmetric!
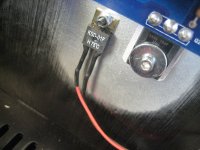
Why is there a sort of Keratherm between cupper bar and alu bar?
Why is there a sort of Keratherm between cupper bar and alu bar?
The F5 audio output is connected to the drain of the mosfets so I mounted them directly to the copper heat spreader, no electrical isolation between transistors and copper. I added a thermal interface product between the copper bar and the grounded aluminum bar to electrically isolate them. There are also nylon bushings in the screw hole to isolate the mounting screws. I figured this would be a good way of transferring heat away from the output devices. Works very well and does not add any significant capacitance between output and ground.
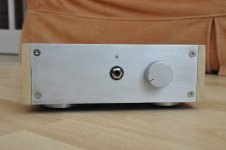
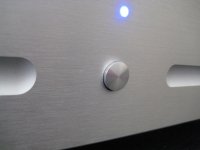
Mod Man that is an amazing piece of diy, absolutely gorgeous! May I ask what power button you used on the front? Is it back lit?
Thanks JSA1971.
Ok, the power button has a blue backlit ring light. Mouser part ULV7F2G11341 E-Switch | Mouser
It is a double pole 3 amp switch wired in parallel for 6 amps that may or may not be big enough, still testing.
Presently using NTC inrush current limiters but may have to go with a relay or a soft start circuit if the switch welds itself closed. I have had that happen in other projects.
Hi,
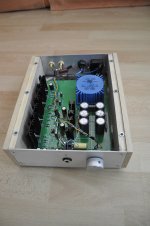
This is my new headphone amplifier. I've got the pcb on his forum. The box is the nicest one I have cobbled together so far... Each new (Pass) amp I make has a better chassis...
Happy camper here.
This is my new headphone amplifier. I've got the pcb on his forum. The box is the nicest one I have cobbled together so far... Each new (Pass) amp I make has a better chassis...
Happy camper here.
Attachments


Case stack for some upcoming builds 😀
Can you name the cases. Are these or some of these chinese ebay enclosures? I'm lookibg for some. Nice bikes too, though I run the bicycle store I can't guess what the brand it is. All the brands look the same these days anyway. In the vintage 90-ties times pretty much only Yeti used this colour finish.
Kind Regards
Wow! Did you build this chassis yourself or get one from somewhere ?
F5 #1 and #2.
Nice - truly art pieces category!!
Two F5 mono blocks. The fiancee decided to call them choo-choo amps. I don't see any resemblance. 😉
Can you share the lcd project?The trigger input is handled by the Arduino as well I guess ?
F6 in new chassis...
The chassis in the first picture ( the dual mono) has had many amps in it, but now I'm giving each type of First Watt amplifier it's own chassis.
I bought a nice chassis on Ebay from Chinese seller, not cheap, but quality is very good.
Also no more dual mono, and this is what my 'standard' F6 looks alike.
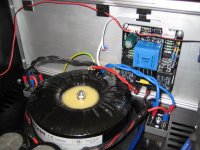
I only replaced the 230V switch which I didn't trust, for a small push button pulse switch and a soft start board with temperature control.
As always a big rocker switch on the back in case things go really wrong 😱
Next, is to give my old standard F5 a new chassis.🙂
The chassis in the first picture ( the dual mono) has had many amps in it, but now I'm giving each type of First Watt amplifier it's own chassis.
I bought a nice chassis on Ebay from Chinese seller, not cheap, but quality is very good.
Also no more dual mono, and this is what my 'standard' F6 looks alike.
I only replaced the 230V switch which I didn't trust, for a small push button pulse switch and a soft start board with temperature control.
As always a big rocker switch on the back in case things go really wrong 😱
Next, is to give my old standard F5 a new chassis.🙂
Attachments


Seems the Chinese plagiarism is without boundaries! However, a nice amplifier you have there. And as long as it is “only” the chassis they copy...
I prefer the old 19” inch 400A lookalike concept, if only to get that ultimate approving nod - “fugly” by Mighty Zen Mod
I prefer the old 19” inch 400A lookalike concept, if only to get that ultimate approving nod - “fugly” by Mighty Zen Mod
Pass DIY Addict
Joined 2000
Paid Member
Beautiful execution, Walter! I see that you are a fan of sanding your heat sinks for mostfet mounting as well!
 so I had to sand...
- Home
- Amplifiers
- Pass Labs
- Pictures of your diy Pass amplifier