Another week another paint job 😀
This time real pearlescent:
This time real pearlescent:
An externally hosted image should be here but it was not working when we last tested it.
An externally hosted image should be here but it was not working when we last tested it.
An externally hosted image should be here but it was not working when we last tested it.
An externally hosted image should be here but it was not working when we last tested it.
Uh-Oh.
Now your going to have to lacquer your seas woofers with multiple coats of c37 - which is expensive..
Check out the left side link C37 Speakers and you'll see what I mean.
http://www.ennemoser.com/
Be forwarned though, the speakers presented on this page have MULTIPLE coats of lacquer.
Here is a review on the stuff:
http://www.tnt-audio.com/accessories/c37_e.html
ShinOBIWAN said:Another week another paint job 😀
This time real pearlescent:
Damn....this looks more like porn to me! 😉
A really beautifull finish!
Grtz, Joris
ScottG said:Uh-Oh.
Now your going to have to lacquer your seas woofers with multiple coats of c37 - which is expensive..
Check out the left side link C37 Speakers and you'll see what I mean.
http://www.ennemoser.com/
Be forwarned though, the speakers presented on this page have MULTIPLE coats of lacquer.
Here is a review on the stuff:
http://www.tnt-audio.com/accessories/c37_e.html
I wouldn't dare stick that gunk on a half decent speaker.
Probably a waste on the Seas too, they're aluminium and the C37 seems to be for stiffening - alu is very rigid compared to paper cones which is what I suspect its aimed at looking at the speakers on the website - fostex, supravox, volt etc.
I think the ATC already has something similar on it - cheap looking gunk that is.
Lol - A 'new' all magical audiophile sauce component 😀. Has anybody tried it on their optical pickup lenses yet 😉
In the review they write about "speed mismatch". I would probably estimate that the entire frequency response was altered when the woofer was doped and thus the *carefully dezigned* crossover is now not optimal.
The aim of a cone is to be as light as possible to ensure that transient response is acceptable, while being as stiff as possible to avoid breakup. What this solution offers is a way of altering the ratio of stifness to weight chosen by the original dezigner of the driver. This is fair enough - especialy for the DIYers, however I think the view of what this treatment can do is overoptimistic. There will always be some compromise
ITO aluminium as cone material - it is one of the lightest most rigid materials used ( the only problem being the inherent resonance of the metal ). I doubt weather the laquer would have any positive effect of this driver.
The biggest problem with this of course, as stated in the review, is that it is not reversable. It is also possible that at some later stage in the life of the treatment it may crystalise, fracture and loose it's rigidity - leaving you in an even more precarious situation.
Shinobi - whew. Those doodabs are looking far too good. You have too much time on your hands. I could just image Anakin on the couch next Padme punching a button on his remote control and Taan Tan Tara - The sound belowing forth from beasts looking just like that. The pearlescent would go very nicely in the scenes done out at Lake Como
Vigier said:
Damn....this looks more like porn to me! 😉
A really beautifull finish!
Grtz, Joris
ROFL
😀
Byrd said:Shinobi - whew. Those doodabs are looking far too good. You have too much time on your hands. I could just image Anakin on the couch next Padme punching a button on his remote control and Taan Tan Tara - The sound belowing forth from beasts looking just like that. The pearlescent would go very nicely in the scenes done out at Lake Como
pinkmouse said:Very nice! 🙂
Thanks fellas, appreciate the kind words.
Also Byrd, love the Starwars movies so your comments gave me a good laugh.
edjosh23 said:ShinOBIWAN,
Any pictures of the rest of the enclosure?
Josh
To be honest they're only at the primer stage, I wanted to be really happy with my choice of colour before doing the lot. Now I've found it they won't be far behind.
Should have pics of the finished cabinets within the next couple of weeks. Then I can sit back and enjoy! Looking forward to it.
The Behringer didn't last very long 
Its for sale in the trading post if anyone's interested in a virtually brand new example at a good price.
Damn these FIR filters are addictive, started looking at prices for the Antelope Isochrone OCX - methinks I'll have to save for that one.
Its for sale in the trading post if anyone's interested in a virtually brand new example at a good price.
Damn these FIR filters are addictive, started looking at prices for the Antelope Isochrone OCX - methinks I'll have to save for that one.
So what is your final solution for your crossover?
Did you get a satisfactory solution to work with TV and DVD-video? If so could you highlight your solution.
On another front, Your speakers look awesome and it looks like you are close to the finish line, It was great to see all the work involved to make a reference pair of speakers. This thread was a significant contribution to this site in my opinion. I think it would be informative fo everybody to document the time and cost it takes to build those speakers. I estimate just on direct raw materials you spend close to $5000 USD. I think newbies would like to know the man hours in research and design, and the actual build. These projects always seem simple at first!!!
I, however, am most interested in your paint, I have never been able to do a good paint job like that. How much time and materials was involved in the finish. I have always farmed out finishing, and I would like to get better at it.
mbutzkies said:So what is your final solution for your crossover?
Did you get a satisfactory solution to work with TV and DVD-video? If so could you highlight your solution.
Yes TV, DVD and gaming all work very nicely. The only problems encountered were CPU usage. With all the option such as FIR filters time alignment and DRC it floats at around 20% which doesn't sound like much but I use heavy post processing of the video in Theatertek and with these options enabled I get some dropped frames on occasion.
Gaming again runs slower than without the XO, not hugely but I like it to be as fast as possible.
This will all be solved soon enough when I move out the XO tasks to a dedicated high powered machine for low latency <20ms.
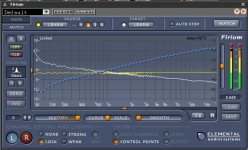
The software setup I use is very similar to Vil's: Console as the plugin host with Waves Linear Phase EQ for FIR crossovers, Voxengo Curve EQ for the DRC and Voxengo Delay for the time/phase alignment.
On the hardware side I use an RME HDSP 9632 sound card and ASIO 2.0.
In the future when I have finished these I'm looking at upgrading my master clock to the Antelope Isochrone OCX. But at the moment I'm very happy.
On another front, Your speakers look awesome and it looks like you are close to the finish line, It was great to see all the work involved to make a reference pair of speakers. This thread was a significant contribution to this site in my opinion. I think it would be informative fo everybody to document the time and cost it takes to build those speakers. I estimate just on direct raw materials you spend close to $5000 USD.
Thanks!
I think newbies would like to know the man hours in research and design, and the actual build. These projects always seem simple at first!!!
I myself wasn't quite prepared for the task, it seems to have moved on significantly from my original plans.
With regards to time, well I spent a month modelling, researching and designing the enclosures/drivers. I'd say around 70-80hrs spent on this stage.
The construction is still ongoing but its been around 3 months now with a lot of time investment - actually aside from work, nearly every spare hour I have goes into these, so a big investment from that point of view. Upto now around 400hrs have been spent on the building. This does include constructing all the electronics aswell though.
I, however, am most interested in your paint, I have never been able to do a good paint job like that. How much time and materials was involved in the finish. I have always farmed out finishing, and I would like to get better at it.
Finishing with spray materials is quite laborious BUT easy if you put the work in. Here's how I do it:
You have to extensively prep MDF prior to any finishing coats otherwise you get something of a dog dinner.
I build up a 5 coat thick layer of specialist MDF primer, which locks the surface and prevents excessive soak up of the finishing coats. I do this with a brush since its nice and quick if rather unsightly at first, I then wet sand the MDF primer flat using 300-400 grit paper.
Afterwards I use generic automotive grey primer and only apply 2 or 3 coats and just one wet sand with 800grit after the last coat of grey primer.
Now its time for the finishing coats, the pearl you see in the photo's requires 3 different types of paint to get that effect going. The first is a basecoat which set the overall tone of the colour, I chose 'Brilliant Black' for this. I applied 2-3 coats then sanded back with 800grit and then carefully added one even coat over this with no sanding afterward.
After the basecoat you then add your pearlescent effect coat, depending on how this was mixed and with what pigments determines the effect you see. My pearlescent mix had purple, green and blue pigments mixed together.
You only need 2 very even coats with this stuff and absolutely no sanding!!! This is a pearl finish and like metalics it doesn't like sanding or abrasives at all.
Onto the basecoat you spray this pearl mix and that is when you see the effect. With no light hitting it mine is a very dark purple, almost black, since I used a black basecoat. Use a lighter basecoat and the effect changes substantially. After experimenting on scrap MDF I found that black gave the most dramatic and pleasing colour shifts. Depending on the angle and light you see black, purple, pink, blue and green. With all shades in between.
The final coat is the clear coat laquer and this really adds to the effect pearl effect, deepens the finish, adds gloss and most importantly protects.
The clear coat is suitable for sanding so you can really go to town on flatting out the surface for a mirror reflection - something I still need to do to the cabinet in the picture above!
Here its best to add a good few coats, I normally do around 5 or 6 and get a really deep look to the finish after sanding and buffing.
I use 1200 grit to flat the surface and then go to a fine rubbing compound such as Safecut from Turtlewax, then I use a high quality polish/wax.
After all this you should have something that looks very nice. Like I said its quite laborious but well worth it once you stand back and take stock of the finished article.
Also take special care to equip yourself with a good vapour and particle mask. When your spraying with this quantity of paint it really pays to protect your health. I have a friend that used to graffiti regularly in his younger days and what I'm about to tell you is absolutely the gods honest truth:
He's told me stories of when he used to work for hours at a time on a large piece of work and during/afterward he had some quite scary health issues related to the spray paint. Things like burning sensations in his throat whilst spray, asthma-like attacks of breathing, tightness of the chest, dizzyness and headaches and blood from the nose. He bought himself a decent coal filter mask back then and all this stopped!
I cannot stess this enough after some of the stories I've been told.
I am glad you got your crossover to work. I guess TheaterTek adds some significant latency.
I used Winamp, Adaptx, and Waves linEq, and got lip sync problems but no dropped frames. I also used Aedio divider with Foobar and like that solution too, but it was audio only. Even with those problems I had, FIR and DRC definitely rocks, and someday I will get serious about writing a low latency FIR filter.
Since you firmly crossed over to PC crossovers, might I suggest these cases.
http://www.zalman.co.kr/eng/product/view.asp?idx=152&code=020
Before you get too excited, I only found one vendor for it at $1100.
A more reasonable case manufacturer
http://www.silverstonetek.com/product-case.htm
These can be had for $100-150, many vendors
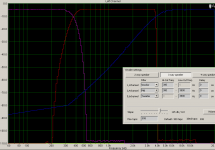
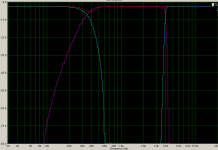
Also, do you have test software, it would be neet to see some graphs?
I used Winamp, Adaptx, and Waves linEq, and got lip sync problems but no dropped frames. I also used Aedio divider with Foobar and like that solution too, but it was audio only. Even with those problems I had, FIR and DRC definitely rocks, and someday I will get serious about writing a low latency FIR filter.
Since you firmly crossed over to PC crossovers, might I suggest these cases.
http://www.zalman.co.kr/eng/product/view.asp?idx=152&code=020
Before you get too excited, I only found one vendor for it at $1100.
A more reasonable case manufacturer
http://www.silverstonetek.com/product-case.htm
These can be had for $100-150, many vendors
Also, do you have test software, it would be neet to see some graphs?
Theatertek 2 has lip sync delay so you can compensate easily for that.
I have flawless playback if I disable all the tricks such as Lanczos 8 Tap filtering and 3D Denoise.
The strange thing is even with these options enable my CPU is at 80%, I guess TT needs some headroom. As long as I'm at around 50-60% load I get perfect panning.
I do have measurement software and I will post some graphs etc. after I get all the drivers back in the finished cabinets.
Vil & Ryan,
Voxengo curveEQ is giving me hassle in console.
CPU usage is around 20% and I'm getting 2-3second dropout in audio every 30 second or so.
I've tried removing Waves LineEQ's to lower the CPU usage to around 5% but it still does this!
This is with just plain old audio routed from the RME using internal loopback, everything works fine if I remove the CurveEQ plugin.
Any thoughts?
for Console users I made small usefull script . its starts Console , loads last project file , turns procesing on and minimize . very usefull . free script software is here :
http://www.autoitscript.com/autoit3/
project file attached
http://www.autoitscript.com/autoit3/
project file attached
Attachments
Aw man, I can't believe this s**t!
Why am I so stupid? I've completely wrecked the sat shown in the photo's through my incessant colour changing.
Thing is I've had 5 colours on there now, so I'd say around 20+ layers. This of course meant that the finish will never dry or at least not within the next 6 months or so.
Now the funny part comes when I decided to strip back the paint to the MDF and redo. I started with some 50 grit wet sanding but because the paint was permanantly tacky it just clogged the paper up real bad, think I used around 5 sheets in an orbital sander just doing around 10 square inches.
So gave that up as bad job and moved onto paint stripper, that just turned the paint to gunk and was very messy and particularly effective.
Then I decided to go all out and remembered how effective heat was when removing old paint from doors etc. So I pulled the blow torch out 😀 and then tried it on the paint, within seconds it was a flaming ball of MDF! Clearly the paint was considerable more flammable that the stuff you use on your interior doors.
I had to get the hose pipe out to put it out but alas it had been burning for around a minute or two before I could get the hose all locked in and unwound to reach.
It didn't actually look to bad until I started sanding the fried paint, then when I reached the MDF it had turned chunks of it into carbon and it just fell out leaving large craters on the surface 😀
My own stupid fault but I can't help but think of all the hours spent on that one sat and then the thought of having to redo another.
I'll post some comedy photo's of the toasted sat when I get the batteries charged for the camera 🙂
- Status
- Not open for further replies.
- Home
- Loudspeakers
- Multi-Way
- 'Perceive' Contruction Diary