No, my left ear needed a rest. All happy now, playing in stereo. One heat sink had to be "re-purposed", but I like reusing what I have. Just need a decent DAC in my test area now... 😉 Looking forward to receiving that set in racing green from you!Still mono? 😀
Oh, and Thank You (and Shaan!)
Attachments
Last edited:
Stereo set playing beautifully!
@PMI - Very nice looking PeeCeeBees you have there!
I finally got both of mine hooked up and playing in stereo. Short subjective review below, but let me say such a simple circuit positively blew my mind .
.
The soundstage immediately blew me away. The little amp really showed what the sound engineer had in mind with respect to creating the illusion of 'being there'. I've heard lots of consumer audio, plus some amps considered to be somewhat up-scale, but never has the music sounded so open.
Treble sounds very detailed yet smooth, no harshness that comes with some amps. This surprises me given the speed and wide bandwidth this little gem is capable of. I'm sure if the speaker could reproduce the note it could faithfully reproduce sounds only my dog and cats could appreciate.
Vocals are almost ethereal. Detail, detail, and more detail. Going to force me to go back through my collection to find all my favourite vocalists and re-listen.
I initially thought bass might have sounded thin but then it struck me that no, it plays plenty low and with authority, but rather there is so much clarity that it wasn't in any way muddied up. You could really hear what the bassist or percussionist was really doing, not masked into something that was smeared and sounding bigger than it was.
Overall, this thing is a true jewel. All those looking to build a simple, low parts count amplifier that given a little care in parts selection will simply 'just work' really needs to look at the VSSA in any form.
Get off the fence! Warm up that soldering iron and build yourself one!
@PMI - Very nice looking PeeCeeBees you have there!
I finally got both of mine hooked up and playing in stereo. Short subjective review below, but let me say such a simple circuit positively blew my mind
.The soundstage immediately blew me away. The little amp really showed what the sound engineer had in mind with respect to creating the illusion of 'being there'. I've heard lots of consumer audio, plus some amps considered to be somewhat up-scale, but never has the music sounded so open.
Treble sounds very detailed yet smooth, no harshness that comes with some amps. This surprises me given the speed and wide bandwidth this little gem is capable of. I'm sure if the speaker could reproduce the note it could faithfully reproduce sounds only my dog and cats could appreciate.
Vocals are almost ethereal. Detail, detail, and more detail. Going to force me to go back through my collection to find all my favourite vocalists and re-listen.
I initially thought bass might have sounded thin but then it struck me that no, it plays plenty low and with authority, but rather there is so much clarity that it wasn't in any way muddied up. You could really hear what the bassist or percussionist was really doing, not masked into something that was smeared and sounding bigger than it was.
Overall, this thing is a true jewel. All those looking to build a simple, low parts count amplifier that given a little care in parts selection will simply 'just work' really needs to look at the VSSA in any form.
Get off the fence! Warm up that soldering iron and build yourself one!
Attachments

Last edited:
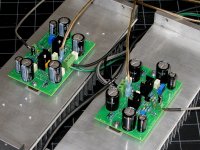
As usual, U R 2 kind. The heat sink is rated for 0.65C/W, so just a bit smaller than what LC recommends for his boards, but should be about right for +/-35~37V rails worst-case power dissipation. In normal volume listening, 8-ohm load, heat sink temperature is about 10-12 deg. C above room temp (measured about one inch from mounting screw for the mosfet. In other words, just slightly warm to the touch.Thnx 4 da þîç! 😉
They look ultra pro with those FETs on giant heatsinks!
shaan
Next test will be with the simplest power supply I can think of to use here, transformer, rectifier, one pair of 4700 uF per rail.
Agreed, especially this part. (was just listening to Diana Krall as I was reading your post) Really brings some difficult to hear passages to life.Vocals are almost ethereal. Detail, detail, and more detail. Going to force me to go back through my collection to find all my favourite vocalists and re-listen.
Thanks for the review Jason. Another happy diy-er, thanks to GABOR and LC for the idea and research.
Visitors, you get the story clear, don't you? Who's next to try, his very own, PeeCeeBee?
Visitors, you get the story clear, don't you? Who's next to try, his very own, PeeCeeBee?
Agreed, especially this part. (was just listening to Diana Krall as I was reading your post) Really brings some difficult to hear passages to life.

I have some jazz instrumental and vocal tracks in mp3 320kbps. My previous amps awfully roll on the floor when any of these files are in the playlist.
But, now-a-days the flowers are in full bloom with all of their colors and textures.
Since the SSA in 2012 March...

Last edited:
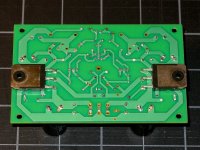
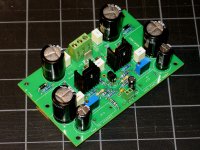
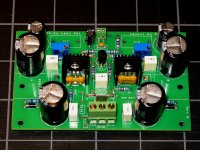
A completed module. Just need to prepare the other heat sink adapter and heat sink for permanent assembly.
Which schematic was used?
Regards zeoN_Rider
Hi zeoN.
See the first post. You have your schematic. 🙂
Are you sure?
Regards zeoN_Rider
It is the schematic Shaan is promoting on this thread with the only exception being that I use a slightly different input filter arrangement. Look for one of the last posts where I posted a redraw of the schematic. Don't be mislead if the values doesn't match, the amp I built is using Shaan's recommended values.
@PMI - Very nice looking PeeCeeBees you have there!
I finally got both of mine hooked up and playing in stereo. Short subjective review below, but let me say such a simple circuit positively blew my mind
The soundstage immediately blew me away. The little amp really showed what the sound engineer had in mind with respect to creating the illusion of 'being there'. I've heard lots of consumer audio, plus some amps considered to be somewhat up-scale, but never has the music sounded so open.
Treble sounds very detailed yet smooth, no harshness that comes with some amps. This surprises me given the speed and wide bandwidth this little gem is capable of. I'm sure if the speaker could reproduce the note it could faithfully reproduce sounds only my dog and cats could appreciate.
Vocals are almost ethereal. Detail, detail, and more detail. Going to force me to go back through my collection to find all my favourite vocalists and re-listen.
I initially thought bass might have sounded thin but then it struck me that no, it plays plenty low and with authority, but rather there is so much clarity that it wasn't in any way muddied up. You could really hear what the bassist or percussionist was really doing, not masked into something that was smeared and sounding bigger than it was.
Overall, this thing is a true jewel. All those looking to build a simple, low parts count amplifier that given a little care in parts selection will simply 'just work' really needs to look at the VSSA in any form.
Get off the fence! Warm up that soldering iron and build yourself one!
Nice review jkuetemann🙂🙂 I very much agreed with your review jkuetemann same as mine🙂🙂 With modified value, low heat comes from the output fet with very small heatsink, temperature same as our body temperature and yet without sacrificing the sound quality the bass even better. Again thank you shaan and LC with your wonderfull amp.🙂🙂
boyet
Last edited:
Bass definition and resolution is one of the best I ever heard. In recent tests we connected some monstrum power amps from well known producers and they sounded undefined with mudded bass in comparison, their price suggested anything but that (8000 EUR and more).I initially thought bass might have sounded thin but then it struck me that no, it plays plenty low and with authority, but rather there is so much clarity that it wasn't in any way muddied up. You could really hear what the bassist or percussionist was really doing, not masked into something that was smeared and sounding bigger than it was.
Good suggestion! 😉Overall, this thing is a true jewel. All those looking to build a simple, low parts count amplifier that given a little care in parts selection will simply 'just work' really needs to look at the VSSA in any form.
Get off the fence! Warm up that soldering iron and build yourself one!

Get off the fence! Warm up that soldering iron and build yourself one!
Build two 😉 , get blown away and be proud of your PeeCeeBee, like us.
Satisfaction, gurranteed! 😀
Already tried just one... my left ear got tired after a few days. Much better with two. 😀😀Yeah, two is better.
Attachments
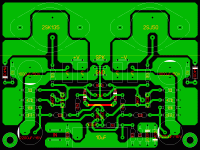
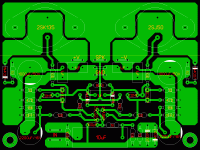
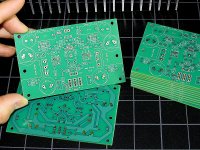
Which one are real?
Regards zeoN_Rider
The artwork in post #218 here, are my final layouts, one for Japanese transistors transistors using the ECB pinout (left one) and one for the recommended BC5xxC transistors with the CBE pinout (right one). If you want a specific one I can put up the files in a printable PDF format, or send them via PM / email.
Last edited:
I hope this will answer some Q's I have had by pm:
There are no expensive parts on my board, all under $1 or less, except for the trimpots. Offset on both boards can be adjusted using one trimmer and a few standard resistor values. If you follow Shaan's directions, you may not need an offset adjustment at all.
The drivers I used on the first two boards are Fairchild KSA1381E/KSC3503D, from Mouser Electronics, very low cost, around $0.30 each. Almost all parts came from this distributor.
Heatsinks for drivers are smallest I could find, 10x15mm footprint. The case of KSA1381E/KSC3503D is all plastic, insulator is not needed, but a bit of thermal compound helps, even if not necessary - on the other hand, BD140/BD139 must use an insulator. The board is laid out to use one flat heat sink for both devices, as Shaan has suggested, but not shown in the pics, because I have not gotten around to cutting one. Compensation caps are installed b/c I want to experiment with different drivers.
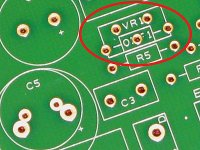
Ahhh yes, "Duelling Trimpots"... dual trim pots are NOT necessary, they were installed to make it easier for me to experiment with the first two boards, and run a few tests at higher temperature. I simply do not have the patience to solder and unsolder parts while testing. Offset can be trimmed out using one trim pot, and replaced with a resistor of equal value, exactly as described by Shaan. (see close-up pic of silkscreen)
Board is laid out so that adjusting one or both pots clockwise lowers the DC offset voltage, turning one or both counterclockwise increases the DC offset voltage.
There are no expensive parts on my board, all under $1 or less, except for the trimpots. Offset on both boards can be adjusted using one trimmer and a few standard resistor values. If you follow Shaan's directions, you may not need an offset adjustment at all.
The drivers I used on the first two boards are Fairchild KSA1381E/KSC3503D, from Mouser Electronics, very low cost, around $0.30 each. Almost all parts came from this distributor.
Heatsinks for drivers are smallest I could find, 10x15mm footprint. The case of KSA1381E/KSC3503D is all plastic, insulator is not needed, but a bit of thermal compound helps, even if not necessary - on the other hand, BD140/BD139 must use an insulator. The board is laid out to use one flat heat sink for both devices, as Shaan has suggested, but not shown in the pics, because I have not gotten around to cutting one. Compensation caps are installed b/c I want to experiment with different drivers.
Ahhh yes, "Duelling Trimpots"... dual trim pots are NOT necessary, they were installed to make it easier for me to experiment with the first two boards, and run a few tests at higher temperature. I simply do not have the patience to solder and unsolder parts while testing. Offset can be trimmed out using one trim pot, and replaced with a resistor of equal value, exactly as described by Shaan. (see close-up pic of silkscreen)
Board is laid out so that adjusting one or both pots clockwise lowers the DC offset voltage, turning one or both counterclockwise increases the DC offset voltage.
Attachments

Ahhh yes, "Duelling Trimpots"... dual trim pots are NOT necessary, they were installed to make it easier for me to experiment with the first two boards, and run a few tests at higher temperature. I simply do not have the patience to solder and unsolder parts while testing. Offset can be trimmed out using one trim pot, and replaced with a resistor of equal value, exactly as described by Shaan. (see close-up pic of silkscreen)
Board is laid out so that adjusting one or both pots clockwise lowers the DC offset voltage, turning one or both counterclockwise increases the DC offset voltage.
Was it 1M trimpot or less?
- Home
- Amplifiers
- Solid State
- PeeCeeBee