Hello sadface,
if you want to build a PEARL 3 for your buddy, then do it as the kit is delivered from the DIYAudio - store.
No experiments necessary.
He will get a phonostage which is far above his expectations. And I hope, that the rest of his audio-chain is on a similar level as the PEARL 3. He should have a really good vinylplayer, amp and loudspeakers to squeeze all the good sound out of the PEARL 3.
Cheers
Dirk 😉

Yes, I omitted the 7815 and 7915 and the 10uF caps associated with them. I located both the regulators in the P3 enclosure, transformer and CRCRC are in the PSU enclosure. I connected the output of the super regs to the point on the board where the output pins of the 7x15's are (I have those red boards from @Algar_emi). I connected the sense wires to the + and - pins of the opamp socket underneath the board.@Wellerman
I assume you omitted the on-board regulators. any other associated components omitted? caps etc??
Where did you connect the super regs on the Pearl 3 board?
The most premium of junk boxes!sadface,
what's with 'the thing with the cheap friend in the place'? I don't know the kind of premium 'junkbox' you got going on, whatever the motivation, it is not saving money. Please try again.You can get a phonostage for 25 USD on ebay
Mostly salvaged transformers, chassis and heatsinks.
But also surplus parts from old projects. I have a lot of surplus rn55 resistors, nichicon electros and Panasonic/wima/tdk film caps.
I tend to buy good quality industrial grade stuff in 'bulk' when I need things.
OK experts...
Have been fixated with the "Mend It Mark" videos introduced by the "25,000 Preamp That Went Wrong" thread. Mark Maher is an exceptional craftsman and the videos are keeping me up at night.
In his Telefunken radio video (
) he uses Chipquik Solder Paste SMD4300SNL10 (SAC 30S Water-Wash T3 Solder Paste) to build a board with very small SMDs (see around 35:58).
And I thought immediately "why can't we use this for the SMDs on the Pearl 3 board?" You just flow the paste onto the PCB areas, tack the SMDs in place, then heat up the board.
Has anyone tried this? It seems like a move forward. Couldn't find the specific Solder Paste on Amazon but it might be there.
Have been fixated with the "Mend It Mark" videos introduced by the "25,000 Preamp That Went Wrong" thread. Mark Maher is an exceptional craftsman and the videos are keeping me up at night.
In his Telefunken radio video (
And I thought immediately "why can't we use this for the SMDs on the Pearl 3 board?" You just flow the paste onto the PCB areas, tack the SMDs in place, then heat up the board.
Has anyone tried this? It seems like a move forward. Couldn't find the specific Solder Paste on Amazon but it might be there.
I used paste from Amazon and a hot air SMD solder station for my P3 SMDs. The process of the solder heating and the part snapping into place gets me every time. So cool
@rhthatcher Thanks as always. Have destroyed two PCB boards by using the Hakko 301 to try and remove SMDs. It generates too much pressure and pulls the copper away from the board. Am wondering if the hot air solder station will remove SDMs by loosening the bond sufficiently to pull them away safely with hot air alone.
And, second, am wondering if this unit will do both jobs (assembly and removal):
https://www.amazon.com/BAKON-881-So...-1-spons&sp_csd=d2lkZ2V0TmFtZT1zcF9hdGY&psc=1
Am starting to get burned out with Mark's videos. You CAN see too many of these in a short time...
And, second, am wondering if this unit will do both jobs (assembly and removal):
https://www.amazon.com/BAKON-881-So...-1-spons&sp_csd=d2lkZ2V0TmFtZT1zcF9hdGY&psc=1
Am starting to get burned out with Mark's videos. You CAN see too many of these in a short time...
Hot air station is the way to do repairs on SMD for sure. It’s also good to have flux and solder wick for the task.
I also have one of those dual units and works great. Not the same one, but close enough. Mine had a little kit including some tweezers, a little wick, solder, and an assortment of tips for the air side and the classical solder side.
I also have one of those dual units and works great. Not the same one, but close enough. Mine had a little kit including some tweezers, a little wick, solder, and an assortment of tips for the air side and the classical solder side.
Hey everyone,
Once again, I’ll preface this by saying that my review might have some bias—not because I got the opamps for free, but because I’ve had great experiences with Burson gear in the past, and this time was no different. Thanks again, Carlos!
After spending some time with the Burson V7 Classic opamps in my Pearl III, I can say they offer a different experience compared to the V7 Vivids. Both are excellent, but which one works better depends on the setup and your personal preferences. For my Pearl III, the Classics were the better fit. That said, the Vivids are still fantastic in my Whammy headphone amp, where their energetic and detailed presentation really shines.
The Classics offer similar levels of clarity and detail as the Vivids but with a more cohesive presentation. Instruments feel like they blend together naturally, and vocals hold the center stage more firmly, resulting in a balanced and unified sound. Where the Vivids excel at pulling out individual details and separating layers, the Classics deliver a smoother, more integrated listening experience.
Here’s how the V7 Classics performed across the same tracks I used with the Vivids:
David Sylvian: "Mother and Child"
Talk Talk: "Happiness is Easy"
- With the V7 Classics, Sylvian’s voice is focused and expressive, while Sakamoto’s piano blends beautifully into the mix. The sequence at 0:55 and 2:18 is still rich with detail, but instead of standing out, it feels naturally integrated. Both opamps make this part essential to the piece, but with the Classics, it flows seamlessly within the music rather than becoming a distinct highlight.
Sun Kil Moon: "Glen Tipton"
- While the Vivids present this track with more precision, the Classics bring out the dynamic range without drawing too much attention to any single element. The acoustic guitar passage at 4:30 feels more connected to the rest of the song, creating a moment with deeper emotional resonance. The percussion and synths also feel less isolated, contributing to the overall balance and cohesion of the track.
This is the Kit: "Bullet Proof"
- There’s less distinction between the two opamps on this track—both keep the vocals and guitar closely connected, giving the song a natural, intimate flow. However, the Classics subtly allow Mark Kozelek’s voice to hold center stage more securely, enhancing the emotional impact without losing the warmth or subtle details.
Ali Farka Toure: "Dofana"
- Both the Vivids and Classics present the interplay of instruments and vocals as tight and well-integrated. However, the Classics offer a slightly more relaxed feel, with the bass still controlled but not as upfront as with the Vivids. The result is a groove that feels organic, with instruments working together harmoniously.
Smashing Pumpkins: "Hummer"
- The Classics handle Toure’s guitar with finesse, maintaining its richness while placing it more naturally within the mix. The instruments feel more connected, creating an organic soundscape where every element contributes to the whole, without any one part standing out too prominently.
Norah Jones: "Come Away With Me"
- This track presents an interesting comparison. The Vivids bring a sharper edge to the electric guitars, which may suit the song’s intensity. However, the Classics smooth out some of the edginess, resulting in a more refined presentation. The bass solos still come through nicely with the Classics, feeling more integrated into the track, while the Vivids provide more dynamic contrast. Both approaches work, but the Classics make the whole experience feel more cohesive.
- The Classics really shine here, with Norah’s voice taking center stage naturally. The piano and instruments support her seamlessly, creating a smooth, intimate listening experience. The richness and detail are all there, but the balance makes everything feel more fluid and engaging.
Both the V7 Classics and V7 Vivids have their strengths. The Vivids excel at drawing out layers of detail and presenting them with precision, which makes them ideal for my Whammy headphone amp. Their energy and separation give the music an engaging edge in that setup. On the other hand, the Classics prioritize cohesion, making them a perfect match for my Pearl III. Their ability to bring everything together naturally feels like the right choice for this system.
The recent upgrades to my Pearl III—including dual PSUs and LT4320 rectifiers—have likely enhanced my impressions of the Classics. The extra air and depth from the dual PSUs, combined with the dead-silent background provided by the LT4320 rectifiers, seem to allow the Classics to shine, reinforcing their ability to unify the soundscape.
This review isn’t meant to declare one opamp superior to the other—both the Vivids and Classics are excellent, each with their own strengths. It really comes down to what you’re looking for. The Vivids are the way to go if you want more precise detail and separation. The Classics might be a better fit if you need a more cohesive, natural presentation with centered vocals.
I’d love to hear from anyone else who has tried these opamps, especially if you’ve experimented with similar setups.
Cheers!
Hi PhopsonNY,
Thank you for sharing the photographs of the Burson V7 Classics opamps installation in the Pearl III Phono Preamp. We are pleased to be able to share this information with the DIY-Audio community.
Attachments


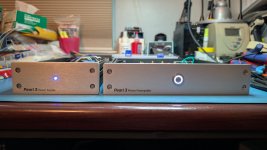
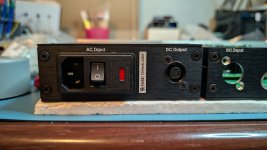
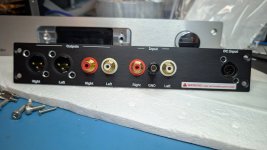
My boards were finished months ago, but I only just now finished the wiring and case work. I went with a Galaxy 230 x 230 for the amp and a Galaxy 124 x 230 for the power supply. Both have aluminum covers and even uncovered it's dead silent. I learned my lesson and went with all stainless steel hardware instead of alloy steel, now future me won't open this up, see rust, and get annoyed.
The panels are my own design and match my DAC, pre amp, and headphone amp. They use Inter v4 for the font and Heroicons for the icons because I had to bring some web design into my audio projects. Unfortunately there was a non-visual artifact in the files that only showed up once printed, but thankfully it's only on the rear panels. I need to try and fix that for future panels.
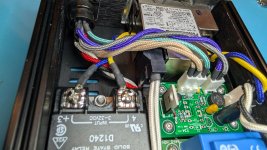
I used the same capacitive switch from Schurter in all my front panels. To power this I used an AMB Epsilon 24 and solid state relay. I planned on using a Crydom D1210 of IR vintage, but that leaked too much current while the modern D1240 I had on hand was just right. That doesn't match the specs of current production ones but I'm not sure what the specs of this one should be so that'll be used in another project.
The umbilical uses 8 pin Neutrik neutriCON connectors with 8x 18 awg wire from Honeywell. They're also interchangeable with my other equipment which should make moving things around a little easier.
The umbilical is sleeved with Multifilament Techflex, while the rest of the wiring is sleeved with paracord. This is where the majority of the build time went I think. All wire that doesn't see an audio signal is a mix of 18 and 22 awg, and Mogami W2944 was used for the input & output. The Molex connectors had to be filed down to fit the board but in the end I made it work. After doing all soldered connections in my B1K I really wanted this to be easily disassembled even if the rca jacks need to be desoldered some.
The rear panel was drilled wrong so I have to redo that when the new one gets here. The umbilical cable is currently not shielded but I have new wire to redo that. For now it's playing music and sounding wonderful.
The way everything is grounded right now is the power entry module is shielded and connected to the panel, the ground pin is connected to the power supply which is also connected to the bottom panel. The shell of the 8pin connector is metal and also connected to the panel. If I use shielded wire for the umbilical then both cases will be tied together through that. The ground post isn't isolated from the panel, so that will go back to the power supply as well. The build guide doesn't show that connection, but it seems like that's how it should work, correct?
Pictures from start to finish can be seen here https://photos.app.goo.gl/4x3iZhYUtPgkwygV7
The panels are my own design and match my DAC, pre amp, and headphone amp. They use Inter v4 for the font and Heroicons for the icons because I had to bring some web design into my audio projects. Unfortunately there was a non-visual artifact in the files that only showed up once printed, but thankfully it's only on the rear panels. I need to try and fix that for future panels.
I used the same capacitive switch from Schurter in all my front panels. To power this I used an AMB Epsilon 24 and solid state relay. I planned on using a Crydom D1210 of IR vintage, but that leaked too much current while the modern D1240 I had on hand was just right. That doesn't match the specs of current production ones but I'm not sure what the specs of this one should be so that'll be used in another project.
The umbilical uses 8 pin Neutrik neutriCON connectors with 8x 18 awg wire from Honeywell. They're also interchangeable with my other equipment which should make moving things around a little easier.
The umbilical is sleeved with Multifilament Techflex, while the rest of the wiring is sleeved with paracord. This is where the majority of the build time went I think. All wire that doesn't see an audio signal is a mix of 18 and 22 awg, and Mogami W2944 was used for the input & output. The Molex connectors had to be filed down to fit the board but in the end I made it work. After doing all soldered connections in my B1K I really wanted this to be easily disassembled even if the rca jacks need to be desoldered some.
The rear panel was drilled wrong so I have to redo that when the new one gets here. The umbilical cable is currently not shielded but I have new wire to redo that. For now it's playing music and sounding wonderful.
The way everything is grounded right now is the power entry module is shielded and connected to the panel, the ground pin is connected to the power supply which is also connected to the bottom panel. The shell of the 8pin connector is metal and also connected to the panel. If I use shielded wire for the umbilical then both cases will be tied together through that. The ground post isn't isolated from the panel, so that will go back to the power supply as well. The build guide doesn't show that connection, but it seems like that's how it should work, correct?
Pictures from start to finish can be seen here https://photos.app.goo.gl/4x3iZhYUtPgkwygV7
Attachments
-
 PXL_20241118_002031050.RAW-01.COVER.jpg235.6 KB · Views: 181
 -
 PXL_20241118_001213090.RAW-01.COVER.jpg590 KB · Views: 169
 -
 PXL_20241117_041916452.RAW-01.COVER.jpg255 KB · Views: 168
 -
 PXL_20241117_034018870.RAW-01.COVER.jpg420.6 KB · Views: 162
 -
 PXL_20241117_033947149.RAW-01.COVER.jpg462.6 KB · Views: 157
 -
 PXL_20241117_033921707.RAW-01.COVER.jpg466.7 KB · Views: 165
 -
 PXL_20241024_041542545.RAW-01.COVER.jpg300.1 KB · Views: 173
 -
 PXL_20241023_195044367.RAW-01.COVER.jpg258.7 KB · Views: 172
I got it from https://www.paracordplanet.com/ and used the 275 for the hookup wire and 550 for the Mogami. The 18awg had a thinner jacket than the 22awg so in the end they were about the same size. I tried the 650 coreless, which would have been easier to work with, but it had a different style braid and the color was also a little bit different from the other sizes so in end then I went with what matched.
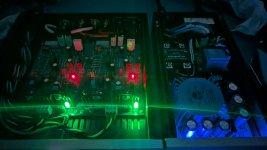
And another one saw the "light of day" during the night. As always...... awesome sound 👍 👍


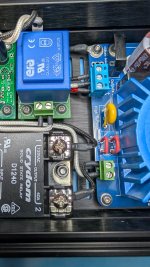
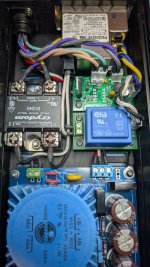
Found them on Ebay/China.That’s great! Love the PSU boards. 🙂
Cut the traces between every second row of lytic caps and mounted resistors across, so each board is CRCRCRCRC.
Gain is set to 64dB. No noise whatsoever. Am really pleased.

Boydk writes:
"Cut the traces between every second row of lytic caps and mounted resistors across, so each board is CRCRCRCRC.
Gain is set to 64dB. No noise whatsoever. Am really pleased."
CraigL59 responds:
My ignorance is greater than this explanation...
Is the DC especially ripple free? Or another benefit?
See them on EBay for not much. The lower board is the same? One for each channel?
Haven´t measured, since this didn´t qualify to search for errors. It is absolutely hum and noise free, so why bother??Is the DC especially ripple free? Or another benefit?
See them on EBay for not much. The lower board is the same? One for each channel?
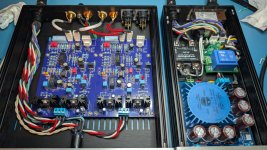
Chose the Kyocera lytics for their particular low ESR.
Yes... the lower board is the same. Nice boards for a close to give away price, and yes.... trafo has 4 individual secondaries, so dual mono
in one enclosure with 7 leads powercable to Pearl-3.
Last edited:
@Craigl59
Btw.... if you´re interrested.... check out the Dropbox link.
Cartridge is AT-33PTG/II, R9 reduced from 2.2K to 1K, so around 64dB of gain, tape out from Vincent SA-T7 pre and
recorded to 16/44.1
https://www.dropbox.com/scl/fi/7yg9...02uuife0ya9z793qaz4d2c5r&e=1&st=o0vhxyxd&dl=0
Btw.... if you´re interrested.... check out the Dropbox link.
Cartridge is AT-33PTG/II, R9 reduced from 2.2K to 1K, so around 64dB of gain, tape out from Vincent SA-T7 pre and
recorded to 16/44.1
https://www.dropbox.com/scl/fi/7yg9...02uuife0ya9z793qaz4d2c5r&e=1&st=o0vhxyxd&dl=0
Boydk: Well, it's ridiculously quiet for a TT feed. Could achieve this level for a vinyl source but would have to use my DAW, Samplitude, and drop out the base noise. If you're achieving this level of quiet with the chain you describe, would very much like to know your P3 part build list. When you converted to the *.wav file did you do any filtering??
But congrats on your incredible achievement regardless.
But congrats on your incredible achievement regardless.
@Craigl59
Nothing really special with a few exceptions.
Q1-4 are meticously matched 2SK209 to 6,0 mA.
R9 is reduced to 1K to lower gain to 64dB instead of 70dB
C3 and C4 are "these"
C1 is "This One"
Q6 and Q7 are MJE340/MJE350 instead of TTA(C004B.
R4, 5, 6, 7 & 8 are meticously matched Welwyn MFR-5
C6, C21 & C22 are "Frolyt" EKS series 220µF.
C7 is Rubycon ZF 470µF
C8 is a Sanyo Oscon SEPC 330µF/16V
C18 & 19 are Sanyo Oscon 15µf/25V
Opamp is LME49720 metal can (TO-99)
R27 tuned to 4,90 mA
Everything else is as recommended pr. parts list.
Last edited:
- Home
- Amplifiers
- Pass Labs
- Pearl 3 Burning Amp 2023