I have the other 5 boards done. Etched, silkscreened, tinned and ready for parts.

Looking like an amp factory. Wow is this repetitive. The tedious part is measuring each of the resistors. Some are good reliable Yageo but the others are the cheapies from Sure on Ebay.

Looking like an amp factory. Wow is this repetitive. The tedious part is measuring each of the resistors. Some are good reliable Yageo but the others are the cheapies from Sure on Ebay.
MJL21193 said:I don't know if it's my imagination, but I think this latest version has a difference in the midrange/treble. Seems more detail is coming through. Could this be attributed to the lower Miller cap value? This is the first listen with it at 47pF.
Thats a typical effect of marginal HF instability.
yes, peaking on fast transients is heard as extra treble/detail/spitting/ssssingG.Kleinschmidt said:
Thats a typical effect of marginal HF instability.
G.Kleinschmidt said:
Thats a typical effect of marginal HF instability.
And this would be due to the low value Miller cap, right? I'm still operating without a Zobel or output inductor - could this make a difference?
The thing is, I can't be absolutely certain that the extra (apparent) detail is there or not. Like I've said, the best of my hearing is behind me. Especially high frequency stuff.
Here's what I'm going to do: I'm going to build the other 5 with 100pF for Cdom and leave this one as is. I can then quickly switch between each to listen for a difference. When complete, I will be taking this out for some real instrument testing at Chris' (anatech). His ears are probably better than mine.
With everything else fit and figured on this amp, it's not a big deal to swap out the Miller cap on these, when I arrive at the best value.
As I've mentioned earlier, the intended purpose for this amp design was for use in a 6 channel amp to drive my active three-way speakers. To this end I have been assembling 6 amp modules and I have good progress there. It' tedious so I have switched my focus temporarily to the chassis.
Shown earlier were my homemade heatsinks. To these I added angles to mount the amp boards. The thermal contact between the angle and the rather uneven surface of the heatsink is less than ideal. To fix this, I did something I've been meaning to do for a while - get shielding gas (argon) to allow me to use my Lincoln MIG welder for aluminum. After about 10 minutes of heating the sink up with my propane torch, I was able to start. I think I'm in love! It was amazing how easy it was to run a continuous bead across the joint. So smooth and spatter free it didn't need any grinding.
Afterwards, I cleaned them up again and painted the inside surfaces black again (I sanded the paint off to weld). They look sharp:

I cut and bent a sheet of 18 gauge stainless steel for what is the bottom, back and the front behind the wood front. I was able to unbolt the threaded rod and feed it through holes drilled in the stainless - makes for a very solid case.
Shown earlier were my homemade heatsinks. To these I added angles to mount the amp boards. The thermal contact between the angle and the rather uneven surface of the heatsink is less than ideal. To fix this, I did something I've been meaning to do for a while - get shielding gas (argon) to allow me to use my Lincoln MIG welder for aluminum. After about 10 minutes of heating the sink up with my propane torch, I was able to start. I think I'm in love! It was amazing how easy it was to run a continuous bead across the joint. So smooth and spatter free it didn't need any grinding.
Afterwards, I cleaned them up again and painted the inside surfaces black again (I sanded the paint off to weld). They look sharp:
I cut and bent a sheet of 18 gauge stainless steel for what is the bottom, back and the front behind the wood front. I was able to unbolt the threaded rod and feed it through holes drilled in the stainless - makes for a very solid case.
Looks fantastic. Wish I could do that too 😀
ATM i'm contempating fashioning something new into the guts of an old Teac A919DC I picked up from freecycle. There's a lot of nice parts in there, but a lot of compromises, and IMO the output stage isnt big enough for the voltage used (one pair of 2SC2565/2SA1095 on 71VDC rails!!). At least it's good for a pair of heatsinks 🙂
ATM i'm contempating fashioning something new into the guts of an old Teac A919DC I picked up from freecycle. There's a lot of nice parts in there, but a lot of compromises, and IMO the output stage isnt big enough for the voltage used (one pair of 2SC2565/2SA1095 on 71VDC rails!!). At least it's good for a pair of heatsinks 🙂
MJL21193 said:makes for a very solid case.
Hi John, After one year, now we are getting somewhere!
Nico
jaycee said:one pair of 2SC2565/2SA1095 on 71VDC rails!!). At least it's good for a pair of heatsinks 🙂
Thanks jaycee,
Those are nice output though

Most of the stuff I find and scrap don't have such nice transistors. I have a few heatsinks but I can never seem to use them - they don't fit with my plans so I wind up buying or, like I did here, making my own.
The best chassis' are the ex-consumer audio amps or receivers. Just bolt on a new face plate over the old one and a new back plate to cover all of the old holes. I have gone down that road before:


That was an Akai receiver.
Nico Ras said:
Hi John, After one year, now we are getting somewhere!
Nico
Hi Nico,
It's always one step forward and a half step back with me. I can make steady progress once I have the prize clearly in my sight.
I will most likely have this finished in a week or so. I'm hung up a bit on the front though. I was inspired by the pic you showed me of your headphone amp, and I want to do this one in wood. Coming up with a suitable look, one that matches my vision for this amp, is proving elusive.I do know that I want to keep it clean and simple - no LED's. For the power switch, I'm trying something different - a touch switch. Just a small aluminum or stainless "button" or surface on the front panel.
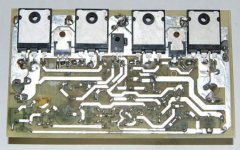
Hello, John. Could you share how did u make the boards ? They seem like factory-made, I can do the tracks that good as well with the laser toner transfer method, but how in the world did you do the perfect tin coating? 
p.s. Would you care to email me the final review of the borad and schematic files (pdf's or pcb program files), so that I can try the patchwork as well - I saw it a long time ago and wanted to check it out, but didn't like the board and I didn't made it - the "reloaded" board looks far more better, so I might hear it out. 😀
Niks
kalmara said:Could you share how did u make the boards ?
Hi,
Here's how I do it for single sided boards:
1 - Print the design and iron on. I have been leaving the iron on the paper for longer, just letting it sit there for 5 minutes at a time then move it around rubbing. I find this takes less effort and the pattern transfers are crisper.
2 - Etch with 2 parts peroxide, 1 part muriatic acid. When finished I rinse with warm water and use wet/dry fine sandpaper to remove most of the toner. I then clean the rest of the toner with lacquer thinner.
3 - Print and iron on the silkscreen. After the paper has been cleaned off I dry it thoroughly and spray a coat of lacquer to protect the silkscreen and to make it more visible. You could use clear urethane also, water based or solvent. I happen to have the lacquer and it dries very fast.
4 - Tinning. Go to the hardware store and visit the plumbing section. Buy a roll of lead-free plumbing solder and some plumbing paste flux. Also, a cheap 25 or 40 watt soldering iron. Coat the copper side of the board with the flux, using your finger to spread it thin. Take the tip off of the soldering iron (if it's small. If it has a big tip, keep it on there) and let it heat up. I have ground a flat part on the end on mine that I've tinned.
Melt the solder onto the iron and use that like a paint brush to tin the traces. Be careful not to heat up the traces too much or they might separate from the board. You can use your regular iron for the small traces. Continue until all of the board is tinned. Wipe the board off with a paper towel to get rid of the excess paste flux and clean with steel wool. It's ready for drilling.
5 - Drilling is done after the tinning, even if you have printed the trace pattern with the drill holes open, they will not cover with solder during the tinning as easily as if they were drilled. This is not obvious and I found it out through experimentation.
You end up with a nice looking board that is lead-free and will not oxidize like bare copper will. It has the added benefit of beefing up the trace thickness, for improved current flow.
Attachments
Spent most of the evening on this. My touch switch circuit is finished. I have included on the board a 15A inrush current limiter and fuse for the primary of the big toroid. Switching is done with two 12A/125VAC relays.
Works very well.

Works very well.
kalmara said:
p.s. Would you care to email me the final review of the borad and schematic files
Mail sent Niks. 😉
MJL21193 said:
Mail sent Niks. 😉
Yes, I saw it ... thank you for that .... 😀
Now all that is left is to dig up some good components (carbon 1% resistors, nice caps, and ORIGINAL power transistors) that will be well worth the expences, concidering the very well designed schematic.....aaaaaand give it a try! I am tired already from my MDA2020's. 😀
Thanks again and bye from me for now!

Hi John,
just something you could try in the future for tinning that also gives excellent results is to smear a thin layer of solder paste and stick the board in the oven for a short while. The result is very pleasing and absolutely flat surface.
Nico
just something you could try in the future for tinning that also gives excellent results is to smear a thin layer of solder paste and stick the board in the oven for a short while. The result is very pleasing and absolutely flat surface.
Nico
kalmara said:
Yes, I saw it ... thank you for that .... 😀
Now all that is left is to dig up some good components (carbon 1% resistors, nice caps, and ORIGINAL power transistors) that will be well worth the expences, concidering the very well designed schematic.....aaaaaand give it a try! I am tired already from my MDA2020's. 😀
Thanks again and bye from me for now!
Hi Niks,
I have switched drivers to the 2SA1837 / 2SC4793 which are as good or better than the 2SA1011/2243. They are the insulated package that I really like - saves a lot of time mounting. Now, if we had outputs with mica already attached I'd be in heaven. 🙂
Check back when you get yours done and report, good
or bad 
😎
Nico Ras said:Hi John,
just something you could try in the future for tinning that also gives excellent results is to smear a thin layer of solder paste and stick the board in the oven for a short while. The result is very pleasing and absolutely flat surface.
Hi Nico,
I did this the first time with a propane torch
 and the solder flowed out very flat. It's very convenient with the iron though and it takes a minute or so to do a really smooth job.
I thought about melting a pound or so in a small pot to dip the boards in but that's a bit of overkill.
I have three modules complete and tested, plus I have been getting more of the chassis done - added binding posts to the rear panel. I have the face plate roughed out to the basic shape I want, just need to figure where I will put the metal parts for the touch switch.
Progress report.
The remaining three modules are about 50% assembled. I have been working with the chassis to get it ready for the amps.
I added the 12 binding posts and the IEC connector to the back panel:

I want to get all of the power components installed before I decide where to put the RCA inputs. It looks like the best place will be directly above the binding posts, 3 on each side. They will be separated by the mounting angle on the heatsink.
A lesson learned: it's not easier or better to put the Zobel on the binding posts, especially if there are six. Here's a look at the Zobels in place. A tight spot - under the mounting angle.

I also did some work on the front. I added the metal strips for the touch switch (one for on, one for off). A picture of that next time.
The remaining three modules are about 50% assembled. I have been working with the chassis to get it ready for the amps.
I added the 12 binding posts and the IEC connector to the back panel:
I want to get all of the power components installed before I decide where to put the RCA inputs. It looks like the best place will be directly above the binding posts, 3 on each side. They will be separated by the mounting angle on the heatsink.
A lesson learned: it's not easier or better to put the Zobel on the binding posts, especially if there are six. Here's a look at the Zobels in place. A tight spot - under the mounting angle.
I also did some work on the front. I added the metal strips for the touch switch (one for on, one for off). A picture of that next time.
Getting closer.

All of the power components are installed, including the touch switch circuit. There is a tiny 12VAC transformer that will stay on all of the time to run the switch circuit.
I have all of the amp modules assembled and tested - ready to go in the chassis once all of this other stuff is finished. I need to make another power supply board and these will mount vertically in the space left in the middle. I haven't figured out what I'll do for the top yet
The wood face-plate is getting finished. The aluminum strips are embedded in the wood and are for the touch switch.
A little more progress.
Don't listen to anyone that says a project like this is a minor undertaking. It's a lot of work and takes many hours to get anything done. Figuring the best way to do things, second guessing yourself and designing on the fly with the chassis to get everything to fit. I'm enjoying every minute of it though. 🙂
I had to abandon the touch switch. It was causing some interference that I could not control. Not much loss, I think that I'll just have a main switch on the back panel to turn the unit off and on. This amp will be on most of the time anyway.
Three of the modules installed and working. The second power supply has been finished and that is installed along with the first.
- Status
- Not open for further replies.
- Home
- Amplifiers
- Solid State
- Patchwork Reloaded: Circuit Optimization and Board Layout.