Nothing to be sorry man!! Please!! All the luck with your accounting class!!
Also... Yes. I've followed de ASR Directiva thread, but as @HammerSandwich said, it won't meet my budget and it's an active design. Heissmann acoustics is another alternative (with DXT), but in the end... I think SB17+SB26+Augerpro, price/performance wise IT's the way to go... I calculate it should be around USD$300 per speaker (not accounting for the enclosure) which is spot on. If there is a cheaper woofer alternative with SB26+Augerpro I would also jump on it!
Also... Yes. I've followed de ASR Directiva thread, but as @HammerSandwich said, it won't meet my budget and it's an active design. Heissmann acoustics is another alternative (with DXT), but in the end... I think SB17+SB26+Augerpro, price/performance wise IT's the way to go... I calculate it should be around USD$300 per speaker (not accounting for the enclosure) which is spot on. If there is a cheaper woofer alternative with SB26+Augerpro I would also jump on it!

Thanks! And yes, all 3d printed. I have plans to print the cabinet as well, but making it from MDF would certainly be faster and cheaper. We'll see.Very nice!!! The whole baffle is 3d printed??
Looking forward to the updates!!!
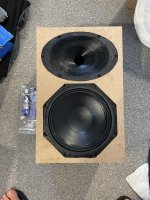
For me the price difference isn’t too much. The total cost for the DIY is around £600 per speaker compared to £490 per Genelec. Here is how the prototype waveguide looks and the woofer, I plan on building a test box soon. If I am happy with the performance I’ll either use a better printed waveguide, sand and try to make use of the current waveguide or get the front baffle CNC from MDF with the waveguide integrated.@monty6400
Very nice!! Surely you will get a TON more dynamic range and sound pressure compred to the Genelecs!
Price wise thou... at least for me... it's a lot compared to the Genelec's. Your design is around USD$800 aprox. per speaker (not counting on box of course)?
My room is small by the way... and by small, I mean small by europe's standards not US's standards, around 25 cubic meters (2,5mtW x 4D x 2,5H aprox.).
Strangely enough, my room is almost the same size. 5x2.5x2.3m! The Genelecs sound awesome but struggle even with a 4th 120hz HP for high level playback!
Attachments

Last edited:
Passive XOs have been posted, though you'd obviously have to rework them for different drivers.I've followed de ASR Directiva thread, but as @HammerSandwich said, it won't meet my budget and it's an active design.
There is a nice thread here with crossover examples and measurements, cost would be quite lowI want to upgrade my HT system and after that, hopefully NOT upgrade it in a long time... so my alternatives are 5x Genelec 8030c (around USD$500 each) or wait for good DIY design
https://www.audiosciencereview.com/forum/index.php?threads/revel-m105-copy-diy-build.29465/
Does anyone have any tips for using Revell Plasto for smoothing out my waveguide. How to apply, how much to apply, all over? And what sandpaper to use? Thanks guys!
Attachments
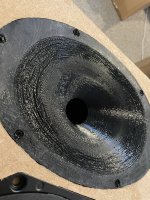
This was just a cheap test print from an online website, I was just wondering if there is anything I can do using the Revell to smooth it out a little!
It does look like they printed it with the mouth down on the bed which is why the inner contour is so lumpy. There is going to be a lot of work to sand and fill that out.
If you want to continue with what you have start with coarser grit like 80 or 120 grit to remove the material more quickly to get to the point you want add some filler, then fill sand, rinse repeat until the surface is getting smoother progressively working through the grits. Stop when you have had enough or the surface is smooth enough for you.
If you have or got some scrapers the process would go quicker
Thanks for this, I’ve sanded a little and added some revel plasto and will sand again tomorrow using fine grit, this is only a prototype so not too concerned atm! What grit would you recommend for a fine finish?
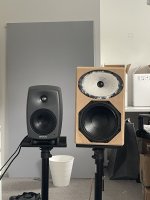
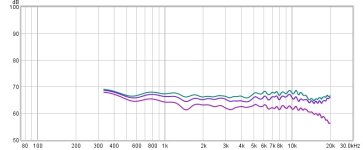
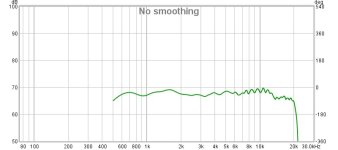
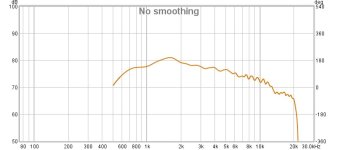
Prototype box completed and some very rough REW EQ and time alignment. Measurements performed inside. Unfortunately this meant a 2.8ms gate on the measurments due to reflections, I plan on taking this outside and using VituixCad when the weather permits. Looking promising so far though. Did some mono-listening with a Genelec 8030c side by side, both high passed at 120hz. They sound more similar than different, although so far I would say I can here some resonance from the DIY box in the 400hz ish region. Will do proper distortion measurements when outside. (Far = farfield near=near field for the picture labels).
Attachments
Don't write off those Peerless woofers because they are cheap.with a cheap peerless woofer
There are quite some extremely well known and respected brands out there that basically use exactly those woofers, or a derivative from it. (even shown in this topic in a nice grey finished box)
Maybe an idea to use a battery backup system or a UPS for those 3d printers 😉
I know I need to get another UPS! I already have one for my PC / headphone setup and one for my theater room, and they are absolute life savers.
I do sanding and the use spray filler, 2-3x. This fills pretty good and you are free with the next layers of colour.Does anyone have any tips for using Revell Plasto for smoothing out my waveguide. How to apply, how much to apply, all over? And what sandpaper to use? Thanks guys!
With some fine tuning of my print configuration I get way nicer surfaces now. Only needs a few minutes sanding (but starting rough, 60-80. Not to much pressure. 120 as last step is enough for the spray filler)
You probably already know this, so apologies for telling you how to suck eggs - Those wiggles between 6-20k are possibly just your mic/boom setup so no need to try and correct those.Prototype box completed and some very rough REW EQ and time alignment. Measurements performed inside. Unfortunately this meant a 2.8ms gate on the measurments due to reflections, I plan on taking this outside and using VituixCad when the weather permits. Looking promising so far though. Did some mono-listening with a Genelec 8030c side by side, both high passed at 120hz. They sound more similar than different, although so far I would say I can here some resonance from the DIY box in the 400hz ish region. Will do proper distortion measurements when outside. (Far = farfield near=near field for the picture labels).
- Home
- Loudspeakers
- Multi-Way
- Open source Waveguides for CNC & 3D printing!