Good morning!
No hurry!
https://www.hwk-muenchen.de/api/pub...alse;f=0.0,0.0/f/c;t=JPEG/JW8IsNgoj0BqqzM.jpg
Here my workshop for leg-adaptions 🙂
Size is good, I‘m not sure if I should go with smallest R of thermistor (there’s between 2R5 and 20R)?
No hurry!
https://www.hwk-muenchen.de/api/pub...alse;f=0.0,0.0/f/c;t=JPEG/JW8IsNgoj0BqqzM.jpg
Here my workshop for leg-adaptions 🙂
Size is good, I‘m not sure if I should go with smallest R of thermistor (there’s between 2R5 and 20R)?
Last edited:
it seems that one of these divine tools ( pic) got few times in wrong direction 
should I write few times more :


should I write few times more :
value of NTC 10R to 15R, no less

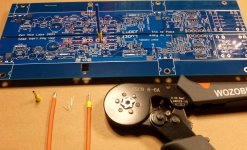
Ferrules (metal sleeve) can be used as well. Terminal with 2 mm diameter fits the PCB and can accept 2 mm2 (AWG14 wire). For 2.5 mm2 wire, I hat to cut 8 strands so the wire could fit to sleeve.
Anyway, this was just for test. I have ordered AWG14 silicon wires that have 400 strands and are, IMO, very good for power supply and speaker connections. They are sold as specialized RC car battery wires.
Anyway, this was just for test. I have ordered AWG14 silicon wires that have 400 strands and are, IMO, very good for power supply and speaker connections. They are sold as specialized RC car battery wires.
Attachments
Yes but…...
(In other words—I‘m freaking around just because… making fewer errors when I make it complicated I guess)
looking good!
Thank you, mighty!
Have to say that… I 100% forgot about those connectors [emoji849] and haven’t got a usable crimping plyer…
But I enjoyed fiddling with the wires [emoji3166][emoji361]
Have to say that… I 100% forgot about those connectors [emoji849] and haven’t got a usable crimping plyer…
But I enjoyed fiddling with the wires [emoji3166][emoji361]
Last edited:
I'm not using crimping tool with these - as I said - remove plastic (heat gun, lighter, candle), just gentle crimp (regular small pliers good enough, half then other half), then solder..........heatshrink with preferred color, solder on pcb
I'm not using crimping tool with these - as I said - remove plastic (heat gun, lighter, candle), just gentle crimp (regular small pliers good enough, half then other half), then solder..........heatshrink with preferred color, solder on pcb
Ahaa! This changes everything xept my tea-strainer-style brain of sorts. Hahaha!
Ferrules (metal sleeve) can be used as well. Terminal with 2 mm diameter fits the PCB and can accept 2 mm2 (AWG14 wire). For 2.5 mm2 wire, I hat to cut 8 strands so the wire could fit to sleeve.
Anyway, this was just for test. I have ordered AWG14 silicon wires that have 400 strands and are, IMO, very good for power supply and speaker connections. They are sold as specialized RC car battery wires.
I just arrived at home, where I have better access to the forum...
Tombo, this is a great documentation of what you're suggesting (even the 8 strands are there 🙂 )
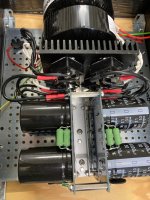
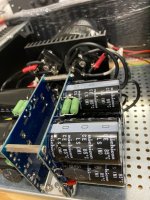
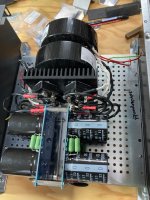
I'm using AWG13 _AFAIK_, good to work with although a little bit ... fat. On the cap bank-side, I went with blade-connections (didn't dare to solder both sides because... I'll quite probably disassemble it again during the build), and already went the "pry-open-and-solder-route", quite the way GMZM put it...
Since I have a very rude 😉 workshop with almost no metalworking tools/machines at hand, I am improvising a lot. But it's really cool to see it coming to shape, and it has basically become a build-process (and not an experimental beast).
IF only I had a CNC/engraver, sigh! Or more time and material to experiment with! sssiighh!
I started collecting parts for my own CNC milling station, intended work area of 600x600mm - have all custom elements made, what's left is to obtain pre-fabricated parts in adequate dimensions
then I found my self in series of amps ...... remembering CNC only when I read it somewhere mentioned ....
then I found my self in series of amps ...... remembering CNC only when I read it somewhere mentioned ....
Yes, we are always several thousand $ short for the ‘necessary’ DIY equipment. 😀
FastOn blade connectors are very good and convenient and I like to use them where I can.
I will also examine this solder cups intended for connecting wires to the PCB:
H9026-01 Harwin | Mouser Europe
Seems like better connection quality option.
FastOn blade connectors are very good and convenient and I like to use them where I can.
I will also examine this solder cups intended for connecting wires to the PCB:
H9026-01 Harwin | Mouser Europe
Seems like better connection quality option.
naah
too complicated
with needle end connectors, they're firmly connected to wire
I have them now on my T-Bed, multiple soldering desoldering, and everything stays good for many cycles more
that speaking about flexibility of use - though - I'm changing pcbs on my T-Beds, while PSU with wiring stays for torture
Oh, these look good! [emoji1303]
I once used 2mm bananas, for some thoughts on modularity… needs „adjustment“, but otherwise I quite liked it. Hm.
With old soul, in the moment, I‘m fine again with soldering onto the board.

I once used 2mm bananas, for some thoughts on modularity… needs „adjustment“, but otherwise I quite liked it. Hm.
With old soul, in the moment, I‘m fine again with soldering onto the board.

while PSU with wiring stays for torture
PSU being torturer or tortured? 😀
both
🙂
how you can call what's happening with puny 500VA Donut, while feeding two channels of Babelfish XA252, while rails load being highly asymmetrical, which is the case with SIT and SET iterations ....
🙂
how you can call what's happening with puny 500VA Donut, while feeding two channels of Babelfish XA252, while rails load being highly asymmetrical, which is the case with SIT and SET iterations ....
Last edited:
Reasoning connection details
Oh gm ZM
Today, I spent a lot of time with the front-plate (DONE! 😀) and staring at what goes where.
I luckily spotted a glitch (connected the 2nd fuse to the neutral), corrected it and was about to continue. But something itches me: Did you put the thermistors deliberately "after" the trannies, on the returns? My gut-logics keeps telling me to better install them right before them...
Haven't done it yet...
- Home
- Amplifiers
- Pass Labs
- Old Soul


