Edited first post to contain few general setting procedure tips and tricks
ZM is doc Emmett Brown 😀 while we are still in August he is already in September


No no, I was referring to Papa giving advice what iron (edcor, cinemag or thing) to use.
My Old soul will be built as mighty ZM conceived it [emoji1317]
My Old soul will be built as mighty ZM conceived it [emoji1317]
Good evening ZM
Tranny here, chassis here, caps still missing. So I'm slowly crawling back into bugging-mode 😀 but don't even remember if already asked:
Input impedance is R102 = 100k?
sorrythankyou!
d.)
Tranny here, chassis here, caps still missing. So I'm slowly crawling back into bugging-mode 😀 but don't even remember if already asked:
Input impedance is R102 = 100k?
sorrythankyou!
d.)
Last edited:
Playing around with the layout.
I got a mini dissipante 3U 300, so space is a bit of a concern for my next washing machine :devil:
Went to confirm how you did it on Tbed, and realized
A) your heatsink is >300mm! (Note to self: be creative, kid)
B) you placed the germanium far away of the board‘s spot, so I guess this isn‘t going to be an issue?
aha!
Beauty of modern mini washing machines !!

yeah, no problem with remote placing of Ge
- you forgot "y" or "r" in your ":devil:"
Beauty of modern mini washing machines !!
yeah, no problem with remote placing of Ge
- you forgot "y" or "r" in your ":devil:"

HA! ?
Oh mighty ZM
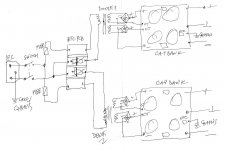
I'm not sure about the configuration of the HA:
It is one tranny, 2 diodes, 1 board per side, pos / gnd / neg into 1 channel, and thus a true dual mono?
a scm would be cool...
so as to not to invoke the boiling program (of my washing machine 😀)
😀)

(I'll stop poking the washing machine-joke right now)
Oh mighty ZM
I'm not sure about the configuration of the HA:
It is one tranny, 2 diodes, 1 board per side, pos / gnd / neg into 1 channel, and thus a true dual mono?
a scm would be cool...
so as to not to invoke the boiling program (of my washing machine
😀)(I'll stop poking the washing machine-joke right now)
That sounds like true mono to me, assuming also that each PSU has NTC between its ground and the chassis.
Oh mighty ZM
I'm not sure about the configuration of the HA:
It is one tranny, 2 diodes, 1 board per side, pos / gnd / neg into 1 channel, and thus a true dual mono?
a scm would be cool...
so as to not to invoke the boiling program (of my washing machine
(I'll stop poking the washing machine-joke right now)
several possible ways , but lets just write about proper dual mono:
in fact, lazy, easier to sketch and scan
Attachments
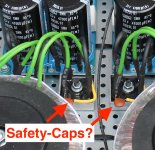
While looking for pics of a built HA!, I found one in your SissySIT, very helpful.
the capacitors on the diodes... safety caps I presume, just like in 6L6's build, correct?
that left picture is of one build where I put RC snubber on secondaries
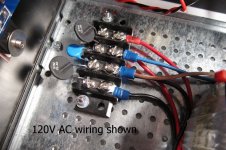
bridge rectifiers
Howdy fellows!
How warm are the bridge rects expected to get? ~50°C, so that the modushop steel-baseplate is sufficient? some moderate heat-sinking if mounted vertically (between tranny and cap-bank)?
Do they spread noise (for orientation-options)?
Howdy fellows!
How warm are the bridge rects expected to get? ~50°C, so that the modushop steel-baseplate is sufficient? some moderate heat-sinking if mounted vertically (between tranny and cap-bank)?
Do they spread noise (for orientation-options)?
some thermal goop between them and base plate, proper M4 screws (split washer!) and that's it - you can keep fingers on them indefinitely
see pics of my builds
even if base plate is steel, transfer is more than good enough for amount of heat, while sheer size of baseplate is taking care that temp. of bridges isn't significantly bigger than surround
see pics of my builds
even if base plate is steel, transfer is more than good enough for amount of heat, while sheer size of baseplate is taking care that temp. of bridges isn't significantly bigger than surround
Last edited:
Part & connection questions
Mighty morning and everyone,
re: the HA!-ground-connection, we're told "10mm NTC connecting Audio GND to chassis", ok. I want to support my Swiss supplier to keep it alive, but its difficult to translate english electronic-denominations into Swiss-german.
Anyway, should I go for a NTC with its R as low as available? (like, 2R5 ?)
And, thermo-coupling the germanium-bigun has to be non-conductive (so just goop won't do it), right?
and,and,and ? 😀
(I'm at my 4th cup of coffee, so possibly having a head start. Try to compensate by meditating over wether I should complicate the layout and mount the PSU vertically)
Mighty morning and everyone,
re: the HA!-ground-connection, we're told "10mm NTC connecting Audio GND to chassis", ok. I want to support my Swiss supplier to keep it alive
, but its difficult to translate english electronic-denominations into Swiss-german.Anyway, should I go for a NTC with its R as low as available? (like, 2R5 ?)
And, thermo-coupling the germanium-bigun has to be non-conductive (so just goop won't do it), right?
and,and,and ? 😀
(I'm at my 4th cup of coffee, so possibly having a head start. Try to compensate by meditating over wether I should complicate the layout and mount the PSU vertically)
NTC need to be up to 10mm in Diameter
you can squeeze bigger one, but bigger ones are having thicker pins, so you'll need to fire up lathe, mill and neighbor's excavator, to decrease pin thickness
value of NTC 10R to 15R, no less
Ge Bigun must have mica and goop, probably easiest to obtain and arrange
or Keratherm 86/82 sheet from Conrad.de, then cut and punch
btw. I'm punching even mica regularly, but no hand tool good for that - I'm using screw and nut of appropriate size
screw is puncher, nut is, well , rest
put mica on nut, lean/put screw on, smack with small hammer
dunno proper words for screw punch/nut as former ......... I'm sure it is not translatable form Serbian (I believe origin is German)
first morning coffee just brewing, so cope with me
- Home
- Amplifiers
- Pass Labs
- Old Soul