tinitus said:If its plaster(gips) I would consider lacquer first, or the wax may just be soaked up and not working properly
It´s polyester filler, and I have painted it with primer and black spraypaint.
Today I went down to the local boat building shop and he lend me some Norpol Wax W-70 and some Norslipp 9860 PVA release agent.
I have been thinking of the elliptical mold and have some ideas, but that will be the next project.
gedlee said:Looks good - that is the way its done. Thats a big waveguide.
Maybe you can make molds for me! Or waveguides?
I'd like to see that!
I've been showing people how to make waveguides for half a decade now. And it wasn't because I like building waveguides, it was because you CAN'T BUY THEM! It's amazing that a good waveguide is so hard to come by, at ANY price.
Here's my method, if anyone cares:
http://www.htguide.com/forum/showthread.php4?t=22137
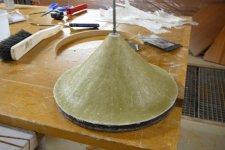
Kim Schultz said:Here is pic. of the progress I made yesterday.
I started by making a printout using a corrected John K WG OS 2 spreadsheet.
When opened in Openoffice it´s pretty easy to scale it to exact dimensions and when printing on my Canon printer it´s dead on.
Then I cut a large mdf disc the same size as the wg mouth, and some smaller ones ending up with the throat piece.
I then made a template after the printout and started plastering with polyester filler.
Today I´ll get some filler that hasn´t fibers in it, that is better for a smooth finish.
Kim, that is BRILLIANT.
I can't even tell you how excited I am, seriously.
So basically you print the curve on your printer, transfer the curve to a piece of wood, and then rotate the mold around it's axis, adding filler to the mold until it matches the curve?
BRILLIANT!

Patrick (John)
I do sell waveguides.
And, the spining part cut to a computer printed template is what I have used for years to make my molds. I cut down, instead of build up. Either way works.
Word of warning - be careful, not all printers are dimensionally accurate when printed. You have to check and then you can recalibrate the drawing to compensate for the printer.
Patrick Bateman said:So basically you print the curve on your printer, transfer the curve to a piece of wood, and then rotate the mold around it's axis, adding filler to the mold until it matches the curve?
Yep, I have done a pair of 170hz tractrix horns for Lowthers and a pair of 400hz horns for 4" drivers this way. Works great.
gedlee said:Word of warning - be careful, not all printers are dimensionally accurate when printed. You have to check and then you can recalibrate the drawing to compensate for the printer.
Yes, this is very important, but quite easy to do.
I have modified the graph in the spreadsheet to only show the width dimension lines. This way I can measure the width lines and the wg depth to see if the printout match the screen.
I made some progress today.
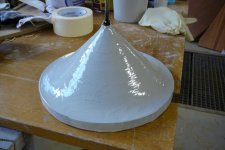
After applying 5-6 coats of wax and polishing in between I put on the coat of PVA. Then back to the boat building shop and buy some grey gelcoat.
I have never used gelcoat before but have high hopes for it.
Here are a picture of the mold with gelcoat.
Attachments
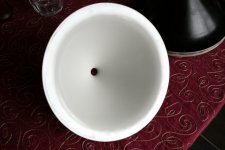
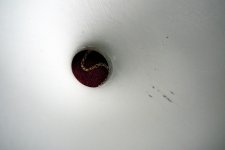
I hope it comes off!! In my waveguide the inital angle is very small, about 6 degree, which is not much draft. The part loves to grab on to this point and hold very well making the parts often very difficult to remove. For some reason it looks like your draft angle at this point is much larger than mine.
By the way, whats the PVA for? Usually the gel coat goes right on to the waxed part. Am I corect that PVA is Poly Vinyl Acetate?
By the way, whats the PVA for? Usually the gel coat goes right on to the waxed part. Am I corect that PVA is Poly Vinyl Acetate?
OK, educate me, what is this PVA? Does it become solid and part of the part? Or is it just a mold release? If its a mold release then won't that leave a rough funish on the part? (It looks very rough). The pro glassers that I know gel coat right onto a waxed form and then pull that part which leaves a mirror finish.
gedlee said:I hope it comes off!! In my waveguide the inital angle is very small, about 6 degree, which is not much draft. The part loves to grab on to this point and hold very well making the parts often very difficult to remove. For some reason it looks like your draft angle at this point is much larger than mine.
The initial throat angle is 0 degress, it´s just the layers of fibreglass building up, and the small throat diameter that makes it look like that.
gedlee said:OK, educate me, what is this PVA? Does it become solid and part of the part? Or is it just a mold release? If its a mold release then won't that leave a rough funish on the part? (It looks very rough). The pro glassers that I know gel coat right onto a waxed form and then pull that part which leaves a mirror finish.
This PVA is polyvinyl alcohol, it´s a mold release and it´s the first time I have ever used it. It leaves a very thin film on mold.
Directions on the wax says to use the PVA the first 4-5 times on a new mold, after that it´s enough to use wax. But the guy in the boat shop said to use it always.
The rough grey surface you see is the gelcoat.
It was very easy to remove, all it took was a piece of sharpened wood to loosen the edge all around, and then just tapping the wood stick in between to mold and edge until it popped off.
The downside to the PVA is that you will get a lot a small scratches (brush marks) in the final product. But that´s not a problem for me, and if I make e new casted mold it should be easier to use just the wax.
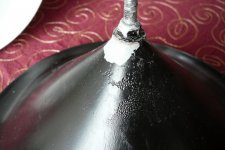
I did however screw up a bit, when I trusted the normal spraypaint to hold up to the heat generated by the curing fibreglass, this resulted in some paint peeling off at the throat.
So I need to get all the paint off the mold and brush on a coat of polyester, or cast a new mold from the wg I now got.
Here the paint fault is easy to see. Notice the small dips in the paint also.
This is not in transferred to the wg.
Seeing the scratches on the mold, I don´t think all the scratches in the wg are due to the PVA. most of them are probably due to the paint lifting.
This is not in transferred to the wg.
Seeing the scratches on the mold, I don´t think all the scratches in the wg are due to the PVA. most of them are probably due to the paint lifting.
Attachments
Nice job! I've been following this and related threads ... I've always wanted to move towards horns, and this seems like a good solution for the MF/HF range.
I was slightly into boat building in the early 70s...
IIRC, - gelcoat was used as the first layer in the molds. should hold better than spray laquer....??
Comressed air was also used to loosen the joint.
I was slightly into boat building in the early 70s...
IIRC, - gelcoat was used as the first layer in the molds. should hold better than spray laquer....??
Comressed air was also used to loosen the joint.
AuroraB said:I was slightly into boat building in the early 70s...
IIRC, - gelcoat was used as the first layer in the molds. should hold better than spray laquer....??
Comressed air was also used to loosen the joint.
Yep, you can use the gelcoat on the mold also, but that is usually done when you make a mold out of something else. Like if I make a new mold inside the wg. Then I can put gelcoat as the first layer and then fibreglass layers.
I don´t have any compressed air yet, but might buy a small compressor as I seem to need it more and more.
Kim Schultz said:Here is pic. of the progress I made yesterday.
I started by making a printout using a corrected John K WG OS 2 spreadsheet.
When opened in Openoffice it´s pretty easy to scale it to exact dimensions and when printing on my Canon printer it´s dead on.
Then I cut a large mdf disc the same size as the wg mouth, and some smaller ones ending up with the throat piece.
I then made a template after the printout and started plastering with polyester filler.
Today I´ll get some filler that hasn´t fibers in it, that is better for a smooth finish.
That's how I made my plug. Just curious, did you use filler for the entire section between the two discs? I used a wood core and built-up filler around that. Would have used a lot of filler otherwise. Looks really good, nice job.
dfdg said:That's how I made my plug. Just curious, did you use filler for the entire section between the two discs? I used a wood core and built-up filler around that. Would have used a lot of filler otherwise. Looks really good, nice job.
That´s how I made it too, 5 discs in total. Then grinded it down to a rough shape and used filler for the rest.
When I made the huge 140hz tractrix horn, I used wood to get the right height, then foam, clay and last filler.
try it!AuroraB said:I wonder if a wg is feasible for, say a Fostex 108 or 125 x-ed at 300Hz +/-....
Any opinions?
it's amazing in the range it works in.
the problem is what to do above and especially below...
- Home
- Loudspeakers
- Multi-Way
- Oblate Spheroid Waveguide - Consolidated Construction Thread