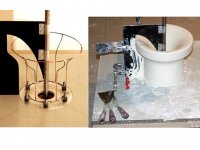
Crazy horn construction idea seen on the internet #2. Slow set plaster spun on wheel using 2D template. Plaster supposenly takes up to 1 month to completely dry.
http://s172.photobucket.com/albums/w3/jessie-dazzle/400Hz Tractrix Horn/
http://s172.photobucket.com/albums/w3/jessie-dazzle/400Hz Tractrix Horn/
Attachments
gedlee said:John
I have had a lot of trouble with molds like that. Mine never lasted more than a couple of pulls. I've had them fail first time. How did you get 20-30 from something with Bondo at the surface? And what did you do with 20-30 waveguides?
I've built 20-30 horns and waveguides. I've only used molds for the past few years. Until five years ago I'd build horns out of paper, using the same method described on htguide to build molds. Basically make the horn out of paper, then glass it. The inside of the horn is smooth (because it's paper), which is where it counts. The outside of the horn is a mess, because it's fiberglass.
When I say "paper", I mean cardboard comic book backing boards, which are a smooth sturdy paper stock, a bit heavier than the cardboard you would find in a cereal box. It's flimsy enough to cut with scissors, but strong enough not to collapse.
The way that I keep my molds from getting trashed is that I cover the mold in tin foil, then pull the tin foil away from the mold. The tin foil then becomes part of the waveguide.
Of course you have to use a lot of bondo on the waveguide then, because foil is too rough.
This method is good if you're making two waveguides, but too labor intensive for anything more, since you spend a lot of time applying bondo and sanding.
I missed the tin-foil trick. I have found that the heat from the curing resin trashes the bondo very quickly.
I've use the glassed-cardboard myself - almost 30 years ago! My first loudspeaker enclosure for a car was done that way. Cobble up a box that fits and glass it. As a newby at Ford my boss was quite impressed with my resourcefulness.
I've use the glassed-cardboard myself - almost 30 years ago! My first loudspeaker enclosure for a car was done that way. Cobble up a box that fits and glass it. As a newby at Ford my boss was quite impressed with my resourcefulness.
If I trashed a mold, I'd kill myself. I don't think these people understand how much work it is to make a mold. I spent about 40 hours making a mold that's one-eighth the size of the summa waveguide. I literally WON'T allow my molds to get trashed.
So tinfoil isn't easy to work with, but it keeps the mold from getting ruined, for sure. Of course you then have to waste HOURS applying bondo to the waveguide.
Just not acceptable unless you're doing one or two.
So tinfoil isn't easy to work with, but it keeps the mold from getting ruined, for sure. Of course you then have to waste HOURS applying bondo to the waveguide.
Just not acceptable unless you're doing one or two.
John
I trashed THREE molds while making the Nathans!! Ouch!! Thats why I gave up and had one made in alluminum. I was killing myself making new molds.
I trashed THREE molds while making the Nathans!! Ouch!! Thats why I gave up and had one made in alluminum. I was killing myself making new molds.
When I made a mold for some car horns, I made them in 3 steps...first I made a form to cast the mold out of wood, 2 part foam, and body filler. Any curves were done with the foam because it sanded easy and was easy to fix. Then I smoothed and sealed the foam with Rage Gold Extreme body filler. After that, I sanded it to 400 grit and painted them.
To make the plug, I took the 2 half forms and waxed them 3 or 4 times with mold release wax and finally sprayed a coat of PVA on them. I sealed the halves with clay to prevent any leaks.
Then I poured casting resin into the form (I used Easy Flo 60 from US Composites). And let it cure. I did fill up some of the space with scrap wood to use less resin in the casting. Once cured, I pulled apart the halves and have a pretty nice plug mold. The Easy Flo 60 can be easily sanded really easily. Any imperfections in the plug were either sanded out or smoothed with clay or body filler.
Then to make the part, I polished the plug, waxed it 6 times with mold wax and sprayed it with PVA. Then I brushed on a couple heavy coats of gel coat, let it tack, and laid my glass and core mat on top of that. After curing, I let it set in the mold for a day before I popped it out.
damn car audio guys invading the board LOL
you guys are so much better with fiberglass
(just kidding - this is great info!)
you guys are so much better with fiberglass
(just kidding - this is great info!)
That was the first mold that I had made...got a few pointers from a couple of people more experienced than me (JL Audio has some very nice tutorials on mold making on their website).
If I had it to do over again, I would have some how incorporated a place for an air nossel to fit. I don't know how many of you guys have tried to pull parts from a mold without it, but it can be challenging to say the least. With the air, the piece literally pops out on it's own.
I think making a casting mold like Dr. Geddes is using for his waveguides is far beyond my ability...but pulling parts from a plug mold wouldn't be tooo hard to do. His waveguides would definitly look better from the backside.
Wow this is a great threat. Am I came too late? I hope this treat is not die yet.
I have been reading the OS waveguide for a while and really want to try it. I would like to ask your guys on the idea of making the throat of the waveguide to attached to the compression driver.
Looking at what Earl did, he use a sheet of plexiglass between waveguide and driver and make a hole as part of the waveguide contour. Do I really need to do this. Can I just make a sheet of wood and attached to the throat of waveguide. Might need to make it adjustable to allow alignment
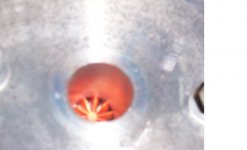
Altec 902-8B physical properties
Although I lack precision instruments, I took a look at the Altec 902-8B.
The 'exit angle' is 6 degrees measured with a protractor.
The final exit diameter is .88 inches (probably called 3/4") measured with calipers. This is with paper and screen removed.
It seems that with this driver, the only way to truly match this exit to a throat is to remove the paper and screen, as the actual exit point is inaccurately depicted by all that mumbo jumbo.....
edit:
Me too🙂
Although I lack precision instruments, I took a look at the Altec 902-8B.
The 'exit angle' is 6 degrees measured with a protractor.
The final exit diameter is .88 inches (probably called 3/4") measured with calipers. This is with paper and screen removed.
It seems that with this driver, the only way to truly match this exit to a throat is to remove the paper and screen, as the actual exit point is inaccurately depicted by all that mumbo jumbo.....
edit:
I hope this treat is not die yet.
Me too🙂
Re: .... also
Blow air through it. Closed cell foam would be air tight.
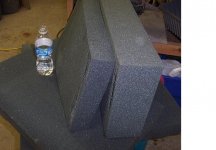
mpmarino said:Is there a way that I can test if a piece of foam that I have is open cell??
Blow air through it. Closed cell foam would be air tight.
Re: Re: .... also
Thanks - tis what I thought!
on the thinner pieces I can feel a breeze thru it using compressed air. On the thicker stuff, it takes the air in and feels cooler all over....
dunk it in the pool and it comes out 100X heavier...
😉
Thanks - tis what I thought!
MartinQ said:
Blow air through it. Closed cell foam would be air tight.
on the thinner pieces I can feel a breeze thru it using compressed air. On the thicker stuff, it takes the air in and feels cooler all over....
inertial said:Hi
Water. If it is open cell it absorb water like a sponge 🙂
cheers,
Paolo
dunk it in the pool and it comes out 100X heavier...
😉
Attachments
Re: Re: .... also
If you're making a plug for a waveguide, you need to use open cell reticulated foam. Plain ol' open cell foam won't work properly. I've posted the URL where you can buy it half a dozen times.
MartinQ said:
Blow air through it. Closed cell foam would be air tight.
If you're making a plug for a waveguide, you need to use open cell reticulated foam. Plain ol' open cell foam won't work properly. I've posted the URL where you can buy it half a dozen times.
By definition, wouldn't foam that let's air pass through be reticulated? Otherwise, if there were no network or path between the cells - air wouldn't pass ?
All the reticulated foam which I've seen use a chemical process to dissolve a significant percentage of the foam.
Actually what is done is that the chemical formulation leaves an explosive gas in each cell. They then ignite one end of the "bun" and the flame burns through to the other end with about 80% of the cells walls blown out.
Just read the last few posts. Reticulated foam does not hold water - it runs right through - that's why it's used for outdoor furniture upholstery and filters.
That picture posted a few entries above has foam with too many 'shiners' and those are cell walls which have not been blown out. All that's left in reticulated foam is the edges of the cells.
That foam above looks like the sort of stuff used for camera cases and it would probably be great to put on the sharp edges of enclosures to kill diffraction effects.
- Home
- Loudspeakers
- Multi-Way
- Oblate Spheroid Waveguide - Consolidated Construction Thread