Love your work Mr D 😎 .
Finding the right fasteners can be a pain .I like what's offered for tricking out motor bikes .
Titanium, Stainless Steel, Aluminium Fasteners & Motorcycle Bolts | ProBolt
Cheers
Mal
WOW, all the searching I did & never once found them in a search. Thanks for the link.
Some of their range comes out from the UK .I used the SS tappered socket cap on the top plates of my amps .
How did you go with the paint selection .
Cheers
How did you go with the paint selection .
Cheers
Some of their range comes out from the UK .I used the SS tappered socket cap on the top plates of my amps .
How did you go with the paint selection .
Cheers
I'm still pondering the paint, I have a bit of time before it's needed.
I had Mister Plywood cut up the sheet to make the bass boxes from, which required 45 degree cuts on the corners for joining & they cut them out of square! so I took them back, they tried again, & in the end gave up as they couldn't 45's square with there mega saw!!!.
I imagine it will be some months before they are finished, they look simple enough but based on personnel experience they will take at least twice as long as I think 🙂
I'm also playing with my BIII/Arduino audio remote control Preamp which is lots of fun and surprise, surprise, time consuming 🙂
I'm about to start a thread re same but have run out of energy for today, cleaning the house in exhausting.
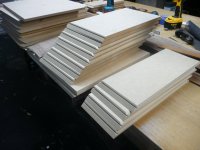
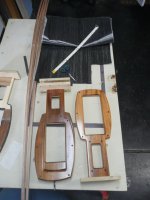
I spent the better part of Saturday sanding the burn marks out caused by the router bit. I'm glad I used a sharp bit otherwise I would have spent the better part of the weekend doing it. I have applied a couple of coats of lacquer to protect the pieces while the carbon fibre etc is applied.
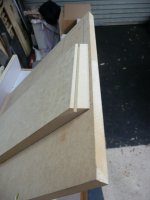
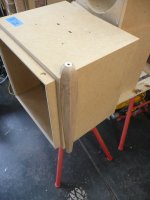
At the moment you can see the plywood edge which was always going to be covered with paint, but at the moment the jury is still out on the final finish for the exposed plywood edge. Building the panels from solid timber was never really an option as it is too unstable and hard to deal with.
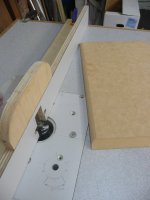
Getting the MDF cut for the woofer boxes has been a real drama, after Misterplywood declared they couldn't do it. I took the pieces to a friends joinery shop & he trimmed them up on his much less expensive saw & they are fine?? EXCEPT now the box is fractionally too small, 1mm, yes folks 1mm. Which means the driver won't fit in with it's rubber surround in place, which adds about 5mm to the overall diameter.
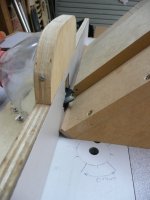
I decided to go with a key join on the corners so have made up a jig for the router table as per the photos.
To be continued next weekend.
At the moment you can see the plywood edge which was always going to be covered with paint, but at the moment the jury is still out on the final finish for the exposed plywood edge. Building the panels from solid timber was never really an option as it is too unstable and hard to deal with.
Getting the MDF cut for the woofer boxes has been a real drama, after Misterplywood declared they couldn't do it. I took the pieces to a friends joinery shop & he trimmed them up on his much less expensive saw & they are fine?? EXCEPT now the box is fractionally too small, 1mm, yes folks 1mm. Which means the driver won't fit in with it's rubber surround in place, which adds about 5mm to the overall diameter.
I decided to go with a key join on the corners so have made up a jig for the router table as per the photos.
To be continued next weekend.
Attachments
Beautiful work Mr D .
Cheers
Thanks
Are you building anything at the moment?
Thanks
Are you building anything at the moment?
Not at the moment . Waiting for the bass amp circuits to be finished .
Last Wednesday I had shoulder surgery ,so out of action plus I can't pick up my amps to work on 🙁 to heavy need to build lighter amps 🙂 .
Cheers
Not at the moment . Waiting for the bass amp circuits to be finished .
Last Wednesday I had shoulder surgery ,so out of action plus I can't pick up my amps to work on 🙁 to heavy need to build lighter amps 🙂 .
Cheers
I thought the weight lifting was done by the missus 🙂
I thought the weight lifting was done by the missus 🙂
I'm at her mercy now 🙂 .The R1 amp have been commisioned so I have to be nice so she can pick them up .
Cheers
Well, I had to look into this thread 😉
I must say that Im really impessed by the qualtity of your woodwork!
It looks really great
I must say that Im really impessed by the qualtity of your woodwork!
It looks really great
Well, I had to look into this thread 😉
I must say that Im really impessed by the qualtity of your woodwork!
It looks really great
Thank you.
Whats happening
Cheers
Not much, work has been getting in the way & now I'm sick 🙁
I have been playing with one of my other project but have not put it up here, keep meaning too. Twisted Pear DAC/Preamp with Arduino Remote Control - DIY Audio & Electronics - StereoNET Australia
Woodworking is for the weekend but if I dont improve tomorrow there will be no woodworking this weekend.
Fortunately the illness came & went quickly. I have been busy trying to kill me BIII while implementing a arduino source selection control setup, fortunately I failed & the BIII still lives 🙂
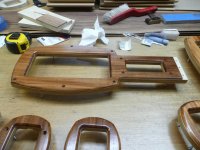
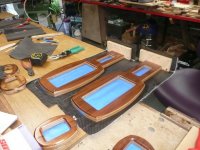
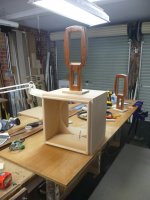
I did manage to get a bit done on the speakers today, I have put the plywood bases on the men, rounded the bottom edge for the carbon fibre & put the carbon fibre on 1 head & 1 body. I thought I'd only do one to make sure I got it right first.
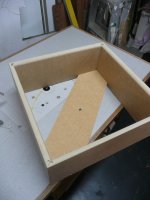
I then did some work on the base boxes, rounding the internal corners & cutting most of the joining slots. I would have got more done but half way through cutting the slots I realised I forgot to double check the depth & yes I had to do them again.
I did manage to get a bit done on the speakers today, I have put the plywood bases on the men, rounded the bottom edge for the carbon fibre & put the carbon fibre on 1 head & 1 body. I thought I'd only do one to make sure I got it right first.
I then did some work on the base boxes, rounding the internal corners & cutting most of the joining slots. I would have got more done but half way through cutting the slots I realised I forgot to double check the depth & yes I had to do them again.
Attachments
Been busy playing with the Arduino stuff. I swear I couldn't have made these speakers any more difficult to build, anyway getting there slowly.
Attachments

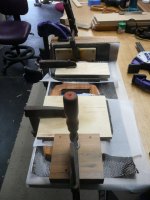
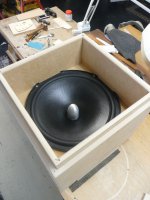
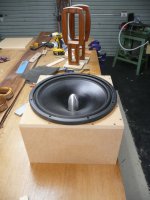
Thanks to Mister Plywood cutting the mitres out of square, the box has ended up slightly smaller than planned & the bass driver wont fit in the box with the rubber surround on it. The rubber surround isn't absolutely necessary but I would have preferred to have it in place.
If you ever think about buying or making a router table, GO FOR IT, it has so many uses.I use mine as a joiner as well, although the jointing width is limited to the length of the cutting edge in the bit, You'll never use a plane again to straighten an edge once you have one of these & a good bit.
If you ever think about buying or making a router table, GO FOR IT, it has so many uses.I use mine as a joiner as well, although the jointing width is limited to the length of the cutting edge in the bit, You'll never use a plane again to straighten an edge once you have one of these & a good bit.
Attachments
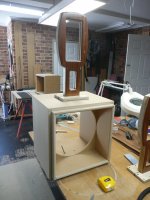

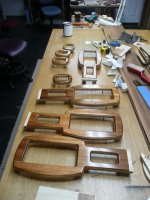
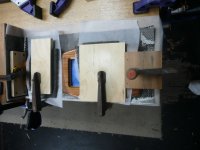
I've been beavering away getting things done slowly. The boxes are finished ready for painting. The "Men" are largely finished, although I expect the finishing touches to take a while yet. I have finalised my plan to make the grill cover surrounds, they will be laminated up using three pieces of 4mm ply with the left over carbon fibre between the ply to add stiffness. I made a test piece which is a strong as you could hope for.
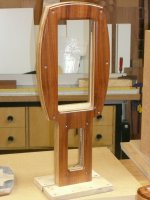
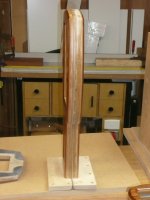
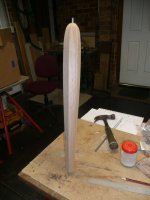
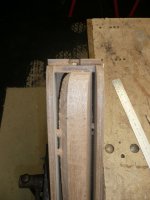
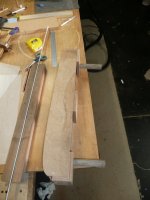
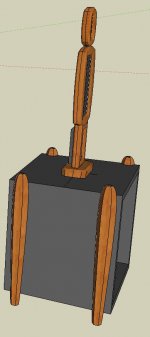
I have been having fun making a test leg for the speaker boxes, the final legs will be made from Tasmanian Blackwood the same as the thick veneer on the Men faces. It took a while to devise a plan for the leg construction, I'm glad to say the plan seems to have worked ok & I have learn't a few lessons on the way. The leg is made in two halves & only glued at the top & bottom so it will be easy to cut out the middle section, I laid some baking paper between the non glue section so any glue that seeped in wouldn't glue the pieces together where I didn't want glue.. The threaded rod doesn't actually run all the way through, I have cut a nut in at each end inside the leg which will come out when the middle section is cut out of the leg. The leg was roughed out on the router table & fine tuned with the trimmer.
I have recessed acorn nuts into the Men bases so the Men can be bolted onto the boxes.
I have settled on a paint system for the boxes, which will be.
* Two Pack Undercoat
* Single Pack K&H Fine Bumper Texture
* Colour is from an Alfa & Is called Bronze Metallic.
* Acrylic Automotive lacquer Topcoat
I had intended on using all 2 Pack (2K) but could not find a texture that I could put 2K over. I haven't done a sample of the texture yet so that could still be abandoned. I want a low sheen finish.
Ideally I wanted the colour to match my amps which are powder coated with Interpon "Asteroid" texture. Interpon do make a paint the same colour, but it costs a fortune & it is 2K, so it wont go over the texture.
I'm hoping to have this lot finish for Christmas.
Attachments
-
 12-10-04 DQ OB 01_7.JPG503.3 KB · Views: 105
 -
 12-10-04 DQ OB 01_5.JPG549.9 KB · Views: 92
 -
 12-10-04 DQ OB 01_6.JPG560.1 KB · Views: 87
 -
 12-10-04 DQ OB 01_4.JPG523.6 KB · Views: 97
 -
 12-10-04 DQ OB 01_3.JPG522.6 KB · Views: 104
 -
 12-10-04 DQ OB 01_2.JPG508.7 KB · Views: 93
 -
 12-10-04 DQ OB 01_1.JPG554.2 KB · Views: 101
 -
 12-10-04 DQ OB 01.JPG571 KB · Views: 125
 -
 10-12-11 The One Final Side.JPG40.4 KB · Views: 125


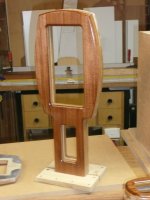
I'm thinking maybe the leg is a little too fat.
No way. Any thinner and it would look insignificant. You don't want it to look like a skinny dining table chair leg do ya?
- Status
- Not open for further replies.
- Home
- Loudspeakers
- Multi-Way
- OB Project Design Started, Help Requested.