Given the success and the sound of the PC speaker listed in this thread:
http://www.diyaudio.com/forums/chip...onics-amplifier-conversion-2.html#post4660638
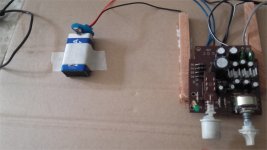
I will be transferring these electronics - minus the transformer - to the sleek amplifier case.
Running off DC or batteries is a safer option for me than messing with a hardboard casing with 220 volts AC running inside.
http://www.diyaudio.com/forums/chip...onics-amplifier-conversion-2.html#post4660638
I will be transferring these electronics - minus the transformer - to the sleek amplifier case.
Running off DC or batteries is a safer option for me than messing with a hardboard casing with 220 volts AC running inside.
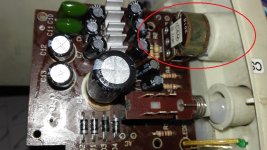
Cannot remove board due to volume contrl
I cannot remove the volume control knob to free the board from the case, any ideas? The rest of the board is loose, removed the hot glue supports to the case. Should I desolder the volume control ?
I cannot remove the volume control knob to free the board from the case, any ideas? The rest of the board is loose, removed the hot glue supports to the case. Should I desolder the volume control ?
Attachments
Last edited:
I cannot remove the volume control knob to free the board from the case, any ideas? The rest of the board is loose, removed the hot glue supports to the case. Should I desolder the volume control ?
You can snip it off easily with some little side cutters. Then desolder the legs left over.
I was hoping to keep the original volume control - ah well. Hope I have not damaged board by trying to pull it out.
Usually the shafts of the pots are splined or D shaped and you can just pull off the knobs. Is that not the case here?
Once you have the knob off, you'll probably find a recessed nut that you need to remove.
Tom
Once you have the knob off, you'll probably find a recessed nut that you need to remove.
Tom
Tpa 3116D2/ Tpa 3118D2/Tpa 3130D2 are good choices too. With 2*50w/ 2*30w/2*15w with later two dont even need active cooling heatsinks.works from 4.6-26v. Thd of 0.1% is present and its acceptable. And mute function is present, so as master - slave sync. Can be controlled using digital switches, so as gain. Also shutdown /standby modes are avilable.
Its a good chip with lot of power and features.. Check its datasheet.
Its a good chip with lot of power and features.. Check its datasheet.
Managed to remove the knob, as you said remove the know and there is a lock nut on the other side. Once this is turned loose, the board can be removed from the case.
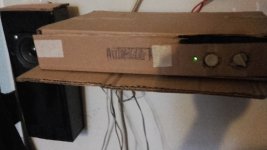
Cardboard Prototype Amplifier completed
Construction
I managed to remove the board and after testing it with a 9 V battery, connected the 9V battery and attached the board to a cardboard enclosure for testing. Cutting out the holes for the knobs proved to be a bit of a task, also constructing the enclosure needed to be better thought of. The thing works off a 9V battery.
Testing
I think the Hi Fi magazine calls it insight. I am hearing sounds I never heard before. Clarity is excellent, and imaging is something I have not heard before. I am setting here and hearing some favourites (70s and 80s pop) as if for the first time. In fact it reminds me of listening on headphones. Some bass would make the sound perfect.
Next Steps
I need to connect an AC-DC adapter, but I remembered just in time that I should put in a fuse, so for a 1 W x 2 amplifier, with the 12 V input to the board, I would expect to put in a 1 amp fuse ?
I also need to construct my hardboard enclosure - anyone want to comment on the fire hazard of such a thing?
I will use a 1 Amp 12V DC fuse?
This is based on 2 W output and 12V input.
Does this site cover it all?
FUSES
http://www.st.com/web/en/resource/technical/document/datasheet/CD00000172.pdf
This is based on 2 W output and 12V input.
Does this site cover it all?
FUSES
http://www.st.com/web/en/resource/technical/document/datasheet/CD00000172.pdf
I got my amplifier working with a AC-DC converter, one which converts 220V AC to anything from 3 volts to 9 V DC. I tried it using the 9V power setting and works fine.
The heat sink on the TE 2025 chip gets really hot, and the heat sink slides arounf a bit. I made some ventilation holes on the top of the enclosure.
Sound quality is good, the last 9V battery I used lost power until it was down to 6V and the power light kept dimming when loud sounds were being reproduced. Interesting.
I do not think I need the fuse, the adapter will have its own protection.
Next I need a more permanent enclosure - next.
I got my amplifier working with a AC-DC converter, one which converts 220V AC to anything from 3 volts to 9 V DC. I tried it using the 9V power setting and works fine.
The heat sink on the TE 2025 chip gets really hot, and the heat sink slides arounf a bit. I made some ventilation holes on the top of the enclosure.
Sound quality is good, the last battery I used lost power until it was down to 6V and the power light kept dimming when loud sounds were being reproduced. Interesting.
I do not think I need the fuse, the adapter will have its own protection.
Next I need a more permanent enclosure.
I have been looking at how amplifiers are constructed - this video is interesting : https://www.youtube.com/watch?v=CYnPNe4L6Uc
The heat sink on the TE 2025 chip gets really hot, and the heat sink slides arounf a bit. I made some ventilation holes on the top of the enclosure.
Sound quality is good, the last 9V battery I used lost power until it was down to 6V and the power light kept dimming when loud sounds were being reproduced. Interesting.
I do not think I need the fuse, the adapter will have its own protection.
Next I need a more permanent enclosure - next.
I got my amplifier working with a AC-DC converter, one which converts 220V AC to anything from 3 volts to 9 V DC. I tried it using the 9V power setting and works fine.
The heat sink on the TE 2025 chip gets really hot, and the heat sink slides arounf a bit. I made some ventilation holes on the top of the enclosure.
Sound quality is good, the last battery I used lost power until it was down to 6V and the power light kept dimming when loud sounds were being reproduced. Interesting.
I do not think I need the fuse, the adapter will have its own protection.
Next I need a more permanent enclosure.
I have been looking at how amplifiers are constructed - this video is interesting : https://www.youtube.com/watch?v=CYnPNe4L6Uc
Amplifier Concept in Wings 3D


Amplifier concept model 3D model screen shot. Actual size may vary 🙂
Amplifier concept model 3D model screen shot. Actual size may vary 🙂
Last edited:
A quick question about safety: the amplifier has been tested and will be used with a AC to DC wall mounted adapter feeding 12V DC to the amplifier circuit, which was anyway designed for AC step-down transformer from 240V.
The enclosure is to be made out of hardwood.
Is there any risk of electric shock?
How do I make sure my amplifier catches fire? Does not catch fire?
Fire Safety Requirements for Electrical Cabinets and Enclosures
https://www.cpsc.gov/s3fs-public/electric.pdf
The enclosure is to be made out of hardwood.
Is there any risk of electric shock?
How do I make sure my amplifier catches fire? Does not catch fire?
Fire Safety Requirements for Electrical Cabinets and Enclosures
https://www.cpsc.gov/s3fs-public/electric.pdf
1.) fit a fuse rated for the smallest cable that follows.
2.) connect the Protective Earth wire permanently to the main chassis component.
2.) connect the Protective Earth wire permanently to the main chassis component.
Thanks Andrew, this fuse is in addition to the power adapter? A good one should have protection?
I have yet to see a fuse in any of the four computer speakers that I have disassembled. In any case these are two pin configurations, no earth wire. But I plan to install a fuse, Google will tell me the values.
I have yet to see a fuse in any of the four computer speakers that I have disassembled. In any case these are two pin configurations, no earth wire. But I plan to install a fuse, Google will tell me the values.
- Home
- Amplifiers
- Chip Amps
- New Sleek Chip amp project