Alright, I'm not happy with having to do another rectangular cutout, but I'm at least satisfied that this switch will safely handle two of the SMPS1200 supplies.
C1350ARBB-602AW Arcolectric | Switches | DigiKey
250VAC, 150 amp rated inrush current, 20A continuous. Maybe it will be nicer to get a little illuminated pushbutton switch on the front, and soft start, but for now I think that this one on the rear panel is going to get the job done safely.
C1350ARBB-602AW Arcolectric | Switches | DigiKey
250VAC, 150 amp rated inrush current, 20A continuous. Maybe it will be nicer to get a little illuminated pushbutton switch on the front, and soft start, but for now I think that this one on the rear panel is going to get the job done safely.
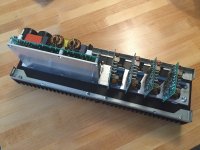
Well, I've finally got four channels and one power supply attached to the heat sink! I've also located and installed a 20 amp DPST paddle switch, rated for motor use. I'm moving forward assuming that the surge current would be given as worst case (240V operation) and it will be a lot less here with my 120V mains.
I did the thermal interface plate by hand, laid out with calipers and a center punch, and if I had it to do over I'd probably send that out to a machine shop too. Oh well... it saved me probably $100 to do them myself, and they'll work.
The speakers these are meant to drive are mostly assembled now, so I'm quite eager to wrap it up.
Attachments
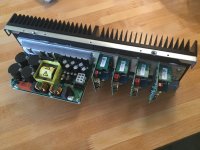
Well, I've finally got four channels and one power supply attached to the heat sink! I've also located and installed a 20 amp DPST paddle switch, rated for motor use. I'm moving forward assuming that the surge current would be given as worst case (240V operation) and it will be a lot less here with my 120V mains.
I did the thermal interface plate by hand, laid out with calipers and a center punch, and if I had it to do over I'd probably send that out to a machine shop too. Oh well... it saved me probably $100 to do them myself, and they'll work.
The speakers these are meant to drive are mostly assembled now, so I'm quite eager to wrap it up.
Clean !
Now you are ready for the wiring process 😀
An update - it turns out that the inrush is too small to measure with my clamp meter. When I flip the switch I hear a small delay before a click, but I see no surge current. That's a relief! I guess I worried for nothing.
An update - it turns out that the inrush is too small to measure with my clamp meter. When I flip the switch I hear a small delay before a click, but I see no surge current. That's a relief! I guess I worried for nothing.
You can't measure the inrush current because you have not enough time resolution.
The rush current is way too fast for a multimeter.
Well, I've finally got four channels and one power supply attached to the heat sink! I've also located and installed a 20 amp DPST paddle switch, rated for motor use. I'm moving forward assuming that the surge current would be given as worst case (240V operation) and it will be a lot less here with my 120V mains.
I did the thermal interface plate by hand, laid out with calipers and a center punch, and if I had it to do over I'd probably send that out to a machine shop too. Oh well... it saved me probably $100 to do them myself, and they'll work.
The speakers these are meant to drive are mostly assembled now, so I'm quite eager to wrap it up.
nice work on the heatsink and plates. Could you share the source?
Thanks! I got the heat sinks from Modushop: Modushop by Hi-Fi 2000
The rear plate is from Front Panel Express: Front Panel Express: Front Panel Design Software and CAD Conversion Service: Home
The interface plates are just 2"x1/4" aluminum bars that I cut and drilled over my kitchen trash can, laid out with calipers.
The rear plate is from Front Panel Express: Front Panel Express: Front Panel Design Software and CAD Conversion Service: Home
The interface plates are just 2"x1/4" aluminum bars that I cut and drilled over my kitchen trash can, laid out with calipers.
Resurrected from the dead...
My OCD kicked in since there wasn't closure. Any pictures of the finished amp?
My OCD kicked in since there wasn't closure. Any pictures of the finished amp?
Pretty sure he posted the finished version here: LX521 Speaker build- the Hypex multi-channel amplifier - Totally Should!
As an FYI, he misinterpreted the article from nuerochrome. While the total voltage noise of the unbalanced signal is lower, the SNR is lower when you use the balanced signal to the mini dip
As an FYI, he misinterpreted the article from nuerochrome. While the total voltage noise of the unbalanced signal is lower, the SNR is lower when you use the balanced signal to the mini dip
- Status
- Not open for further replies.
- Home
- Amplifiers
- Class D
- New multi-channel Hypex build for LX521