Member
Joined 2009
Paid Member
The cable is simply being relied on to substitute for an output coil. Capacitance is not a necessary part of an output coil network but it exists in the cable nonetheless, so it is included in the cable specification. Don't be distracted by trying to match all the cable specs, since it's the total inductance that is the essential requirement here.
So as Bigun just suggested, fit a small coil, like 2uH, in series with your + output leads and most cable concerns will vanish - simple as that. If you prefer to follow all Naim recommendations to the letter, then buy their recommended cable as a consumer instead. I think a DIY would have more urgent problems with the components in their parts kit though 🙁
For curiosity, you can measure the small cable inductance and capacitance with one of several affordable LC meters like the LC200A but the real test is stability (no ringing) of the amplifier when driving the speakers. You'll very likely need a 'scope for that. Otherwise, the R, L, C properties of copper twinflex are all determined by its basic cable geometry. i.e. the diameter of each wire bundle, the centre spacing and length - assuming all types have a common insulation like PVC.
I use cable whose strands are not turned, just pulled straight and no problem, I did not even check their capacitance and it's been working for two or three years
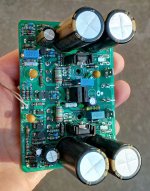
Ok, so today I finaly done my amp and I think all the troubles that I posted in NAP-140 Clone Amp Kit on Ebay is gone.
I have changed transistors in current sourse from MPSA18 to MPSA06, changed broken ZTX753, also found burned resistor, changed spacers under PCB to plastic ones.
Now it is dead quiet. Set the bias - it also OK. DC on outputs is around 10mV.
Just tried it with smal speakers on my job, have to move it to home, and than if I'll like it I'll make it look beter.
One more time thanks elerybody.
I'd like a job where I can do my Audio DIY repairs too 😀
Nice going, as it seems there were a few faults to eliminate.
Nice going, as it seems there were a few faults to eliminate.
Hey guys,
Yep, for best acoustical results keep original in circuit and construction wise.
Had my tonsils removed two and a half month ago. From then till now i am not able to DIY HIFI yet....
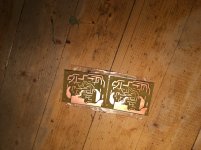
Before the surgery, i started to produce high quality, very accurate PCB-s at home.. 🙂
I also promised here a comparision, mostly observing RESISTORS, not sure if i continue this route anymore. From my experience, i will stick to "everything matters" concept.
As i have all parts at hand now and even more, i will make new naim amps with corrected errors from past projects.
Yep, for best acoustical results keep original in circuit and construction wise.
Had my tonsils removed two and a half month ago. From then till now i am not able to DIY HIFI yet....
Before the surgery, i started to produce high quality, very accurate PCB-s at home.. 🙂
I also promised here a comparision, mostly observing RESISTORS, not sure if i continue this route anymore. From my experience, i will stick to "everything matters" concept.
As i have all parts at hand now and even more, i will make new naim amps with corrected errors from past projects.
Attachments

Member
Joined 2009
Paid Member
Very nice! How did you transfer the mask to the board? Did you use the iron-on laser-printer toner method?
I took a H-140 naim clone and cloned these PCB again 😀
laser-printer toner method <-- that is correct. Using high quality white paper(it means most suited for MY LAZER printer) + a spray that makes paper transparent for ~15-20 minutes.
Most time consuming was to get right amount of UV light and a mix of sodium hydroxide with water.
Right amount of UV light depends on light itself, paper, black ink/toner quality and transparency of the paper and also printer IMAGE quality setting and programs😀
Mix of sodium hydroxide depends on UV light applied, Copper Board light sensitive coating.
I buy my Copper boards allready coated in light sensitive lacquer.
I will give more detail later.. its getting so offtopic, sry 🙁
I took a H-140 naim clone and cloned these PCB again 😀
I will give more detail later.. its getting so offtopic, sry 🙁
no, on the contrary we are right in!
this old thread 'is more like that and then it's super interesting another approach
Thanks Rensli, that's very interesting. I was thinking laser - heat transfer but didn't expect UV mask.
I hope you'll be able to open a thread somewhere appropriate and talk about it some more as I'd be very interested to learn.
Cheers

I hope you'll be able to open a thread somewhere appropriate and talk about it some more as I'd be very interested to learn.
Cheers
Interesting. I tried the iron-transfer method and didn't get on with it, but I never tried the UV-sensitive mask. Might have to give it another go....
Thanks,
Iron transfer is pain, everything else is real pain😀
Buying light-sensitive boards and using UV method is fastest for good results. There are only two not very hard to find chemicals involved: NAOH and Fe3Cl.
Only minus i consider is getting it started and the final cost per finished board....
L160xW100mm one-sided board of 35µm copper costs 2.8044€
L100xW75mm on sided board 35uM copper = 1.6€
Finished boards with UV method:
L160xW100mm will cost you total ~3,2€
L100xW75mm ~2€
20minutes per board, drilling not included.
Briefly on another topic, I thought I'd mention there is a new Caowei kit available again. This time it is the NAP150, a somewhat depowered version of NAP200 - the impressive improved single board design format that was very popular here a couple of years ago. Caowei produced a good kit with good quality components - important if you buy an expensive kit and still find many of the parts need upgrading before you even begin.
Note the option for caps...which would you choose 🙄?
DIY Clone NAIM NAP150 Stereo power amplifier kit 60W 8ohm /120W 4ohm L11-43 | eBay
Note the option for caps...which would you choose 🙄?
DIY Clone NAIM NAP150 Stereo power amplifier kit 60W 8ohm /120W 4ohm L11-43 | eBay
Member
Joined 2009
Paid Member
i like it but i have always a big doubt for the output device 2n2922 ...Briefly on another topic, I thought I'd mention there is a new Caowei kit available again. This time it is the NAP 150
Note the option for caps...which would you choose 🙄?
DIY Clone NAIM NAP150 Stereo power amplifier kit 60W 8ohm /120W 4ohm L11-43 | eBay
- Home
- Amplifiers
- Solid State
- NAP-140 Clone Amp Kit on eBay