This is my 2019 Toyota Tundra.

I will be starting a system install today. I have been acquiring the components for it over the past couple of months now and I finally have what I need to start the install and the rest will be coming today or Monday.
There will be some tricky parts to this install especially with the subs since there is little room for them. I'm debating whether I should cram a narrow wedge box behind the rear seats like so many other Tundra installs I have seen on youtube that leave the subs pressed right up against the back of the seat or do a more serious involved custom install that requires me to cut into the factory installed foam floor riser under the rear seats and use fiberglass to build boxes for the subs between the raised mounting sections of the trucks floor. This would give me upward firing subs under the rear seats that won't be smashed right up against the seat but it will require quite a bit more work and it forever alters the "stockness" of the truck. The subs I have chosen for this install are two JL Audio 12TW3 shallow mount drivers. These are some very nice drivers and are nothing like what I expected from a shallow mount driver. These things are going to bump. They should be quite musical too as JL Audio gear is always top notch and that is the reason I went with them. I hadn't heard any of the many different manufactures shallow mount subs before so i have no idea how any of them sound but I do know how JL Audio subs in general sound so I figured if I'm going to pull the trigger on something as expensive as subs I better have a general understanding of how they are going to sound before buying them so I went with what I know. At this point I'm leaning toward installing them in the floor but that might change.
My goal for today is to get the back seats out and start applying the sound deadener to the rear wall and possibly the rear doors as well. I have some very nice set of CDT ES-6CX coaxial drivers coming today or Monday for the rear doors plus I will likely put a small tweeter up in the door panels where there is one now as part of the stock system.
If anyone else has installed a system in a second gen Tundra I'd like to hear what you have to say on the subject. I'll update this as I progress with pics.
Cheers.

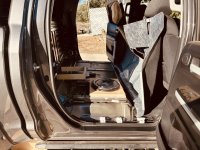
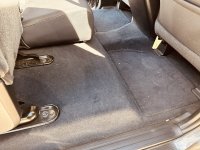
Well today was pretty productive. I concentrated on the rear of the vehicle primarily. My goals for today where to get the back seats out of the truck and get the rear window area damped down and then to figure out how I was going to mount the subs. I had hoped there was going to be enough room under the rear seats to mount the subs in the floor but no luck there.
The factory sound treatment is a rather heavy piece of mass loaded vinyl draped across the back wall.

These Tundra's have an operational back window that I like a lot.

Panel is off and ready to be killed dead.

Full dead now.

So is the inside.

Sizing things up.

It won't work.

Not enough room.

It became obvious that there wasn't going to be enough room to mount the subs in the floor so it was time to mock up a cardboard box and see if it was going to fit behind the seats and if it was going to be deep enough to fit the two 12" drivers. Most everyone else I've seen doing a subwoofer install on the Tundra's used 8 or 10 inch subs.
My mocked up cardboard box. IT FITS!
Tomorrow I will go to the Home Depot and get some plywood to build the box for real. I think I'm going to use plywood here because the box panel thickness will have to be 1/2 & 5/8" to make it work and I need the strength of plywood. Plus I might put one or two layers of fiber glass over the top of the box when I'm done putting it together for durability and moisture resistance and It will bond a lot better to plywood then MDF.

So I sound damped the floor under the seats and decided I will put my amps there in stead seeing that the subs where not going there. It is actually a perfect place for the amps.

Well it is 10;30PM here and day light savings time starts tomorrow and I'm tired. So it's off to bed for me and hopefully I can get the box built by tomorrow. We shall see. I'll update this thread tomorrow.
Cheers
The factory sound treatment is a rather heavy piece of mass loaded vinyl draped across the back wall.
These Tundra's have an operational back window that I like a lot.
Panel is off and ready to be killed dead.
Full dead now.
So is the inside.
Sizing things up.
It won't work.
Not enough room.
It became obvious that there wasn't going to be enough room to mount the subs in the floor so it was time to mock up a cardboard box and see if it was going to fit behind the seats and if it was going to be deep enough to fit the two 12" drivers. Most everyone else I've seen doing a subwoofer install on the Tundra's used 8 or 10 inch subs.
My mocked up cardboard box. IT FITS!
Tomorrow I will go to the Home Depot and get some plywood to build the box for real. I think I'm going to use plywood here because the box panel thickness will have to be 1/2 & 5/8" to make it work and I need the strength of plywood. Plus I might put one or two layers of fiber glass over the top of the box when I'm done putting it together for durability and moisture resistance and It will bond a lot better to plywood then MDF.
So I sound damped the floor under the seats and decided I will put my amps there in stead seeing that the subs where not going there. It is actually a perfect place for the amps.
Well it is 10;30PM here and day light savings time starts tomorrow and I'm tired. So it's off to bed for me and hopefully I can get the box built by tomorrow. We shall see. I'll update this thread tomorrow.
Cheers
Attachments
Okay so it has been raining for the last couple of days and that has sidelined me from getting things done. But no rain today so I got busy building the box. Here are some photos of my progression.
Using the dimensions that I obtained from my cardboard mock up box I cut the pieces for the real box. Originally my plan was to use plywood but the selection at Home Depot was pitiful and very expensive so I ended up going with 1/2" MDF since I was going to be glassing it anyways. I did end up using 3/4" for the end caps and internal bracing though. The box dimensions are aprox 52" long by 19.5" tall on the back side and 7" on the bottom and 2" at the top. The angle is 13 degreese. There is quite a bit more bracing in the finished box then what you see hear.

Box is all glued up and here I am test fitting my subs in the first hole . Prefect fit and the speaker doesn't even touch the rear wall of the box. Definitely a good thing. Now I just hope the speaker doesn't touch the seat. I did get metal grills for them so they won't get damaged but It would be nice not to have to use them seeing the drivers are already having to play through the seats themselves and adding a metal grill may protect them but it is just one more think standing between the speaker and my ear.

Box construction is done and I'm bringing it inside so the glue completely dries. Tomorrow it gets glassed.

Back side. Man this box is narrow.

Some of the internal bracing visible through the speaker cut out. Because this is 1/2" MDF I put more bracing in the box then I would normally have. That little square cut out on the front face is to accommodate part of the seats frame that protrudes a little bit.

Chop Mat and polyester resin. I cover the back, top, bottom and sides with one layer of mat and resin making sure that it all lays down flat and is free from air pockets and bubbles. I think it turned out good.

Another view.

A close up of the corners.

Edges are all trimmed and sanded and ready for some 2K polyester primer that I will likely apply tomorrow morning.

The front side will not be getting fiberglass because it would make installing the subs difficult because the mounting surface would not be flat anymore and I really don't want to have to deal with the extra time and labor it takes to get it flat again. So tomorrow morning it will get primed and then it is done and time to load the subs and install it in my truck. This box will not be visible once it is installed and the seats are put back in so I really don't care about it's appearance as long as it built properly works like's it supposed to and of course sounds good I will be happy with it. Since it can't be seen all it is getting is primer coat for finish.

So there you go. One sub woofer box ready to be installed. The total air space inside the box is approximately 1.66 cubic feet. It's not ideal but it should work once I stuff it with poly fill. JL Audio calls for a sealed box with 1 cubic foot of air space for each driver for an f3 of 38.27 with a QTC of 0.9919. I honestly don't know what the tuning of this box will be once it is installed in the truck. I just built the largest box I could fit in the space allowed and the tuning will be what ever it is. With cabin gain helping I hope to at least end up with a box tuning that gets me down around 40 to 45HZ range. We shall find out. I am kind of thinking that maybe I should have picked up a set of 10" subs instead of the 12" ones I did get but oh well.
Anyways I pretty much now have every thing I am going to need to complete the install except for the 1/0 gage power cable that will bring the power back to where the amps will be located at which point it will go into a fuse block that will supply power to each of the amps through 4 gage wire. In my next post maybe I will do a run down on what equipment I'm putting in the truck and possibly with some pics. Maybe.
I have limited time during the week to get things done due to work so most things will have to wait till the weekend to get installed but I will try and get what I can get done in the evenings done. I have no idea if anyone will be following my progress or not but I will be posting it anyways.
Cheers and chow.
Using the dimensions that I obtained from my cardboard mock up box I cut the pieces for the real box. Originally my plan was to use plywood but the selection at Home Depot was pitiful and very expensive so I ended up going with 1/2" MDF since I was going to be glassing it anyways. I did end up using 3/4" for the end caps and internal bracing though. The box dimensions are aprox 52" long by 19.5" tall on the back side and 7" on the bottom and 2" at the top. The angle is 13 degreese. There is quite a bit more bracing in the finished box then what you see hear.
Box is all glued up and here I am test fitting my subs in the first hole . Prefect fit and the speaker doesn't even touch the rear wall of the box. Definitely a good thing. Now I just hope the speaker doesn't touch the seat. I did get metal grills for them so they won't get damaged but It would be nice not to have to use them seeing the drivers are already having to play through the seats themselves and adding a metal grill may protect them but it is just one more think standing between the speaker and my ear.
Box construction is done and I'm bringing it inside so the glue completely dries. Tomorrow it gets glassed.
Back side. Man this box is narrow.
Some of the internal bracing visible through the speaker cut out. Because this is 1/2" MDF I put more bracing in the box then I would normally have. That little square cut out on the front face is to accommodate part of the seats frame that protrudes a little bit.
Chop Mat and polyester resin. I cover the back, top, bottom and sides with one layer of mat and resin making sure that it all lays down flat and is free from air pockets and bubbles. I think it turned out good.
Another view.
A close up of the corners.
Edges are all trimmed and sanded and ready for some 2K polyester primer that I will likely apply tomorrow morning.
The front side will not be getting fiberglass because it would make installing the subs difficult because the mounting surface would not be flat anymore and I really don't want to have to deal with the extra time and labor it takes to get it flat again. So tomorrow morning it will get primed and then it is done and time to load the subs and install it in my truck. This box will not be visible once it is installed and the seats are put back in so I really don't care about it's appearance as long as it built properly works like's it supposed to and of course sounds good I will be happy with it. Since it can't be seen all it is getting is primer coat for finish.
So there you go. One sub woofer box ready to be installed. The total air space inside the box is approximately 1.66 cubic feet. It's not ideal but it should work once I stuff it with poly fill. JL Audio calls for a sealed box with 1 cubic foot of air space for each driver for an f3 of 38.27 with a QTC of 0.9919. I honestly don't know what the tuning of this box will be once it is installed in the truck. I just built the largest box I could fit in the space allowed and the tuning will be what ever it is. With cabin gain helping I hope to at least end up with a box tuning that gets me down around 40 to 45HZ range. We shall find out. I am kind of thinking that maybe I should have picked up a set of 10" subs instead of the 12" ones I did get but oh well.
Anyways I pretty much now have every thing I am going to need to complete the install except for the 1/0 gage power cable that will bring the power back to where the amps will be located at which point it will go into a fuse block that will supply power to each of the amps through 4 gage wire. In my next post maybe I will do a run down on what equipment I'm putting in the truck and possibly with some pics. Maybe.
I have limited time during the week to get things done due to work so most things will have to wait till the weekend to get installed but I will try and get what I can get done in the evenings done. I have no idea if anyone will be following my progress or not but I will be posting it anyways.
Cheers and chow.
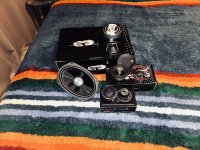
Ok it has been a couple days but the box has been primed with 2k polyester primer with a coat of black spray paint just because I had it sitting around. The box has been stuffed with poly fill and both drivers have been loaded and it currently resides in the truck. So some progress has been made. I'm going to cut out the foam in the floor to accommodate the amps and DSP unit(s) before I put the seats back in and I hope they go back in without any problems with box fitment. But that is all going to have to wait till later today because I have to go to work. I got to pay for this stuff somehow. Anyways for amplifiers & DSP I have:
I may only use one of the 4 channel amps and one of the DSP units. I'm not sure yet.
Here is a pic I took last night after I got the box installed. It's not that great of a pic so maybe later today I will get a better one.

Cheers for now.
- 1- D4S JP8 class D monoblock
- 2- D4S JP8.4 class D 4 channel
- 2 - Dayton Audio 4X8
I may only use one of the 4 channel amps and one of the DSP units. I'm not sure yet.
Here is a pic I took last night after I got the box installed. It's not that great of a pic so maybe later today I will get a better one.
Cheers for now.
4 8 inch woofers may fit better there and still yield 4 ohms load. I got down to 25hz in a hatchback with a single 8 inch Pyle tube
So, I've been busy the past few evenings after work trying to get this install done. I cut the Styrofoam pieces that fit between the rails that the rear seats are mounted to that make up the deck under the seat so that I would have compartments to mount the amps and other equipment in.
Here is what it looked like before.

Here I have cut out the spaces and gave them a wrap in killmat.


Now with the carpet cut out and the seats put back in.

With the seats back in I got lucky because the box almost didn't fit. The grills on the subs are right up against the seats and if the box was any wider it would have interfered with the operation of the seats but all is good.


Oh and hey Toyota. What the hell going on here? All of the bolts that attach the seats to the frame of the truck are a fine thread except for one of them that is a course thread. What's up with that? Strange. I don't understand why they did this but they did it on all of the model years so there must be a reason for it I just can't figure out what it is.

So I built a pattern out of thin strips of plywood that I will use to trace out the frame that will cover the compartments. Anyone who has done any granite counter tops will recognize the method I used.

Last night I cut the frame out of three quarter MDF and rimed out the compartments with half inch MDF and glued it all together. I didn't get any pics of that last night. By the time I was done it was freezing cold and all I wanted to do was get inside so I will get some later on today and will post them this evening. Till then,
Cheers.
Here is what it looked like before.
Here I have cut out the spaces and gave them a wrap in killmat.
Now with the carpet cut out and the seats put back in.
With the seats back in I got lucky because the box almost didn't fit. The grills on the subs are right up against the seats and if the box was any wider it would have interfered with the operation of the seats but all is good.
Oh and hey Toyota. What the hell going on here? All of the bolts that attach the seats to the frame of the truck are a fine thread except for one of them that is a course thread. What's up with that? Strange. I don't understand why they did this but they did it on all of the model years so there must be a reason for it I just can't figure out what it is.
So I built a pattern out of thin strips of plywood that I will use to trace out the frame that will cover the compartments. Anyone who has done any granite counter tops will recognize the method I used.
Last night I cut the frame out of three quarter MDF and rimed out the compartments with half inch MDF and glued it all together. I didn't get any pics of that last night. By the time I was done it was freezing cold and all I wanted to do was get inside so I will get some later on today and will post them this evening. Till then,
Cheers.
Attachments
Okay where did I leave off? Oh yea. I built this.


Then I mounted a couple of my amps. I still have one more 4 channel amp that will go up under the front passenger seat where the stock amp currently lives. The center cubby is where my power distribution center will be. Power from the battery will come into the center cubby through 1/0 AWG power cables to the fuse block you see then to the various amps and DSP.


Last night I switched directions and concentrated on getting the doors done. I started with the drivers side rear door. I got the panel off and the stock drivers out. This consisted of a 6-1/2" woofer and a small Mylar tweeter. Both total crap. I then ran Killmat on the outer skin of the door as well as the inner skin. I made a panel out of quarter inch MDF to cover the large hole in the inner door skin then Killmated that. Then last I taped down all of the wires and anything else that could rattle with scrap pieces of Killmat. Looked something like this when I got done.

Now for drivers. Out with the old in with the new.
The stock drivers. These are a joke.


And now for the new drivers.
In the rear doors there will be a set of ES-6CX 6-1/2" coaxial speakers made by CDT Audio with a carbon fiber cone. The two tweeters shown I was thinking I would use one of them to put an additional tweeter up in the door panel in the stock position but they are two big. So I will be looking for a smaller driver to fit the opening.


The driver is mounted in an adapter made by Metra and there is also (but not shown in this pic) a foldable silicone speaker baffle made by NVX that does three things. Those things are, protect the driver from any rain water that might get into the door, decouples the driver from the plastic mounting bracket and funnels all of the sound into the cab of the truck.
So that's where I'm at for now. I'll be back at it tonight. Till then
Cheers.
Then I mounted a couple of my amps. I still have one more 4 channel amp that will go up under the front passenger seat where the stock amp currently lives. The center cubby is where my power distribution center will be. Power from the battery will come into the center cubby through 1/0 AWG power cables to the fuse block you see then to the various amps and DSP.
Last night I switched directions and concentrated on getting the doors done. I started with the drivers side rear door. I got the panel off and the stock drivers out. This consisted of a 6-1/2" woofer and a small Mylar tweeter. Both total crap. I then ran Killmat on the outer skin of the door as well as the inner skin. I made a panel out of quarter inch MDF to cover the large hole in the inner door skin then Killmated that. Then last I taped down all of the wires and anything else that could rattle with scrap pieces of Killmat. Looked something like this when I got done.
Now for drivers. Out with the old in with the new.
The stock drivers. These are a joke.
And now for the new drivers.
In the rear doors there will be a set of ES-6CX 6-1/2" coaxial speakers made by CDT Audio with a carbon fiber cone. The two tweeters shown I was thinking I would use one of them to put an additional tweeter up in the door panel in the stock position but they are two big. So I will be looking for a smaller driver to fit the opening.
The driver is mounted in an adapter made by Metra and there is also (but not shown in this pic) a foldable silicone speaker baffle made by NVX that does three things. Those things are, protect the driver from any rain water that might get into the door, decouples the driver from the plastic mounting bracket and funnels all of the sound into the cab of the truck.
So that's where I'm at for now. I'll be back at it tonight. Till then
Cheers.
Well I have been busy and have gotten some things done. I now have both rear doors finished. I did find a tweeter to fit into the stock location in the rear door panels. I went with the Dayton Audio ND25FN-4. It is a 1" neo silk dome tweeter.

These go in here.

Here is the passanger side rear door all matted down. I cut some 1/4" MDF to cover the large service holes in the doors then put Killmat over them.

Here are the drivers installed.


Since I put covers on the service holes I needed to do something with this.

It is a foam block that extended into the service opening I'm assuming to give the door panel some rigidity. But now it is in the way so I took a hand saw to it.

With that out of the way I glued the ND25FN-4 into it's spot in the door panel and put Killmat anywhere that was rattling, because we can't have that, and then reattached the panel. Then I pulled the amp rack out of the truck to glue the bottoms into the rack.

Then I decide to paint the rack with black bed liner. I used what my local auto parts store had which was Dupi Color spray in bed liner.


I like the way it turned out. Here is what it looks like back in the truck.

I also ran the power cable back to the rear of the truck. I ran it from the battery down along the top of the frame rail and popped it in through a rubber gromet in the rear right where I needed it. I then attached it to a fuse block.


So now I have the two amps in the rear mounted and power and ground hooked up and the subs are hooked to their amp. All I need now is to run the RCA's and the remote turn on that will be switched by a relay. There is one more 4 channel amp and a DSP unit that will be mounted up under the front passenger seat. This is what it looks like with the back seat folded down.

One word of advice to anyone thinking of using bed liner to finish anything inside their vehicle, let it cure outside of the vehicle for a few days before installing it because this stuff stinks pretty bad until it is done curing.
So now I'm waiting on two more boxes of Killmat to be delivered. It should be here two days from now on Monday so I can pull the front seats out and deaden the floor and deaden the front doors as well.
It's raining right now but hopefuly I can get the new head unit in today if there is a break in the weather. I'll be putting in a Phoenix Automotive 13" Android 10 vertical screen navigational Radio to replace the little 7" non JBL Entune stock head unit that is in there now. I will get some pics of that latter on today if I get a break in the rain.
Until then cheers.
These go in here.
Here is the passanger side rear door all matted down. I cut some 1/4" MDF to cover the large service holes in the doors then put Killmat over them.
Here are the drivers installed.
Since I put covers on the service holes I needed to do something with this.
It is a foam block that extended into the service opening I'm assuming to give the door panel some rigidity. But now it is in the way so I took a hand saw to it.
With that out of the way I glued the ND25FN-4 into it's spot in the door panel and put Killmat anywhere that was rattling, because we can't have that, and then reattached the panel. Then I pulled the amp rack out of the truck to glue the bottoms into the rack.
Then I decide to paint the rack with black bed liner. I used what my local auto parts store had which was Dupi Color spray in bed liner.
I like the way it turned out. Here is what it looks like back in the truck.
I also ran the power cable back to the rear of the truck. I ran it from the battery down along the top of the frame rail and popped it in through a rubber gromet in the rear right where I needed it. I then attached it to a fuse block.
So now I have the two amps in the rear mounted and power and ground hooked up and the subs are hooked to their amp. All I need now is to run the RCA's and the remote turn on that will be switched by a relay. There is one more 4 channel amp and a DSP unit that will be mounted up under the front passenger seat. This is what it looks like with the back seat folded down.
One word of advice to anyone thinking of using bed liner to finish anything inside their vehicle, let it cure outside of the vehicle for a few days before installing it because this stuff stinks pretty bad until it is done curing.
So now I'm waiting on two more boxes of Killmat to be delivered. It should be here two days from now on Monday so I can pull the front seats out and deaden the floor and deaden the front doors as well.
It's raining right now but hopefuly I can get the new head unit in today if there is a break in the weather. I'll be putting in a Phoenix Automotive 13" Android 10 vertical screen navigational Radio to replace the little 7" non JBL Entune stock head unit that is in there now. I will get some pics of that latter on today if I get a break in the rain.
Until then cheers.
Okay so I thought I would post some picks of the door panels and placement of the tweeter.
Here is the stock tweeter placement cut down to except the new slightly larger tweeter. It is a little rough here and it is not totally trimmed yet.

Tweeter glued in place. Not real pretty but it works


Here is the stock tweeter placement cut down to except the new slightly larger tweeter. It is a little rough here and it is not totally trimmed yet.
Tweeter glued in place. Not real pretty but it works
A couple more pics I was trying to upload when the uploads stopped uploading.


There are a lot plastic pieces that make up one door panel and because of this there are many potential rattles so I ended up putting quite a bit of Killmat on these door panels to glue the many pieces together. They are a bit heavier then before but nothing is going to rattle now. So the back doors are done.
-----------------------------------------------------------------------------------------------------------------------------------------------------------------------
So I was depinning the Dayton Audio DSP unit of the wires that I won't be using when I noticed that there was something rattling around loose inside the unit. So I opened it up and didn't like what I found. Here is a pic of what fell out.

Not exactly what you want to see falling out of your brand new DSP unit. These look like cold solder joints to me. I didn't remove the board but maybe I should because what I saw looking down the backside of the board where a bunch of untrimmed through hole parts that where practically touching the box and what looked like cold solder joints. Funny because there is a QC sticker right there on the box. Go figure.
------------------------------------------------------------------------------------------------------------------------------------------------------------------------
Anyways here is my factory replacement radio. Phoenix Automotive Android Radio. I started doing all of the pre install wiring. I wrapped the wires up in TESA tape and got everything all plugged in and ready to be installed. I should have gotten a pic of the wiring harness before I taped everything up in TESA tape. There where wires going everywhere. I suggest that anyone installing one of these or any other after market head unit that uses plug and play type wiring harnesses that can be quite unruly to take the extra time and figure out the harness and tape it up with TESA tape, zip ties and heat shrink where needed so you don't end up trying to stuff a rats nest of wires back into the dash. And never use electrical tape to wrap wires with behind the dash. When it gets hot electrical tape will get soft and gooey and will start to unravel leaving unprotected bare wires coated with sticky glue from the tape. Use shrink tube or marine grade crimp connectors that heat shrink on to the crimped connection once it is crimped sealing it up. Soldering the wires under the dash or really anywhere in the install is completely unnecessary but some people still like to do it that way but there is no real advantage to it but you can if you like. Marine grade heat shrink crimp connectors work just as well.


This should be going in here in a day or two.
From the web site.

Compared to the 5x7" piece of crap that is in there now I think this should be a major improvement. They are on Android 10 now and most of the bugs from the earlier models have been worked out so I think it should be fairly reliable. The only thing is the unit comes with no documentation so you are kind of on your own trying to figure things out. At least there are a lot of youtube videos on line to help. It does have an OEM fit and finish to it. It looks better then the new 2023 stock big screen units that come with the new Tundra's if you ask me.
-------------------------------------------------------------------------------------------------------------------------------------------------------------------------
So in the next few days barring rain I will pull out the front seats and pull up the carpet so I can damp the floor with Killmat and Siless. Then I will remove the factory amp and install the last 4 channel amp and DSP unit in it's place. Get it all wired up which means I will need to get all of the RCA cables made. to connect everything up. Then there is the head unit and to finish I will need to do the front doors and drivers in the dash and A pillars. Then comes tuning and hopefully no driver swapping. I want to be happy with the drivers I choose but the fact remains that I ordered these drivers off the internet not hearing them beforehand so there is always the possibility that I might not like them although I have now heard the ones in the back doors and I'm fairly impressed with them.
Until the next installment
Cheers
There are a lot plastic pieces that make up one door panel and because of this there are many potential rattles so I ended up putting quite a bit of Killmat on these door panels to glue the many pieces together. They are a bit heavier then before but nothing is going to rattle now. So the back doors are done.
-----------------------------------------------------------------------------------------------------------------------------------------------------------------------
So I was depinning the Dayton Audio DSP unit of the wires that I won't be using when I noticed that there was something rattling around loose inside the unit. So I opened it up and didn't like what I found. Here is a pic of what fell out.
Not exactly what you want to see falling out of your brand new DSP unit. These look like cold solder joints to me. I didn't remove the board but maybe I should because what I saw looking down the backside of the board where a bunch of untrimmed through hole parts that where practically touching the box and what looked like cold solder joints. Funny because there is a QC sticker right there on the box. Go figure.
------------------------------------------------------------------------------------------------------------------------------------------------------------------------
Anyways here is my factory replacement radio. Phoenix Automotive Android Radio. I started doing all of the pre install wiring. I wrapped the wires up in TESA tape and got everything all plugged in and ready to be installed. I should have gotten a pic of the wiring harness before I taped everything up in TESA tape. There where wires going everywhere. I suggest that anyone installing one of these or any other after market head unit that uses plug and play type wiring harnesses that can be quite unruly to take the extra time and figure out the harness and tape it up with TESA tape, zip ties and heat shrink where needed so you don't end up trying to stuff a rats nest of wires back into the dash. And never use electrical tape to wrap wires with behind the dash. When it gets hot electrical tape will get soft and gooey and will start to unravel leaving unprotected bare wires coated with sticky glue from the tape. Use shrink tube or marine grade crimp connectors that heat shrink on to the crimped connection once it is crimped sealing it up. Soldering the wires under the dash or really anywhere in the install is completely unnecessary but some people still like to do it that way but there is no real advantage to it but you can if you like. Marine grade heat shrink crimp connectors work just as well.
This should be going in here in a day or two.
From the web site.
Compared to the 5x7" piece of crap that is in there now I think this should be a major improvement. They are on Android 10 now and most of the bugs from the earlier models have been worked out so I think it should be fairly reliable. The only thing is the unit comes with no documentation so you are kind of on your own trying to figure things out. At least there are a lot of youtube videos on line to help. It does have an OEM fit and finish to it. It looks better then the new 2023 stock big screen units that come with the new Tundra's if you ask me.
-------------------------------------------------------------------------------------------------------------------------------------------------------------------------
So in the next few days barring rain I will pull out the front seats and pull up the carpet so I can damp the floor with Killmat and Siless. Then I will remove the factory amp and install the last 4 channel amp and DSP unit in it's place. Get it all wired up which means I will need to get all of the RCA cables made. to connect everything up. Then there is the head unit and to finish I will need to do the front doors and drivers in the dash and A pillars. Then comes tuning and hopefully no driver swapping. I want to be happy with the drivers I choose but the fact remains that I ordered these drivers off the internet not hearing them beforehand so there is always the possibility that I might not like them although I have now heard the ones in the back doors and I'm fairly impressed with them.
Until the next installment
Cheers
Merry x-mas to all. So I've been busy the past week getting things done. Let's see. Where am I at right now? OK. Currently I have the front passenger seat out of the truck and have the sound damping for the floor done on that side.
Here we have two layers. First Killmat to damp and then Siless to silence road noise. Also no more factory amp.

I cut a piece of 1/4" Mahogany and MDF plywood to mount the amp and DSP unit to.

The board is painted black and the amp & DSP are mounted to the board. Here I am taking measurements for the RCA cables that I make my self.

Here the amp is mounted where the stock amp used to be. Everything here is wired and ready to go. To turn everything on I take the 12 volt trigger from the head unit and run it to the DSP then after it boots it sends out a 12v trigger that runs to the switching relay you can see in the photo below triggering the relay and in turn triggering the amps to all turn on. Figuring out the stock wiring was a pain in the *** due to the way Toyota decided to run the stock sound system. I'll get into that a little later on, maybe.

I want tweeters in the sail panels. The stock location for tweeters is up in the dash facing the front glass. I will be using that location for a 2" wideband coaxial drivers but wanted reinforcement. So I had to cot some mounting holes in the sail panels.

Then I inserted the Tang Band tweeters that I had earlier wanted to use in the rear doors but where to big. These are out of my last system that was in my Ford Exploder before I got rid of it so they have some minor surface abrasions but nothing major.


Here they are installed but I have yet to wire them because I have to run wire into the doors to power them and that is no small deal. I'll get to that later.

These will be going up in the dash. CDT Audio ES-02EX 2" Wideband coaxial drivers.

What a mess.


There is very little room behind the dash to fish the wires to where they need to get to. My hands and fore arms are all tore up from forcing them into places they don't fit just to put a ziptie on a speaker wire or something.
I installed a front facing camera that I can display on the head unit at a touch of a button along with the back up camera when ever I would like. It is mounted right below the Toyota emblem that hides the radar unit that is used by the truck for it's adaptive cruse control.

Now I will be able to see how close I am to things in front of me and will be able to see the obstacles and terrain when I am off-roading.

I was having some trouble getting the front door panels to go back on the doors due to some interference with the speaker adapter so I had to remove them and make some adjustments to make them fit right.

I had to trim the speaker grill a bit and remove all sound damping from the speaker adapter and door card where it was interfering .


For those of you with handwriting as bad as mine but still want to have clear & easy to read id tags for cables in your next build I highly recommend something like this. It has worked out very well. I got this one brand new for $15.00 at shopgoodwill.com their auction site.

So at this point,
So today I will be,
I'll let you know how it all turns out in my next post.
Till then
Cheers
Here we have two layers. First Killmat to damp and then Siless to silence road noise. Also no more factory amp.
I cut a piece of 1/4" Mahogany and MDF plywood to mount the amp and DSP unit to.
The board is painted black and the amp & DSP are mounted to the board. Here I am taking measurements for the RCA cables that I make my self.
Here the amp is mounted where the stock amp used to be. Everything here is wired and ready to go. To turn everything on I take the 12 volt trigger from the head unit and run it to the DSP then after it boots it sends out a 12v trigger that runs to the switching relay you can see in the photo below triggering the relay and in turn triggering the amps to all turn on. Figuring out the stock wiring was a pain in the *** due to the way Toyota decided to run the stock sound system. I'll get into that a little later on, maybe.
I want tweeters in the sail panels. The stock location for tweeters is up in the dash facing the front glass. I will be using that location for a 2" wideband coaxial drivers but wanted reinforcement. So I had to cot some mounting holes in the sail panels.
Then I inserted the Tang Band tweeters that I had earlier wanted to use in the rear doors but where to big. These are out of my last system that was in my Ford Exploder before I got rid of it so they have some minor surface abrasions but nothing major.
Here they are installed but I have yet to wire them because I have to run wire into the doors to power them and that is no small deal. I'll get to that later.
These will be going up in the dash. CDT Audio ES-02EX 2" Wideband coaxial drivers.
What a mess.
There is very little room behind the dash to fish the wires to where they need to get to. My hands and fore arms are all tore up from forcing them into places they don't fit just to put a ziptie on a speaker wire or something.
I installed a front facing camera that I can display on the head unit at a touch of a button along with the back up camera when ever I would like. It is mounted right below the Toyota emblem that hides the radar unit that is used by the truck for it's adaptive cruse control.
Now I will be able to see how close I am to things in front of me and will be able to see the obstacles and terrain when I am off-roading.
I was having some trouble getting the front door panels to go back on the doors due to some interference with the speaker adapter so I had to remove them and make some adjustments to make them fit right.
I had to trim the speaker grill a bit and remove all sound damping from the speaker adapter and door card where it was interfering .
For those of you with handwriting as bad as mine but still want to have clear & easy to read id tags for cables in your next build I highly recommend something like this. It has worked out very well. I got this one brand new for $15.00 at shopgoodwill.com their auction site.
So at this point,
- I have all the amps and DSP mounted and fully hooked up ready to go.
- I have all the speaker wires ran with the exception of the tweeters in the sail panels.
- I have all of the RCA cables made and installed.
- I have all of the speakers mounted except for the two on the dash. (will be done today)
- I have all of the trim and plastic parts that where removed back on the car.
- I have the subs installed and wired.
- I have the front facing camera fully installed.
- I have all the wiring that needs to make it to the head unit run and loomed with TESA tape and secured with zipties.
- The old stock system is completely removed from the truck.
So today I will be,
- installing the head unit
- installing the in dash speakers
- putting the passenger seat back in the truck
- pulling the driver side seat.
- sound damping the driver side floor.
- reinstalling the drivers seat.
- finish installing the base control knob up front.
- run the switch for the LED light bars in my front bumper.
- tuck wires under the carpet at rear passenger side.
- put proper fuses in place then fire it up, set the gains, run through the settings and options on the radio, Put the DSP and testing software on my laptop and get to tuning.
I'll let you know how it all turns out in my next post.
Till then
Cheers
I can move most of this to the done column. I still have tuck the wires under the carpet in one spot and I have to set every thing up in the DSP and the gains but everything is in. I also still need to run wires for the tweeters in the sail panels but that will likely be next week as we are in for a good weeks worth of rain heading our way. I'll snap a couple of pics of the dash and post them later on but here is how I mounted the dash speakers. Instead of mounting them behind the factory grills I mounted them on top as didn't like the idea of two grills and this way it gets the driver up on the dash in stead of in it. It looks cool too.
- talling the head unit
- installing the in dash speakers
- putting the passenger seat back in the truck
- pulling the driver side seat.
- sound damping the driver side floor.
- reinstalling the drivers seat.
- finish installing the base control knob up front.
- run the switch for the LED light bars in my front bumper.
- tuck wires under the carpet at rear passenger side.
- put proper fuses in place then fire it up, set the gains, run through the settings and options on the radio, Put the DSP and testing software on my laptop and get to tuning.
So I will report back after I get a chance to dial everything in.
cheers
Okay. First impressions are well.....mixed.
The head unit is so far not delivering the expected sound quality.
First off there is no manual for the thing and all of the videos available on youtube are for previous versions and look nothing like the one I have. So finding my way around in the scattered system menus is no fun and a good part of the configuration options and various features have no description or instructions as to what they do or how they work. So that is one big strike against the unit and another big strike against the unit comes by way of their service department. When I sent them a series of very specific questions I wanted answers to they responded with links to two videos that I already saw and didn't pertain to the questions I needed answers to and like I mentioned were for a previous version with a totally different GUI.
The unit gets another strike for a small factory blemish in the screen. There is what appears to be some foreign material caught between the layers of the screen. It isn't a lot . It's just a small spot but for $800.00 I expect better QC. Then there is an issue with the SUB_OUT RCA not working. To start with it is a single RCA so the signal is delivered in mono I assume from the sum of the stereo signal summed by the head unit and not by the amp. I prefer to give the amp a stereo signal and let the amp do the summing but it doesn't matter because the cable delivered only noise with no signal. To be fair I still need to pull the unit to verify if there is signal at the RCA on the back of the unit to rule out my RCA cable as the defective part. But I did a continuity check of all my cables after making them so I could be sure they worked before wasting time installing something that would only have to be replaced so I highly doubt it is a cable problem. The sub channel bypasses the DSP unit as I had intentions of using the DSP within the head unit to adjust the signal to the subs.
Another strike against the head unit and this is a big one.......it is just plain noisy. This isn't a ground loop issue or alternator wine or anything like that. This is digital noise coming from the head unit it's self likely being caused by improper isolation of the power and amplification stages on the PCB and/or inefficient isolation and shielding of the internal WiFi and Blue Tooth boards. When sitting with the truck off with the key in the ACC position and nothing playing there is a very audible noise emanating from all of the speakers including the sub that gets no signal. This noise sounds very much like it might be the WiFi/Bluetooth inside the unit trying to maintain the connection with my phone and is bleeding over into the signal path. It isn't effected by the volume setting at all. Then there is the noise you get anytime you make an adjustment or interact with the head unit at all. Any adjustment made on the unit such as swiping the screen and scrolling down the page causes a corresponding noise that is clearly digital in origins. When you scroll the page you get a staticky scrubbing noise. I don't see how this can be fixed without maybe disabling WiFi and Bluetooth and even then it's just a maybe.
One more strike against the unit for the way my voice echoes on the other end of calls placed with the hands free capabilities of the unit.
Some other things that are more annoyances then defects are the scattered system menus. Instead of putting all of the settings in one place they are scattered all over. I was also under the impression that the DSP capabilities of this unit where a lot better then they actually are. I thought I was going to be able to set X-over points but in reality there is only very rudimentary DSP implementation. Then there is the fact that the display doesn't dim at night. The screen is pretty bright and is quite distracting as it glares off the glass. You have the option to black out the screen but that doesn't do you any good if you are using the navigation feature. There is also a problem with the units auto detect feature that is supposed to correctly identify the make, model and trim package of the vehicle and display a corresponding home screen with an image of the proper vehicle. Currently their is an SUV displayed on my home screen and I have no idea how to get it to display the right vehicle. It is also supposed to be able to auto detect the trim package and load the proper controls for the HVAC system. I have the very basic SR5 trim without all of the bells and whistles of the Platinum series. I don't have heated seats or separate temperature zones and nothing is automatic but for some reason it thinks I do. Then there is the noise at shut off. When I turn the truck off there is a very brief dying animal sound it make as everything just shuts down abruptly. There is no soft shutdown.
Then tonight when I was coming home from the store the right channel started going in and out. I don't know what that is all about. It was both front and rear channels. Then I noticed the midrange part of the coaxial on the left side wasn't playing at all. So I need to figure that out now. I'm starting to think I wasted $800.00 and I don't think they will refund my money or let me return the unit as I've had the unit more then thirty days plus before I installed the unit I used TESA tape and taped up the harness real good as part of my cable management protocol.
So before I end up writing a novel here I will end this for tonight right here. I will be pulling the unit out tomorrow if I can find the time and hopefully I will be able to figure out a way to deal with the noise and the rest of the issues I'm having because right now I'm not happy.
There is one other thing.
I am thinking that the component set that I got for the front stage isn't going to cut it for me. I like the tonality of the rear stage better then the front so I've decided to pull the 6.5" from the front doors and replace them with a set of 6x9's from the same line as I used in the rears. I'm also likely going to replace the dash speakers with a set of CDT wideband "unity 8.0" drivers. I still need to replace the dashboard center channel as well with one of their dual voice coil 3" midranges with passive volume adjustment pot (L-Pad) to adjust the drivers sensitivity and bring it under control for better integration. This driver is driven by the amp in the head unit and I'm currently still using the stock speaker.
The thing is that CDT Audio, the brand that I am using is a local company. Their main base of operations is in this little industrial area located just a few miles from my house. I know where it is but I have never been there before. So I decided to go by there last night and check out their operation and see if I could speak with one of their engineers. As it turns out I got to meet and talk to the owner and chief designer. I had some questions regarding the different offerings they have as their website is less then helpful and is actually quite confusing as they don't do a very good job at explaining the differences between the various versions of what looks like the same driver. They do have some exceptionally good drivers but unless you have installed them with some regularity and have become accustomed with the different lines and know what they sound like it can be very difficult trying to parse a system together solely by the web site due to the lack of objective technical specifications and the abundance of useless marketing and meaningless langwidge. But after talking with the man for a little while he was able to clear some things up for me. So it looks like I'm going to spend some more money.
Thanks man. I thought about MDF baffles but went with the METRA adapters. They are damped down enough that any advantage that you would gain by using MDF would be very small.Nice work!
I'd think about doing some mdf baffles for your door mounted drivers.
I have already spent more money then I should have on this project. Audio Control offer some very nice products but they want to much money for them. The Dayton Audio DSP, well we will have to wait and see how it works out I guess. I wasn't happy to find those pieces of solder just rattling around in the unit though especially with the QC passed sticker right there on the unit. I haven't had much of a chance to approach the problems I'm having with the head unit yet as it's been raining here in California off and on for the last week and has been forecasted to be raining for the next week so I'll get to it when I can. For right now I have very basic x-overs set up and that is all. It's doing it's job for now. After I get the head unit sorted out I can make a determination as to the DSP's contribution to the noise floor and see where we go from there. This rain is really derailing my forward momentum.& Scrap the Dayton DSP's and get an Audiocontrol DQDX
Update. Rain and more rain. Nothing else to report on other then I got the replacement drivers for the front stage and they are:
CDT Audio HD-690CF 6x9's for the doors
CDT Audio Unity 8.0Plus 2" wide band mid/tweeters for up on the dash replacing the coaxial units. They have the exact same footprint so swapping them out will be easy.
CDT Audio CF-3 center fill driver. This is to replace the stock center fill driver. It is a dual voice coil driver that will have right and left channels attached through a variable L-pad and likely passive x_overs.
There is nothing wrong with the drivers I'm replacing per say. There is just a tonality difference between the front and rear stages and I prefer the way the rear stage sounds over the front plus I need to get more bass up front and more sound coming out of the front doors. The 6x9's that are replacing the 6-1/2" up front are from the same line as the rears and have the same woven carbon fiber cone material so they should carry the tonality of the rear to the front. Being that they are 6x9's and have larger cones they should be able to out put more base up front which I need because at this point there is to much space between the subs in the rear and the front sound stage coming mostly from the dash and I need to bridge the two and tie them back together because right now they are somewhat incoherent. My solution is to put more of the low frequencies up front and possibly put some mid fill's up in the head liner in the back of the cab. This should hopefully solve my problem. The 6x9's are also 2 ohm drivers as apposed to the 4 ohm drivers that they will be replacing giving me more power from the amp that is needed to drive them louder.
The Unity 8.0Plus drivers will be replacing a pair of CDT wide band coaxial's that I put in but decided they don't work with what I'm trying to put together. Again there isn't anything wrong with them per say they just don't work with my system. I got a call tonight from CDT and they informed me that my order was full filled and I could come down and pick them up instead of having them delivered and saving me the $55.00 delivery fee to which I replied, "I will be there in half an hour." While I was there the owner invited me to listen to the Unity 8.0Plus drivers installed in a listening room and I was some what blown away because these things sounded much better then I was anticipating. These little 2" drivers are doing double duty and they are doing it well. I think the choice to replace the newly installed coaxial's up front with these Unity drivers was the right choice to make. This also frees up two channels on the DSP and two channels on the amplifier that I will probably use to drive the rear fills should I decide to install them.
More on the center channel later. I need to explain Toyotas methodology with their stock stereo install in this truck and probably on other vehicles but that is more then I want to get into at the moment because I'm tired and want to go to bed. So until I return here are some pics to enjoy.
Attachments
Got a break in the rain long enough to install the Unity8.0Plus wide band drivers up in the dash as well as the CF-3 center channel driver and what a difference they make. I also straightened up some of the RCA routing as I had a couple of the RCA's going to the wrong channels. I did attempt to replace the mid-woofers in the front doors with the 6x9's and discovered they where a little to big to fit so I am going to keep the 6-1/2"'s and after I spent a bit of time tuning the system and playing with different X-over points and topologies I was able to get the system sounding pretty darn good. So I think at this point those 6-1/2's will work just fine. So now I need to find a use for the 6x9's or sell them. Maybe they can be used in my Mustang.
Now I just need to deal with the noise coming from the head unit and the issue with the right front channel going in and out. I know it is a problem with the head unit and not the amp because when it goes down and I give the dash a good thump with my fist just above the unit the channel comes back on and the only way that happens is if the problem is with the head unit itself. There is also a real bad problem with shutting the truck off and the system sounds like a dying animal as it abruptly shuts down and I have no idea how I'm solve that problem. I did manage to figure out why the RCA for the sub wasn't sending any signal and it had to do with a setting hidden in one of the system setup menus. Again this would be a lot easier if there was some kind of documentation for the damn thing. It looks good though.
For the center channel I wired it into the stock wiring which means it is being powered by the head unit and not by any of the amps. The two tweeters up in the rear door panels are also being powered by the head unit as well. If I ever get around to hooking up the tweeters in the sail panels they to will be powered by the head unit as well. As of right now I don't have the L pads wired into the center channel and I don't think I will be needing it as the volume is pretty much right where it needs to be and as of right now it is running full range and sounds great so I might just leave it like that. It is a full range speaker and it is being run under it's rated power so I think it will be just fine as it is.
I also need to figure out why my front facing camera isn't working. If it doesn't rain later today I will pull the unit out and see what can be done to deal with some of these issues. If I can't fix them the unit will be going back and I will have to find another option. That or the stock head unit will be going back in. Stay tuned. In the mean time here are some more pics.
Here are the Unity drivers.

I think they look pretty good.

Back in the dash along with the tweeters in the sail panels that as of yet are not wired into the system. I'm not looking forward to running the wire into the doors for them as it is a pain in the *** getting it through the rubber grommet connecting the door to the cab. At this point I'm not even sure they are needed.


Here is the head unit. It looks pretty good except for that blemish in the upper top right side and the fact that the screen is a matt finish. So far I am not very happy with it.

The mounting adapter I made for the center speaker along with the stock driver that I removed.

Center speaker installed and working.

And here is why you need silicone baffles to protect your investment from getting damaged by water infiltration during rain storms. This is pretty typical of what the back side of those expensive drivers you have in your doors look like after a good soaking. I have a relatively new vehicle with good rubber so you can imagine how much water infiltration an older vehicle could see. These silicone baffles work pretty good at keeping that water away from the driver.


That is it for now. Once I get the problems with the head unit sorted I will see to maybe doing some measurements and posting the results.
But chow for now.
Now I just need to deal with the noise coming from the head unit and the issue with the right front channel going in and out. I know it is a problem with the head unit and not the amp because when it goes down and I give the dash a good thump with my fist just above the unit the channel comes back on and the only way that happens is if the problem is with the head unit itself. There is also a real bad problem with shutting the truck off and the system sounds like a dying animal as it abruptly shuts down and I have no idea how I'm solve that problem. I did manage to figure out why the RCA for the sub wasn't sending any signal and it had to do with a setting hidden in one of the system setup menus. Again this would be a lot easier if there was some kind of documentation for the damn thing. It looks good though.
For the center channel I wired it into the stock wiring which means it is being powered by the head unit and not by any of the amps. The two tweeters up in the rear door panels are also being powered by the head unit as well. If I ever get around to hooking up the tweeters in the sail panels they to will be powered by the head unit as well. As of right now I don't have the L pads wired into the center channel and I don't think I will be needing it as the volume is pretty much right where it needs to be and as of right now it is running full range and sounds great so I might just leave it like that. It is a full range speaker and it is being run under it's rated power so I think it will be just fine as it is.
I also need to figure out why my front facing camera isn't working. If it doesn't rain later today I will pull the unit out and see what can be done to deal with some of these issues. If I can't fix them the unit will be going back and I will have to find another option. That or the stock head unit will be going back in. Stay tuned. In the mean time here are some more pics.
Here are the Unity drivers.
I think they look pretty good.
Back in the dash along with the tweeters in the sail panels that as of yet are not wired into the system. I'm not looking forward to running the wire into the doors for them as it is a pain in the *** getting it through the rubber grommet connecting the door to the cab. At this point I'm not even sure they are needed.
Here is the head unit. It looks pretty good except for that blemish in the upper top right side and the fact that the screen is a matt finish. So far I am not very happy with it.
The mounting adapter I made for the center speaker along with the stock driver that I removed.
Center speaker installed and working.
And here is why you need silicone baffles to protect your investment from getting damaged by water infiltration during rain storms. This is pretty typical of what the back side of those expensive drivers you have in your doors look like after a good soaking. I have a relatively new vehicle with good rubber so you can imagine how much water infiltration an older vehicle could see. These silicone baffles work pretty good at keeping that water away from the driver.
That is it for now. Once I get the problems with the head unit sorted I will see to maybe doing some measurements and posting the results.
But chow for now.
I’m surprised how much water is getting in. Rather concerning actually. I can’t really see another more effective way though. Looks like you’re doing an excellent jobWell today was pretty productive. I concentrated on the rear of the vehicle primarily. My goals for today where to get the back seats out of the truck and get the rear window area damped down and then to figure out how I was going to mount the subs. I had hoped there was going to be enough room under the rear seats to mount the subs in the floor but no luck there.
The factory sound treatment is a rather heavy piece of mass loaded vinyl draped across the back wall.
View attachment 1106674
These Tundra's have an operational back window that I like a lot.
View attachment 1106675
Panel is off and ready to be killed dead.
View attachment 1106676
Full dead now.
View attachment 1106677
So is the inside.
View attachment 1106678
Sizing things up.
View attachment 1106679
It won't work.
View attachment 1106680
Not enough room.
View attachment 1106681
It became obvious that there wasn't going to be enough room to mount the subs in the floor so it was time to mock up a cardboard box and see if it was going to fit behind the seats and if it was going to be deep enough to fit the two 12" drivers. Most everyone else I've seen doing a subwoofer install on the Tundra's used 8 or 10 inch subs.
My mocked up cardboard box. IT FITS!
Tomorrow I will go to the Home Depot and get some plywood to build the box for real. I think I'm going to use plywood here because the box panel thickness will have to be 1/2 & 5/8" to make it work and I need the strength of plywood. Plus I might put one or two layers of fiber glass over the top of the box when I'm done putting it together for durability and moisture resistance and It will bond a lot better to plywood then MDF.
View attachment 1106682
So I sound damped the floor under the seats and decided I will put my amps there in stead seeing that the subs where not going there. It is actually a perfect place for the amps.
View attachment 1106686
Well it is 10;30PM here and day light savings time starts tomorrow and I'm tired. So it's off to bed for me and hopefully I can get the box built by tomorrow. We shall see. I'll update this thread tomorrow.
Cheers
Thanks. It's really sounding good except for the noise coming from the head unit. I still need to run an RTA on the system and do some measurements with REW to get the final tune put in it but it won't due me any good until I get the issues fixed with the head unit first. But even as it is right now with just a preliminary tune by ear I don't think it is going to take much to dial everything in tight. So far the only EQ that I have applied is a small bit of boost to the 45-120hz range just to give the mid base a little bit of a leg up. This is my first system using CDT drivers and so far I'm pretty happy with their performance. They have some really nice stuff and it seems like they all ways have some sale going on over at their web site so you can get some nice drivers for cheep if you just wait for them to go on sale. The Unity 8.0Plus 2"wideband drivers are exceptionally good. They have a surprisingly flat frequency response starting at around 450hz and by 800hz they are ruler flat until around 18k where they start to gently roll off. By 20k they are down by maybe 2db.I’m surprised how much water is getting in. Rather concerning actually. I can’t really see another more effective way though. Looks like you’re doing an excellent job
As for the water in the doors what you see is pretty normal after being outside in a heavy rain storm. and is nothing to get alarmed about. You will find that most cars are the same way. The doors get pretty wet inside you just need to keep the water off the speakers and everything's fine.
- Home
- General Interest
- Car Audio
- My Tundra is getting a new system