I know it's been a while since an update with any substance, but the lamination of the sides has been a bit slow-going and not really noteworthy, plus a vacation tossed a nice (enjoyable) delay in the mix.
Alas, a few progress pics.
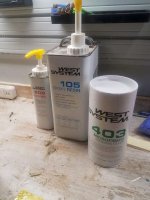
For laminating the 1/4" ply to form the sides I used West Systems epoxy resin along with a bit of their microfiber filler. My dad introduced me to this stuff while making various boat repairs, and although it's expensive (~$150USD for a gallon of resin and the corresponding hardener), it's wonderful to work with and is extremely strong. You can buy different "speed" hardeners depending on desired working time and ambient temperature. It takes ~24hours to fully cure, so I'm able to do about one layer per day if I have time. One of nicest things about this system is that you can buy calibrated pumps for the resin and hardener which result in a 1-pump:1-pump ratio.
The filler is essentially ground up fiberglass and can be mixed into the resin to change its viscosity and allows it to "fill" gaps better. I mixed enough in to make it a syrup-like consistency which helped to prevent it from running after I spread it out.

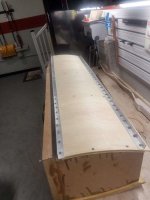
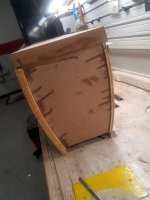
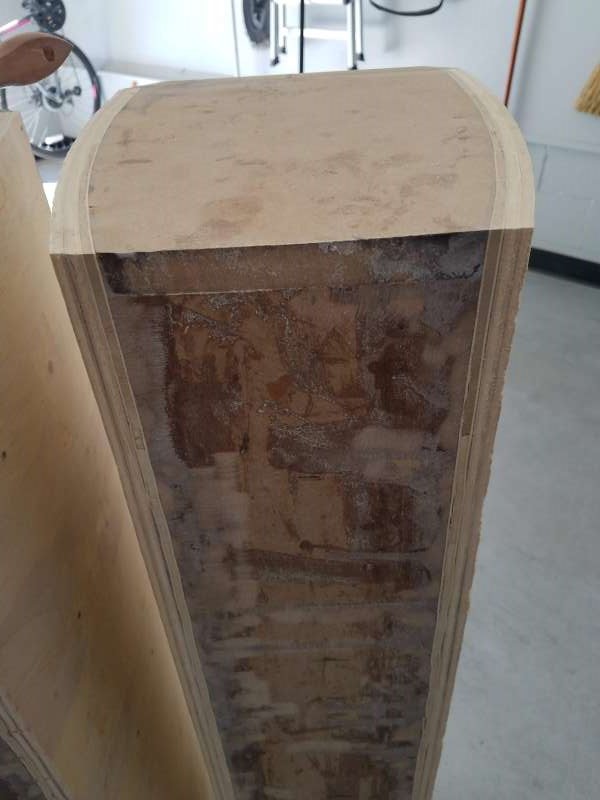
I've had to experiment with different methods of bending/clamping the layers and I think I've finally found an efficient and effective method. I took a pair of aluminum angle-stock and drilled holes approximately every 1.5" to accept a drywall screw. After laying out a coat of resin, I lay the next layer in place up against the front baffle and screw the first angle down. I then add a few screws directly through the plywood layer and into the shelf braces to pull the sheet down tight. Finally I screw down the second piece of angle into the rear baffle to hold the back edge down tight. I'll have some holes to fill in, but this seems to give a nice tight bondline during lamination.

And finally, a shot of the tower which is furthest along. Three fully cured layers on one side, with the 2nd layer curing on the other. Later today I hope to get a piece of walnut to fabricate the port flares. Tomorrow I plan to glue up the third layer. If all goes well, later next week I'll start taking measurements of the mid and woofer in the first completed cabinet in parallel with finishing the 2nd cabinet.

Alas, a few progress pics.
For laminating the 1/4" ply to form the sides I used West Systems epoxy resin along with a bit of their microfiber filler. My dad introduced me to this stuff while making various boat repairs, and although it's expensive (~$150USD for a gallon of resin and the corresponding hardener), it's wonderful to work with and is extremely strong. You can buy different "speed" hardeners depending on desired working time and ambient temperature. It takes ~24hours to fully cure, so I'm able to do about one layer per day if I have time. One of nicest things about this system is that you can buy calibrated pumps for the resin and hardener which result in a 1-pump:1-pump ratio.
The filler is essentially ground up fiberglass and can be mixed into the resin to change its viscosity and allows it to "fill" gaps better. I mixed enough in to make it a syrup-like consistency which helped to prevent it from running after I spread it out.
I've had to experiment with different methods of bending/clamping the layers and I think I've finally found an efficient and effective method. I took a pair of aluminum angle-stock and drilled holes approximately every 1.5" to accept a drywall screw. After laying out a coat of resin, I lay the next layer in place up against the front baffle and screw the first angle down. I then add a few screws directly through the plywood layer and into the shelf braces to pull the sheet down tight. Finally I screw down the second piece of angle into the rear baffle to hold the back edge down tight. I'll have some holes to fill in, but this seems to give a nice tight bondline during lamination.
And finally, a shot of the tower which is furthest along. Three fully cured layers on one side, with the 2nd layer curing on the other. Later today I hope to get a piece of walnut to fabricate the port flares. Tomorrow I plan to glue up the third layer. If all goes well, later next week I'll start taking measurements of the mid and woofer in the first completed cabinet in parallel with finishing the 2nd cabinet.
Attachments
I use the exact same resin and hardener, and yes, boat refurbishment is my other hobby... It is an excellent product. I usually buy the resin in quart size.
Progress looks great!
Progress looks great!
Around here, a gallon of resin is $100 while a quart is $45. For that price difference I couldn't justify buying it by the quart given that I'll find plenty of uses for whatever is left over
Me too, although it'll be a little while. I want to get the x-overs sorted out before I apply the finished so that I don't ding them up. We're having family over for Thanksgiving, so my goal is to have them painted, veneered, and stained by then.
I lied, one more update 🙂
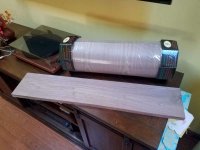
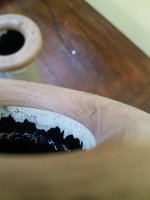
Roughed in the port flares, epoxied in the ports, the routed them flush and added the roundovers. I'll need to touchup the paint on the ID of the tubes after I sand/stain the trim rings.


]
Roughed in the port flares, epoxied in the ports, the routed them flush and added the roundovers. I'll need to touchup the paint on the ID of the tubes after I sand/stain the trim rings.
]
Attachments

One thing to be aware of regarding veneer... I have found that veneer does not always take a finish the same way as solid wood timber does. The color can be different.
With some wood species (like cherry and maple) there is almost no difference. But others, including walnut, I have also noticed it.
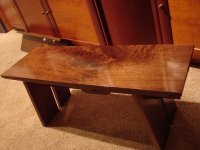
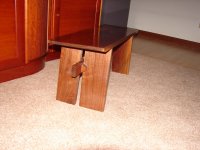
I attached two pictures of a walnut bench I made a couple of years ago. This was finished with General Finishes Arm-R-Seal clear gloss finish, which I rubbed down to a satin. Notice it has a reddish tint to it.
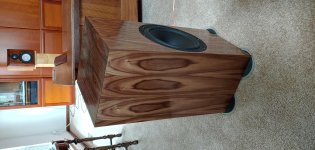
I also attached two pictures of a woofer cabinet I recently made. It was veneered in walnut. Notice there is no reddish tint. It is various shades of brown, but no red. Once again I used General Finishes Arm-R-Seal gloss, and rubbed it down to satin
Before applying finish, both pieces looked very much the same, i.e. typical black walnut. The veneer looks like wood timber, until the first coat of varnish.
I don't know of a solution to this, and from my perspective it is not a problem... the beauty of wood is in the inherent variations. But I don't want you to be surprised.
I notice this effect most strongly with teak, mahogany, walnut. Not so much with cherry, and white oak. Maple and birch seem completely unaffected.
With some wood species (like cherry and maple) there is almost no difference. But others, including walnut, I have also noticed it.
I attached two pictures of a walnut bench I made a couple of years ago. This was finished with General Finishes Arm-R-Seal clear gloss finish, which I rubbed down to a satin. Notice it has a reddish tint to it.
I also attached two pictures of a woofer cabinet I recently made. It was veneered in walnut. Notice there is no reddish tint. It is various shades of brown, but no red. Once again I used General Finishes Arm-R-Seal gloss, and rubbed it down to satin
Before applying finish, both pieces looked very much the same, i.e. typical black walnut. The veneer looks like wood timber, until the first coat of varnish.
I don't know of a solution to this, and from my perspective it is not a problem... the beauty of wood is in the inherent variations. But I don't want you to be surprised.
I notice this effect most strongly with teak, mahogany, walnut. Not so much with cherry, and white oak. Maple and birch seem completely unaffected.
Attachments
Last edited:
Thanks for the heads-up. I was planning on testing out finishes on scraps of lumber and veneer prior to applying to the cabinets, but I'll make sure to keep a lookout for significant differences in finish.

 Someday I'll have a TTZ. My first Z32 was a black 2+2 NA and I now have a white slicktop NA that comes out on nice days.
 Are you on TT.NET or 3ZC?
Nothing like a chipped twin turbo Z to wear out rear tires and break them loose on dry roads, let alone the wet. I bet NA is a lot less scary. I sold my '91 original owner TT in '07 but still remember it fondly. Now I am driving twin turbo BMW with Dinan engine software.
^^ The nice thing about the NA is that it generally doesn't have enough power to get into too much trouble, unless road conditions are crap. This is even more true for me since I swapped the OEM NA wheels with the wider 16x8.5" rear TT wheels on all four corners with 245 Toyos.
Progress update:
One cabinet is fully laminated up and the second cabinet has the third layer on one side drying. Tomorrow I'll add layer 2 to the other side with hopes of adding the final layer mid-week. Next weekend I hope to trim up the overhangs, sand them out, and start prepping them for primer.
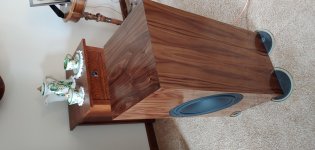
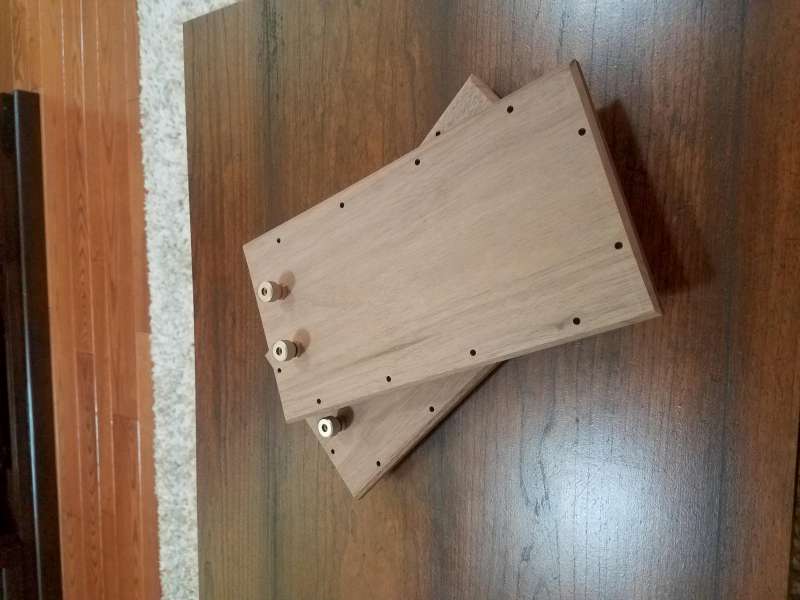
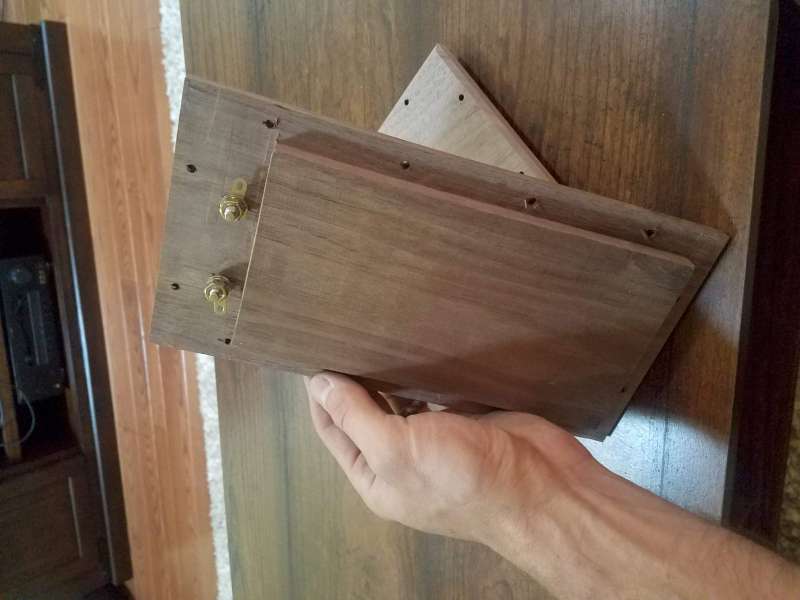
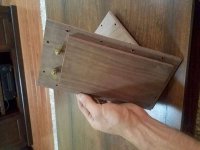
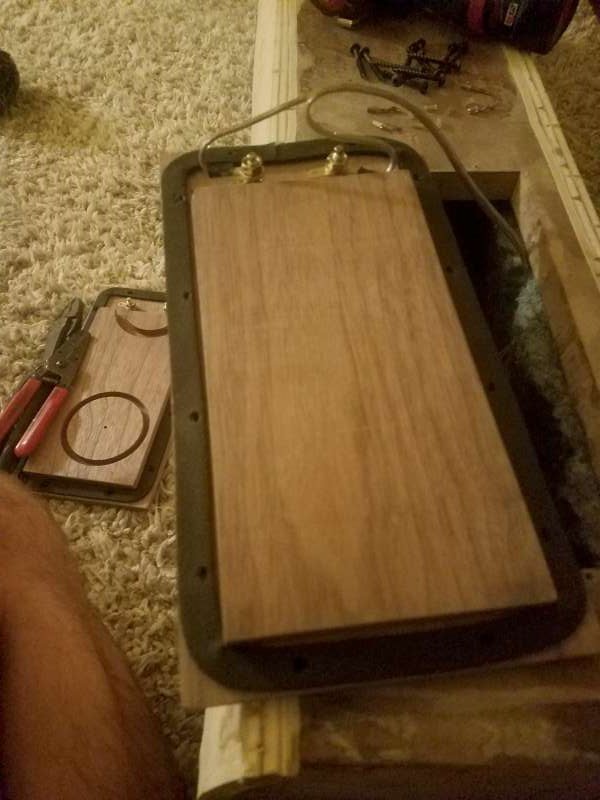
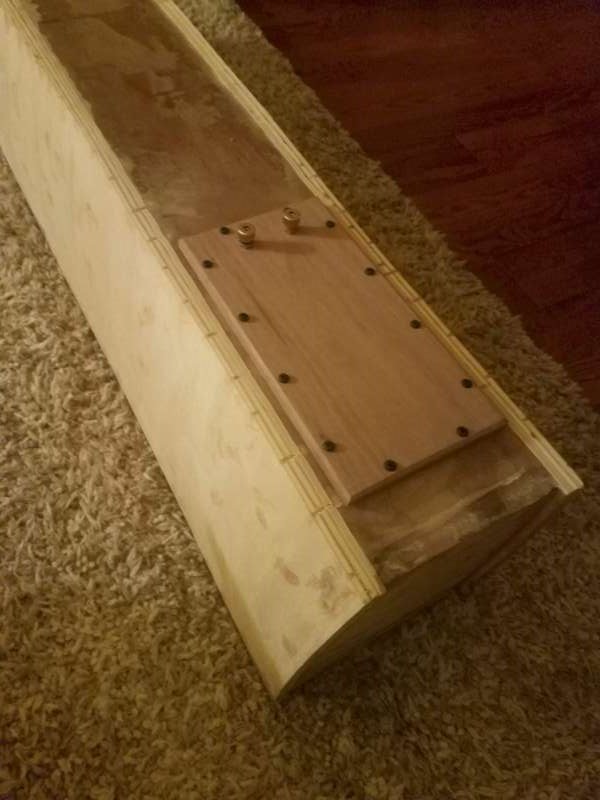
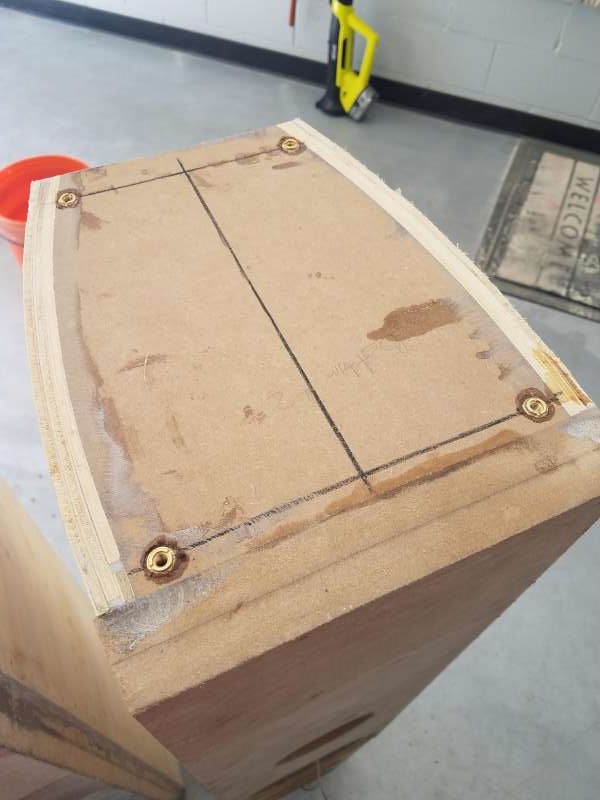
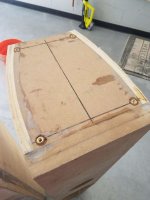
In addition, I spent a few hours this morning/afternoon fabbing up access panels out of the leftover walnut. These will screw into the back baffle to allow access to the crossovers. They'll also likely be the first piece of wood that gets a proper finish 😎
Progress update:
One cabinet is fully laminated up and the second cabinet has the third layer on one side drying. Tomorrow I'll add layer 2 to the other side with hopes of adding the final layer mid-week. Next weekend I hope to trim up the overhangs, sand them out, and start prepping them for primer.
In addition, I spent a few hours this morning/afternoon fabbing up access panels out of the leftover walnut. These will screw into the back baffle to allow access to the crossovers. They'll also likely be the first piece of wood that gets a proper finish 😎
Attachments

Mostly cleaned up the overhanging plywood on the rear of the first cabinet yesterday. I have a bit more work with the DA sander to finish leveling out some areas, and then a bit of work with some filler. I also added gasket material to the back of the access panels, burned screw holes into it with a soldering iron to avoid tear-out when driving the screws in, and mounted everything back up for a final assessment of the low end bass.
Much better extension 🙂 It's really amazing how much a few minor leaks impact the bass performance of an enclosure. I might actually pull out the measurement mic before I disassemble them for further finishing.
Much better extension 🙂 It's really amazing how much a few minor leaks impact the bass performance of an enclosure. I might actually pull out the measurement mic before I disassemble them for further finishing.
Attachments


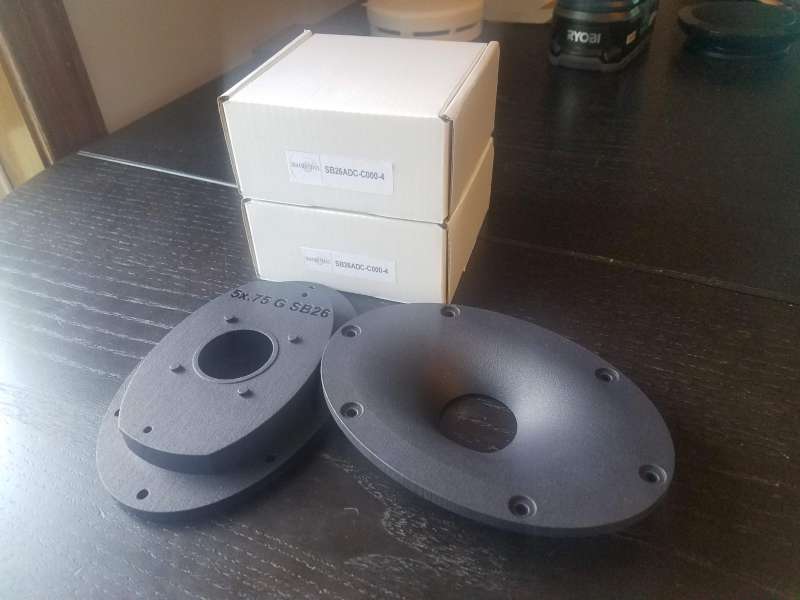
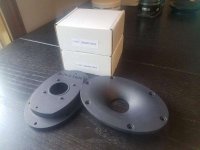
The last of the goodies came in this week 🙂 SB26ADC tweeters from Madisound and a pair of augerpro's SB26 5" waveguides. I sourced them from Xometry and had them built in SLS Nylon with a "machine tumble and black dye" finish added. They ran me $125 shipped for the pair including tax. Not cheap, but I'm VERY happy with the build quality.
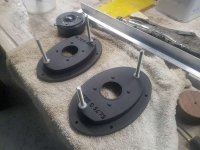
Last night I layed up the FINAL side layer on the second cabinet Tonight after work I removed the screws and mixed up a thick batch of west systems epoxy to fill the screwholes. I then drilled and tapped the two waveguide holes for 1/4-20, and threaded in some threaded rod with a healthy dab of leftover epoxy.
This weekend should be very productive. I'm hoping to get both cabinets trimmed, sanded down, and hopefully ready for primer.


Last night I layed up the FINAL side layer on the second cabinet
Tonight after work I removed the screws and mixed up a thick batch of west systems epoxy to fill the screwholes. I then drilled and tapped the two waveguide holes for 1/4-20, and threaded in some threaded rod with a healthy dab of leftover epoxy.This weekend should be very productive. I'm hoping to get both cabinets trimmed, sanded down, and hopefully ready for primer.
Attachments
Fabrication progress for the weekend:
Trimmed the overhanging plywood from both cabinets and ground/sanded the joints reasonably flush. I'll need to do a bit more sanding/filling/resanding before they're ready for paint & veneer.
Drilled ~0.5" deep blind holes for M6x1.0 threaded inserts for mounting the spikes and installed the inserts with a dab of epoxy for good measure:
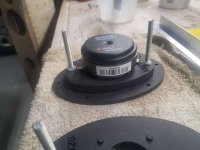
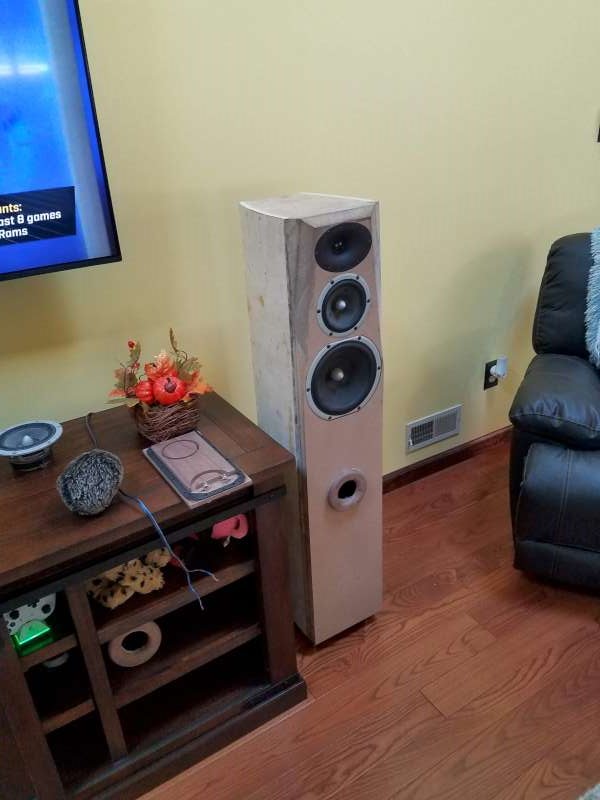
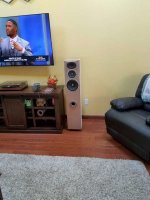
...and then installed the SB26s (with waveguides) along with the other two drivers into one cabinet and moved it into the livingroom for some measurements. My plan is to use this cabinet to measure the speakers and start x-over design work while I work on the cosmetics of the other speaker cabinet

Trimmed the overhanging plywood from both cabinets and ground/sanded the joints reasonably flush. I'll need to do a bit more sanding/filling/resanding before they're ready for paint & veneer.
Drilled ~0.5" deep blind holes for M6x1.0 threaded inserts for mounting the spikes and installed the inserts with a dab of epoxy for good measure:
...and then installed the SB26s (with waveguides) along with the other two drivers into one cabinet and moved it into the livingroom for some measurements. My plan is to use this cabinet to measure the speakers and start x-over design work while I work on the cosmetics of the other speaker cabinet
Attachments


Lots of fun with data and charts 🙂
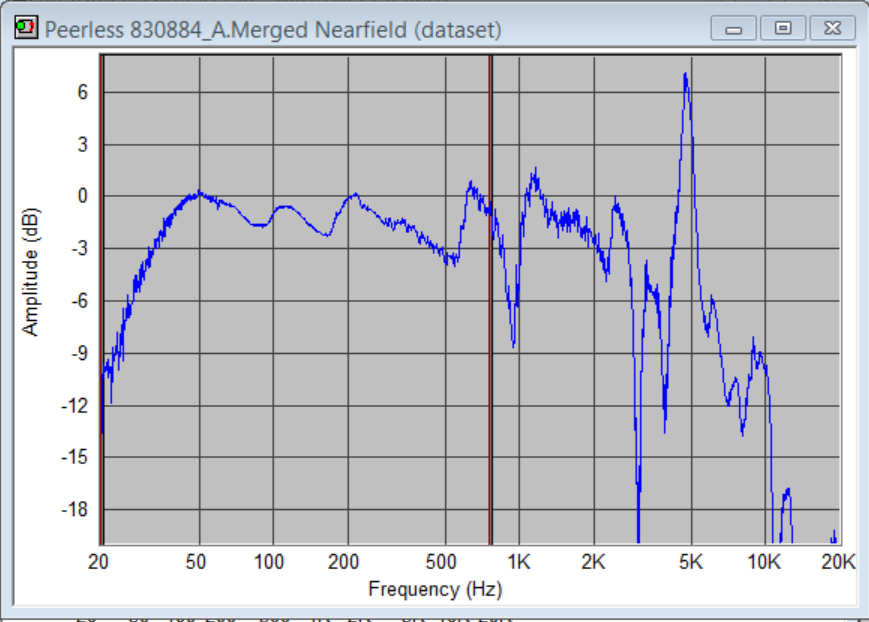
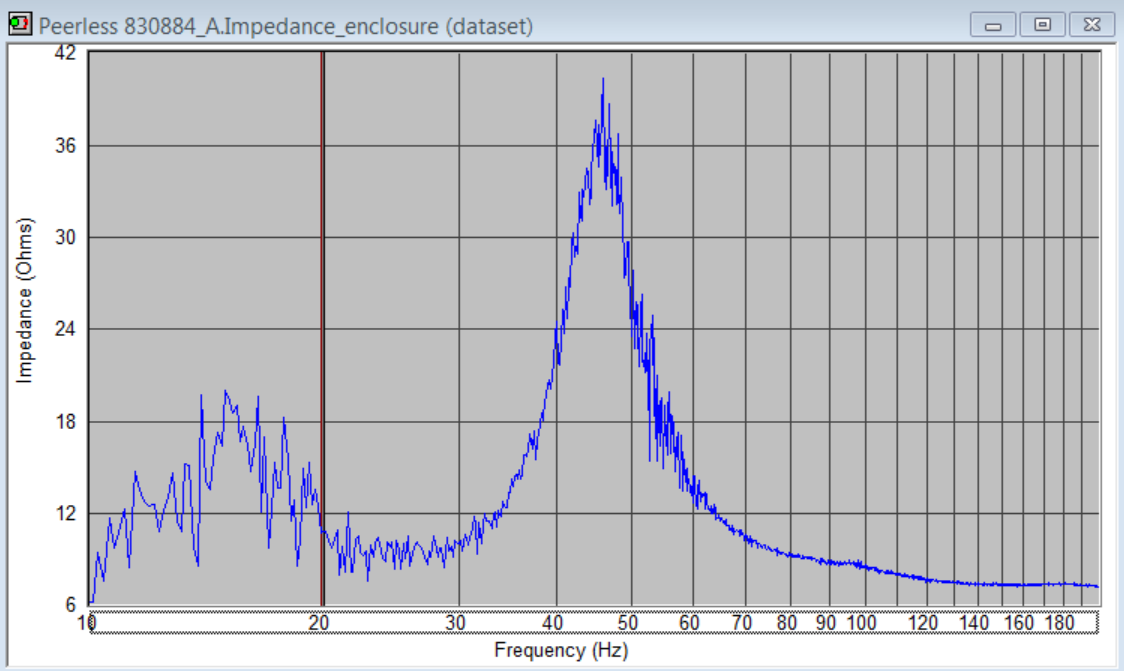
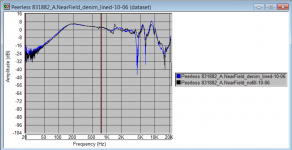
Nearfield response of the woofer and port. Valid up to ~650hz if my calcs are correct. Solid response down to ~50hz. Impedance plot shows a tuning of around 25hz if I'm reading it correctly, which is a few hz lower than what I targeted. Perhaps due to the heavily lined enclosure presenting a but larger effective volume?
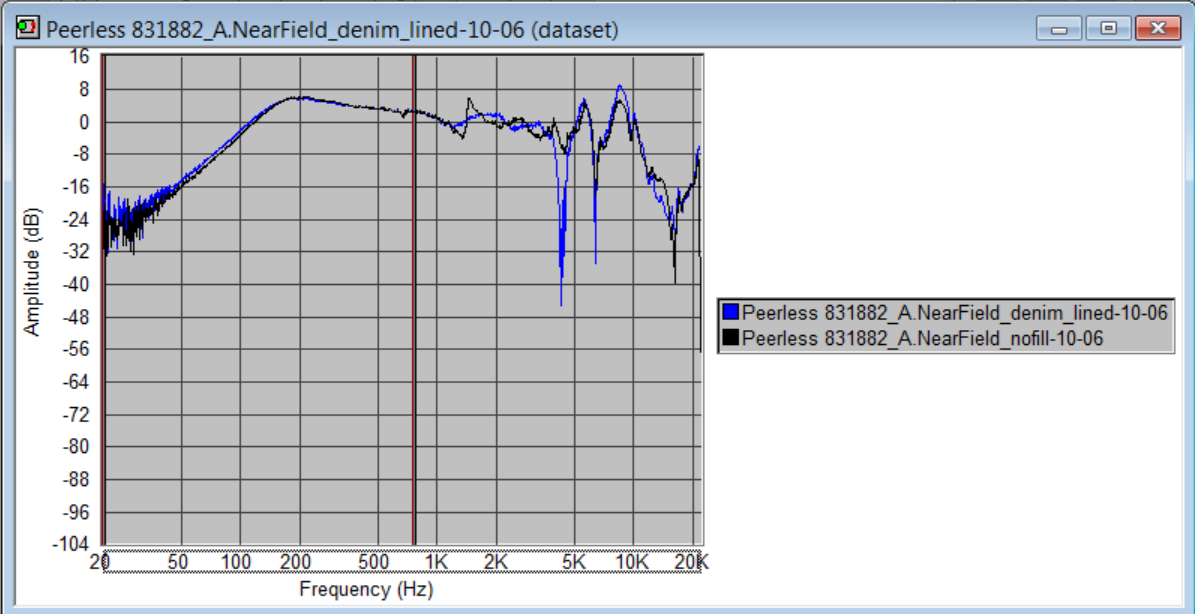
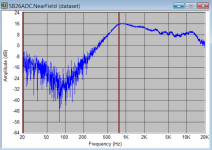
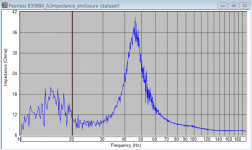
Mid nearfield measurements. I first measured with a naked, unlined mid-enclosure. I then remeasured after adding a lining of denim insulation. The nearfield measurements should be valid up to ~1050hz, but the significant damping of the disturbance at ~1500hz makes me wonder if that is still the denim insulation doing its job. Thoughts?
Tweeter nearfield

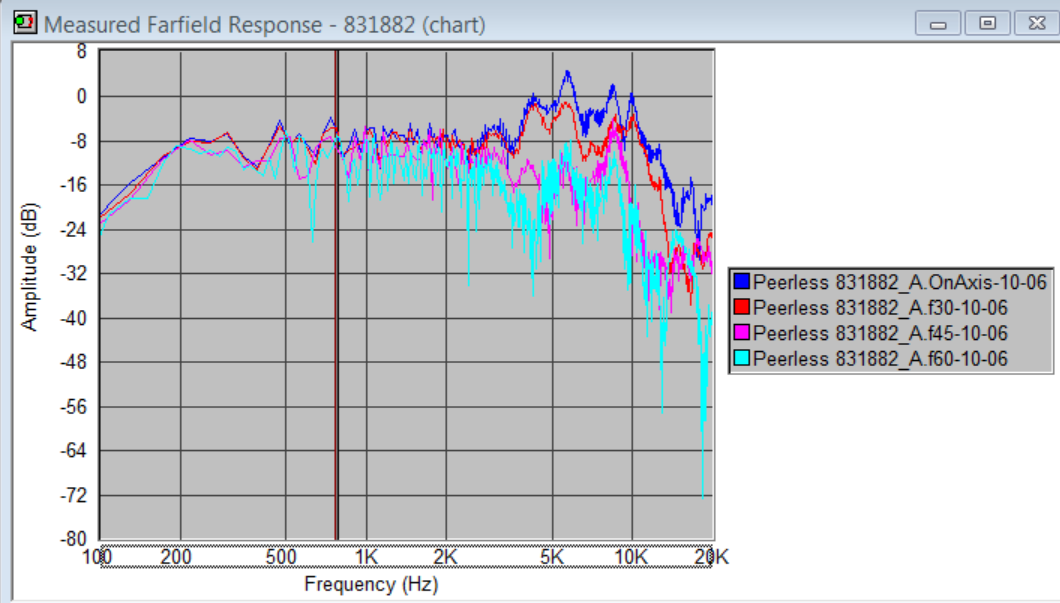
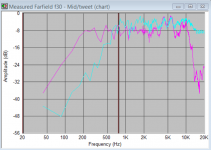
Mid farfield measurments:
Tweeter farfield measurements:
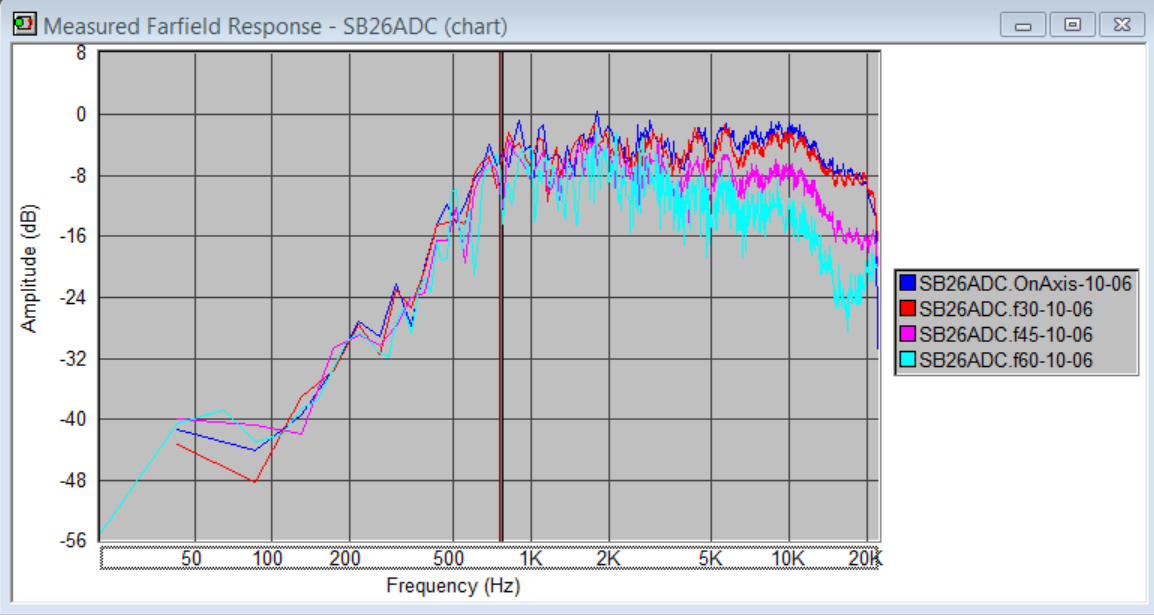
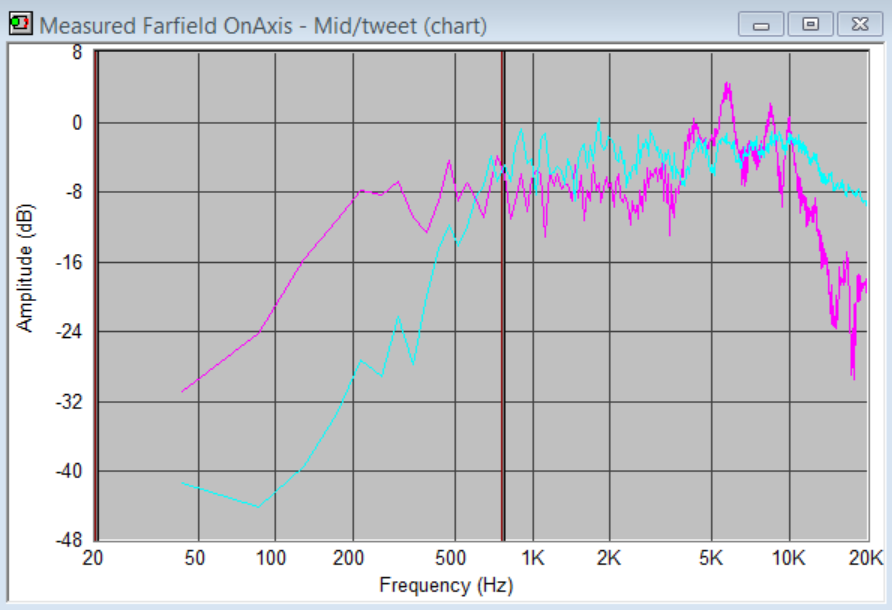
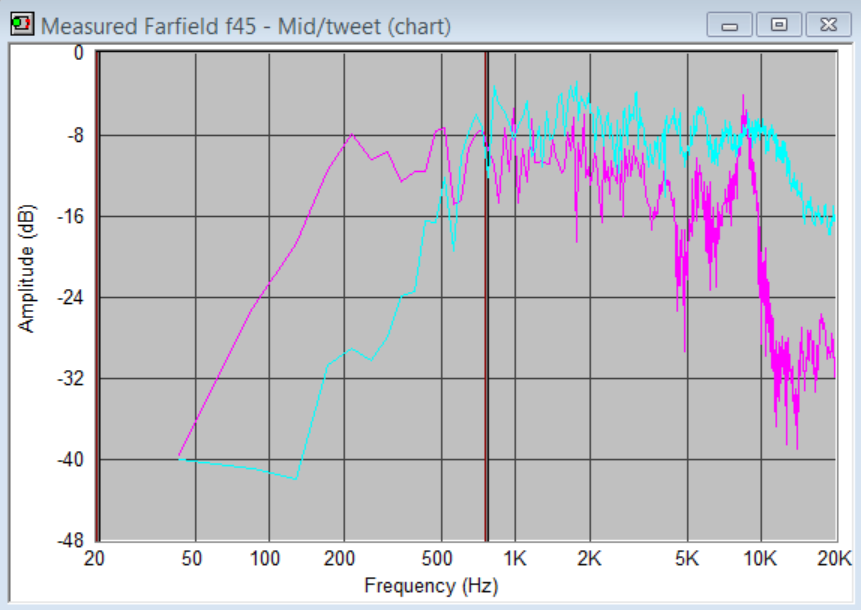
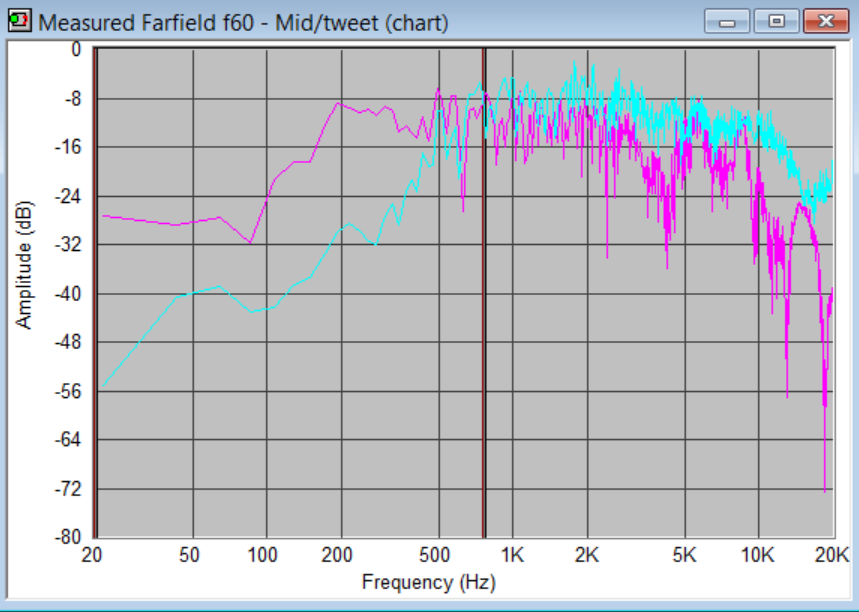
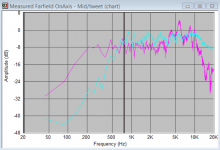
Tweeter/mid overlays on-axis and 30, 45, and 60 off-axis. Looks like a crossover point around 1500hz could work well

Nearfield response of the woofer and port. Valid up to ~650hz if my calcs are correct. Solid response down to ~50hz. Impedance plot shows a tuning of around 25hz if I'm reading it correctly, which is a few hz lower than what I targeted. Perhaps due to the heavily lined enclosure presenting a but larger effective volume?
Mid nearfield measurements. I first measured with a naked, unlined mid-enclosure. I then remeasured after adding a lining of denim insulation. The nearfield measurements should be valid up to ~1050hz, but the significant damping of the disturbance at ~1500hz makes me wonder if that is still the denim insulation doing its job. Thoughts?
Tweeter nearfield
Mid farfield measurments:
Tweeter farfield measurements:
Tweeter/mid overlays on-axis and 30, 45, and 60 off-axis. Looks like a crossover point around 1500hz could work well
Attachments
-
 16 - f60.PNG86.9 KB · Views: 320
 -
 15 - f45.PNG78.8 KB · Views: 315
 -
 14 - f30.PNG74.5 KB · Views: 320
 -
 13 - onaxis.PNG76.3 KB · Views: 308
 -
 12 - tweeter farfield.PNG126.6 KB · Views: 302
 -
 11 - mid farfield.PNG120.2 KB · Views: 309
 -
 10 - tweeter nearfield.PNG78.5 KB · Views: 311
 -
 09 - mid nearfield.PNG103.3 KB · Views: 306
 -
 08 - woofer merged nearfield.PNG72 KB · Views: 309
 -
 16 - impedance.PNG94.3 KB · Views: 316
- Home
- Loudspeakers
- Multi-Way
- My long overdue 3-way tower build