Hi all.
I've been lurking here for a while reading up on the arm. I still dont get what the female part of the bearing is made of... A set screw - what is that? I would appreciate some pictures of one from different angles and maybe a link to an manufacturer. Sorry for being a slow learner... :-(
Brgds
I've been lurking here for a while reading up on the arm. I still dont get what the female part of the bearing is made of... A set screw - what is that? I would appreciate some pictures of one from different angles and maybe a link to an manufacturer. Sorry for being a slow learner... :-(
Brgds
Mine is a simple short screw with a wide Philips head (cross head) I drilled out the head and drilled in with a smaller bit to form the pivot hole for the nib of the pen to sit in. I think this was also the way the original 219 was done though the pivot has been worked on and improved.
Mine is a simple short screw with a wide Philips head (cross head) I drilled out the head and drilled in with a smaller bit to form the pivot hole for the nib of the pen to sit in. I think this was also the way the original 219 was done though the pivot has been worked on and improved.
Thanks squiffything.
So any cup would do? How recessed does it need to be into the arm?
Brgds
I can't answer that one as my pivot sits below the arm wand itself. Mine has a wooden body holding the screw, the wand and the outriggers. It needs to be enough that the male section of the pivot stays in place but not too deep as to bind and stop the arm from turning freely. It took me a fair time of jiggling things before I got a good balance, hence my outriggers.
I can't answer that one as my pivot sits below the arm wand itself. Mine has a wooden body holding the screw, the wand and the outriggers. It needs to be enough that the male section of the pivot stays in place but not too deep as to bind and stop the arm from turning freely. It took me a fair time of jiggling things before I got a good balance, hence my outriggers.
Thanks again Squiffything. Would you mind share a picture of your rig?
Brgds
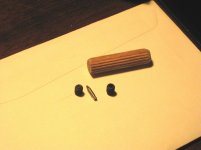
the complete bearing ...
is a set screw (2 pictured), a pen nub (pictured), and a short piece of the appropriate diameter of dowelling (the one pictured is approximately 2" or 51.4 mm long). Make sure set screws are used and not pipe plugs.
I pre-drill the arm wand (one hole only). I pre-drill the dowel completely through to allow the set screw to be screwed into but allow the bottom "cup end" to be exposed. I then use urethane glue to glue the dowel/female cup assembly into the arm wand, adjusting it so as to allow the pen nub to come in contact with the female cup from outside of the tube. That's it.
Attachments
Hi Turbon.
Ive found that using the cap from a glass fuse to be most effective.
In that the ball of the pen is very close to the top of the arm tube, therefor maximising the unipivot ideal.
Jay
Ive found that using the cap from a glass fuse to be most effective.
In that the ball of the pen is very close to the top of the arm tube, therefor maximising the unipivot ideal.
Jay
is a set screw (2 pictured), a pen nub (pictured), and a short piece of the appropriate diameter of dowelling (the one pictured is approximately 2" or 51.4 mm long). Make sure set screws are used and not pipe plugs.
I pre-drill the arm wand (one hole only). I pre-drill the dowel completely through to allow the set screw to be screwed into but allow the bottom "cup end" to be exposed. I then use urethane glue to glue the dowel/female cup assembly into the arm wand, adjusting it so as to allow the pen nub to come in contact with the female cup from outside of the tube. That's it.
Thanks nanook for the clarification. One question - does the set screew have a perfect cup or do one need to drill a better one?
I found your 19" rig squiffything - are you still using it as is?
Yes Jay - I consider your fuse idea as well. I will probably test it if I manage to find the right fuse. Did you mention the diameter of the fuse you used?
Brgds and thanks to all🙂
Hi Turbon.
Ive found that using the cap from a glass fuse to be most effective.
In that the ball of the pen is very close to the top of the arm tube, therefor maximising the unipivot ideal.
Jay
The unipivot ideal - where can I read more about this (lazy me- havn't used my friend...)
Ideally shouldn't the pivot be as far away from the arm as possible or should it be at some geometrical point described by the masses?
Brgds
Ideally shouldn't the pivot be as far away from the arm as possible or should it be at some geometrical point described by the masses?
Not sure if this is relative, but here goes...
Someone at TNT Audio did a bunch of research regarding VTA. They found that arms with a higher center of gravity had less issues with VTA. Less adjustment needed with changing record thinkness. An example of high center of gravity is the "219" arm. Low center of gravity would be something like a VPI arm.
Turbon use your friend, google images of DIY unipivot tonearm and the ideas will pop out at you.
Stew's 219 is a classic in how to do it right, the Altmann arm is his base for ideas (I think). There are plenty of ideas and designs to reserch you've just got to have a look.
Stew's 219 is a classic in how to do it right, the Altmann arm is his base for ideas (I think). There are plenty of ideas and designs to reserch you've just got to have a look.
Thanks guys!
I'll do it as this recipe describes an see later if I can improve it to a degree... I might be happy with the first one - music is most important to me.
Brgds
I'll do it as this recipe describes an see later if I can improve it to a degree... I might be happy with the first one - music is most important to me.
Brgds
Any fuse cap thats about 5-6mm indeed anything that will fit inside the arm tube you have.
Thats how this works use what you have lying around ! or can easily find.....
Simple physics says that the higher the pivot point the more stable, Anything underneath it will be.
Thats how this works use what you have lying around ! or can easily find.....
Simple physics says that the higher the pivot point the more stable, Anything underneath it will be.
Any fuse cap thats about 5-6mm indeed anything that will fit inside the arm tube you have.
Thats how this works use what you have lying around ! or can easily find.....
Simple physics says that the higher the pivot point the more stable, Anything underneath it will be.
Yep, I will build on of these - hard to say if this will be the preffered one but I will build one...
Brgds
Best case scenario what will be the price of a finished asnd completed Nanook 219 tonearm? Worst case scenario what will be the price of a finished and completed Nanook 219 tonerarm?
a few points...
Turbon: QUOTE]One question - does the set screw have a perfect cup or do one need to drill a better one?[/QUOTE] The set screws I use are referred to as "cup point set screws". The cup as is, works perfectly with a 1mm ball point pen nub (medium or medium fine point). I know the picture is a little tough to see.
There are good examples of the extreme case (such as the RS Labs) and the minimal case such as the 219. The 219, in general, has the pivot at or near the CofG. Without doing calculations (which can be done, but are not particularly useful or illuminating), I might suggest that the CofG of the 219 is perhaps 0.5-1 cm below the pivot, depending on how low the counter-weight is hung. The idea is to hang the mass from the pivot so that it is inherently stable.
audiostar: The best case scenario for what it costs to make would be a few $s, so under $3, using as many salvaged parts as possible. The first one cost me $2.19 (essentially all salvaged parts except the arm tube), and hence the name. The worst case scenario is into the $1000s range ( 🙂 ) depending on how fancy a bearing you want, fancier tubing (such as AerMet), although about twice the density of titanium is generally much more expensive. Shooting for a DIY version, and sourcing your own parts, I think under $50, which should include the DIY bearing , arm tube, headshell, internal wiring and some sort of base to hold the bearing. This is based on using some good parts such as Cardas cartridge pins, Cardas tonearm wire, and Neutrik RCA plugs. If you want you can make your own cartridge pins for under $1, and under $10/pr for RCA plugs. If bought right, wire might cost you something like $2. Check with others. If a custom tonearm counter-weight is required or you are looking for some fancy arm weight, I imagine you could spend $20-$30 for one of those, but is not required. Same with an arm lift. Best price I've seen on those is $50. So it depends on what you are after.
Turbon: QUOTE]One question - does the set screw have a perfect cup or do one need to drill a better one?[/QUOTE] The set screws I use are referred to as "cup point set screws". The cup as is, works perfectly with a 1mm ball point pen nub (medium or medium fine point). I know the picture is a little tough to see.
The important thing is to have the centre of gravity below the pivot. There are types that have the centre of gravity(CofG) well below the pivot. The most extreme example I recall is the RS Labs RS-A1 Tonearm. Don't worry too much about the theory. Think of balancing a broomstick vertically on your finger, vs. holding on to one with two fingers hanging down. Which is easier to get and keep stable? I am a bit of a purist in that I prefer to have the simplest solution, which I somehow have developed an intuitive knack for. Thus the CofG is quite close to the pivot.Ideally shouldn't the pivot be as far away from the arm as possible or should it be at some geometrical point described by the masses?
There are good examples of the extreme case (such as the RS Labs) and the minimal case such as the 219. The 219, in general, has the pivot at or near the CofG. Without doing calculations (which can be done, but are not particularly useful or illuminating), I might suggest that the CofG of the 219 is perhaps 0.5-1 cm below the pivot, depending on how low the counter-weight is hung. The idea is to hang the mass from the pivot so that it is inherently stable.
audiostar: The best case scenario for what it costs to make would be a few $s, so under $3, using as many salvaged parts as possible. The first one cost me $2.19 (essentially all salvaged parts except the arm tube), and hence the name. The worst case scenario is into the $1000s range ( 🙂 ) depending on how fancy a bearing you want, fancier tubing (such as AerMet), although about twice the density of titanium is generally much more expensive. Shooting for a DIY version, and sourcing your own parts, I think under $50, which should include the DIY bearing , arm tube, headshell, internal wiring and some sort of base to hold the bearing. This is based on using some good parts such as Cardas cartridge pins, Cardas tonearm wire, and Neutrik RCA plugs. If you want you can make your own cartridge pins for under $1, and under $10/pr for RCA plugs. If bought right, wire might cost you something like $2. Check with others. If a custom tonearm counter-weight is required or you are looking for some fancy arm weight, I imagine you could spend $20-$30 for one of those, but is not required. Same with an arm lift. Best price I've seen on those is $50. So it depends on what you are after.
Stew et all,
How important is the shape and material of the female part of the bearing ?
I'm tinkering about the arm, collecting parts and ideas, but get a little nervous with the idea of an almost flat setscrew in the lower part of the arm. It seems so easy to accidentally drop the arm of the bearing pillar.
As an alternative I was thinking about making up a part on a lathe, small brass bushing with a collar to align the bearing with the shaft with a hole a little larger than the male bearing, a bit like Jay's description of a fuse cap. The pivot point could rise to the upper side of the shaft, adding a little bit of safety as a side effect.
Any chance this could harm the performance of the arm ?
- Status
- Not open for further replies.
- Home
- Source & Line
- Analogue Source
- my latest iteration of "Nanook's 219 tonearm"..