Upupa Epops said:To Brian : " You too, Snubbrutus ? " 😀
Certainly worth trying something new.... Lets not argue the merits of the setup in this thread. I will decide what I think of it once I build one to try for myself.
Upupa Epops said:To Brian : Why are you using two rectifiers ? It have sense only in case, if you can use voltage regulators and have only one polarity one. With center tapped and center grounded transformer you get the same ripple effect by better efficiency. " Ringing " on both rails you can in this case dump by +/- bypasing capacitor, 'cos " ringing " periode is on both rails in opposite polarity.
The setup is for a transformer with seperate secondaries. For a centertapped setup, I have a different wiring procedure, converting the setup to a single bridge.
--
Brian
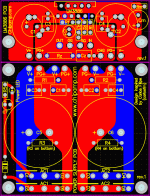
Here is the current layout, 2.9" wide (same as other pcb sets) and 7.6" tall (twice the picture shown below), and will include 2 power supply boards and 2 amplifier board.
I am looking to finalize the layout tomorrow and submit an order for the pcbs.
The Wiki shows interest for 15 boards, so I will do a relatively small order, and see how it works out. If you are interested in getting some of these pcbs, mark indication in the Wiki (e-mail me if you can't figure it out), and I will add you.
Attached is the pictures. The LED on the power supply board now has it own supply. The amplifier board was optimized more, adding the possibility to use a feedback capacitor.
--
Brian
Attachments
Hi Brian,
EDIT: Too slow again, madly deleting half. 😉
This PSU pcb is going on in leaps and bounds and looks very good. I know you are designing it with focus on your LM3886 GC but with a few extra features it would beome a very nice "generic" PSU pcb.
Hope you don't mind if I add of few comments.
1. Are you intending to put heat-relief traces ONLY on low power components?
2. I'm rather naive as far as traces overlapping are concerned but I think I have read the that they can create stray capacitance or even cancel noise. It would be ashame to create extra issues that the "snubberising" is supposed to be fixing. Can anyone enlighten me?
Wishlist (please excuse the repetition).
=====
1. The duplicate V+, PG+, V- PG- holes be side by side allow the use of spades or terminal blocks. (just like the original version 1 3875 power PSU pcb)
2. Is there enough room to fit parallel 4,700uF caps? Probably not. It would be nice to have additional holes just in case.
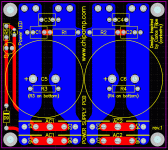
grege said:1. I would be nice if there were power LEDS on both rails. This would allow one to be used on the front panel as a "power on" indicator and the other as "safety" indicator (RED) on the PCB to warn DIYers that there is still danger. The second could go between C4 and "inspired by Carlos".
I thought about this, but I decided that it wasn't worth the extra parts count. I will think about this some more. If anyone else also has input about this, let me know.
grege said:2. One trace on R3/R4 and Rled could go on the blue layer resulting in shorter traces.
[/B]
Are you referring to the most recent screenshot that I posted?
grege said:3. Are you intending to put heat-relief traces ONLY on low power components?
[/B]
I didn't add any to the power supply pcb yet, but all the ones on the amp pcb should be covered.
grege said:4. I'm rather naive as far as traces overlapping are concerned but I think I have read the that they can create stray capacitance or even cancel noise. It would be ashame to create extra issues that the "snubberising" is supposed to be fixing. Can anyone enlighten me?
[/B]
Anyone have any input? I am not aware of any possible issues here.
grege said:1. The duplicate V+, PG+, V- PG- holes be side by side allow the use of spades or terminal blocks. (just like the original version 1 3875 power PSU pcb)
[/B]
The holes are the same spacing as the LM3875 pcb set, 5mm apart, which should work with standard 2-connector terminal blocks for those interested in them.
grege said:2. Is there enough room to fit parallel 4,700uF caps? Probably not. It would be nice to have additional holes just in case. [/B]
There isn't room for the 4,700uF caps, but with the 35mm spacing, the biggest 50v panasonic cap that would fit would be a 22,000uF cap (35mm diameter x 50mm height).
--
Brian
Brian that has come along really well! i will be off to the wicky to make sure i get some 🙂
could you put an additional "score" betweent he 2 halves of the power supply, because then they could be mounted back to back and take up less height (because of the big caps) for people who want to build a low profile case.
if you don't, it doesnt really matter they could still be cut, but it would be convenient for people who do not have lots of tools 🙂
neutron7 said:Brian that has come along really well! i will be off to the wicky to make sure i get some 🙂
could you put an additional "score" betweent he 2 halves of the power supply, because then they could be mounted back to back and take up less height (because of the big caps) for people who want to build a low profile case.
if you don't, it doesnt really matter they could still be cut, but it would be convenient for people who do not have lots of tools 🙂
I don't think you need the score... you can buy 10,000uF panasonic caps in a 35mm diameter x 30mm height: P6940-ND from digikey, so I don't think that the height will be too much of an issue. (this is certainly shorter than having the board mounted sideways, cut in half.
--
Brian
BrianGT said:Are you referring to the most recent screenshot that I posted?
The holes are the same spacing as the LM3875 pcb set, 5mm apart, which should work with standard 2-connector terminal blocks for those interested in them.
It looks like I'm too slow and you're to fast. 😀
Yes, I was referring to "old" screenshot.
Yeah, the connector terminals should work fine but not the spades unfortunately.
Also, I would like thank Peter Daniel and Carlos Filipe (carlosfm) for their input into the design.
--
Brian
--
Brian
grege said:
It looks like I'm too slow and you're to fast. 😀
Yes, I was referring to "old" screenshot.
Yeah, the connector terminals should work fine but not the spades unfortunately.
spades? How do the current boards differ from the older LM3875 boards in terms of accepting spades?
I will try to slow down 🙂 actually I do need to get some sleep soon, so that I can wake up to get ready for work in 5 hours.
--
Brian
BrianGT said:
I don't think you need the score... you can buy 10,000uF panasonic caps in a 35mm diameter x 30mm height: P6940-ND from digikey, so I don't think that the height will be too much of an issue. (this is certainly shorter than having the board mounted sideways, cut in half.
--
Brian
OK thanks for the info , I did not know about those caps.
BrianGT said:spades? How do the current boards differ from the older LM3875 boards in terms of accepting spades?
I will try to slow down 🙂 actually I do need to get some sleep soon, so that I can wake up to get ready for work in 5 hours.
Original holes: V- V- PG- PG- PG+ PG+ V+ V+
Now: V+ PG+ V+ PG+ PG- V- PG- V-
So originally I could stick a spade in the V- V- holes etc.
http://www.briangt.com/gallery/nigc-erskine/BrianGT_GC_PS_800x600
Not a big deal, it just appealed to me. 😉
BTW: I'm sure it takes me longer to write a post than it does you to change the design of your pcb.
grege said:
Original holes: V- V- PG- PG- PG+ PG+ V+ V+
Now: V+ PG+ V+ PG+ PG- V- PG- V-
So originally I could stick a spade in the V- V- holes etc.
http://www.briangt.com/gallery/nigc-erskine/BrianGT_GC_PS_800x600
Not a big deal, it just appealed to me. 😉
BTW: I'm sure it takes me longer to write a post than it does you to change the design of your pcb.
I forgot all about the old design being that way. The reason that it was changed was so that the holes lined up, allowing for this:
http://www.briangt.com/gallery/nigc-maarten/board
--
Brian
neutron7 said:
OK thanks for the info , I did not know about those caps.
I will look into using the 35mm x 30mm instead of the earlier planned 25mm x 50mm when I put the kits together.
--
Brian
BrianGT said:I forgot all about the old design being that way. The reason that it was changed was so that the holes lined up.
I realised that, but you might be able to squeeze the second V+ between the existing V+ and the mounting hole. The layout would look neater as well.
grege said:
I realised that, but you might be able to squeeze the second V+ between the existing V+ and the mounting hole. The layout would look neater as well.
I am looking into changing it back to the old way, as it will improve the flow of the board and simplify things.
I will post a new layout picture when I finish.
--
Brian
homer09 said:Hey Brian,
Just a detail, some labels for V+, V-, PG+, PG- are always a safe addition...😉
I added them after taking the screenshot 😉
--
Brian
Attachments


- Home
- Amplifiers
- Chip Amps
- my first try at a LM3886 layout, any comments/suggestions?