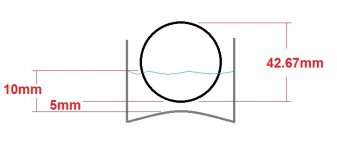
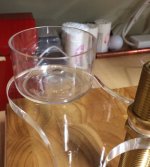
If that's the case then i need a new cup. the pic shows I would only get about 10mm suck into the fluid.
1. Get a new cup
2. Cut down existing cup
3. And by another $12 bottle of silicon
1. Get a new cup
2. Cut down existing cup
3. And by another $12 bottle of silicon
Attachments
Last edited:
If the ball is 42 mm dia. Then 50 mm dia cup would be fine
And say 30 mm depth should work
If you make the cups height moveable till you get the height about right, the cup can be kept smaller that way.
And say 30 mm depth should work
If you make the cups height moveable till you get the height about right, the cup can be kept smaller that way.

Or this
Looking at this the cup is about 53-54mm internal diameter and an internal depth of about 32mm
Looking at this the cup is about 53-54mm internal diameter and an internal depth of about 32mm
Attachments
Last edited:
NEVER use silicon close to hifi equipment.
There are several reasons.
You will destroy the LP´s.
You will destroy all electrical interfaces.
Silicon is a "supra fluid" if you put one small drop on the floor you can find silicon on the whole floor within days! everywhere!! Imagine that you will have silicon over the whole player after some hours. Dust will not get off that easy from that record and its destroyed forever. It´s true. If you use silicon on the rubber sealings around the car door, you will have serious problem repainting the car. Ask anyone working in a repair shop.
Electrical... ive been in the electronic industry for a while and connectors, switches, relays, etc exposed for silicon will be contaminated. When driving a current trough a thin layer (one atomic layer or two...) of silicon creates glass. Glass i not a very godd conductor. It´s an isolator!
Does that sound good to you? Keep away from silicon my friends! Unless it is properly "bound" such as in some silicon gaskets where the molecules stay inside the gasket.
In oils or in non cured silicon glue... forget it! There is probably a life time reading on the net if you dare to read. I have experienced fretting corrosion in switches that has caused major industrial and economic disasters. Because of the reasons mentioned above.
esl
Hi enzedone,
Is this what you are looking for?
My SLT Tonearm build [Archive] - AudioEnz Forums...
May I suggest you post a thread regarding your linear tracking tonearm on this forum. A lot of experts here to help you.
Is this what you are looking for?
My SLT Tonearm build [Archive] - AudioEnz Forums...
May I suggest you post a thread regarding your linear tracking tonearm on this forum. A lot of experts here to help you.
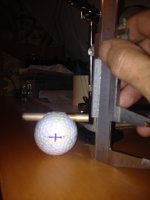
Ball marking
To mark the ball….
Once I had drilled the ball one drill slightly smaller than tube i.e. it just fit inside tube, then one the same size as the tube.
with a short piece of tube inserted into ball, I hung it on a thread.
This allowed me to centralise & level the Ball, in order to mark it about its centre where it will be hung from.
before I drill these two quite small holes, i need to find out if they are indeed opposite one another i.e. 9--3 Equidistant or if they are slightly forward of middle 8--4 which i think they might be.
Audiostar, thanks
Jay, that's a good idea. You are basically doing the same as me, levelling the shaft (I'm using the screws) to get things perpendicular.
My next question is regarding effective length. Do we need to find the centre on top to use as the pivot point?
This would make for very easy set up later on. If you going to tinker around with the ball position inside the cup then how are you going to ensure you have correct effective length?
Unless you marked a point on top of your shaft from which you are hanging the ball?
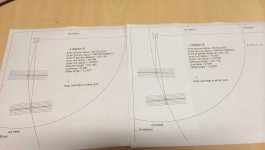
Alignment
Sorry just thinking through things here
If you have the correct alignment sheet printed off then all you need to do is go off that?
I have used that link to print mine off, both Lofgren A & B.
I will print for two lengths and run a 15in and 18in arm.
The printout is about half a mil out, but I'm not going to worry about that as it's probably no worse than my 40 year old cardboard printout for my SME3009
Attachments
Offset angle
Anyone tried bending the shaft as opposed to glueing the head shell unit on at the correct angle?
Anyone tried bending the shaft as opposed to glueing the head shell unit on at the correct angle?
Bending the tube !
No man, if you did you'd spend the next 50 yrs trying to get the thing to work… Just offset the headshell by the required amount.
Try also to keep the headshell simple & light, you can always Add weight, if your cart needs more mass.
But the longer the arm tube the greater the mass of the counterweight will have to have.
Don't forget to make sure you keep the stylus tip on the centreline of the arm tube.
Have a good read of this link
http://www.diyaudio.com/forums/analogue-source/144616-well-tempered-labs-tonearm.html
http://www.diyaudio.com/forums/analogue-source/144616-well-tempered-labs-tonearm.html
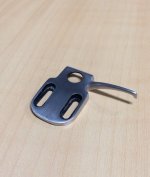
Headshell
Look at my headshell design earlier in the thread-extremely rigid, non resonant and very light-and makes alignment so very easy-and it looks good-what more could you ask for?
Chris
Look at my headshell design earlier in the thread-extremely rigid, non resonant and very light-and makes alignment so very easy-and it looks good-what more could you ask for?
Chris
I don't have good enough tools to make stuff like that. My $60 Ryobi drill press is just not that accurate.
Looking good, Its getting more see through by the day !
That shell should work fine, will you be epoxying it to the tube? & the angle, what have you decided on ?
Also just get the orientation right for the cable hole. as all other adjustments are done from the threads
That shell should work fine, will you be epoxying it to the tube? & the angle, what have you decided on ?
Also just get the orientation right for the cable hole. as all other adjustments are done from the threads
- Status
- Not open for further replies.
- Home
- Source & Line
- Analogue Source
- My DIY WTL Tonearm