Pass DIY Addict
Joined 2000
Paid Member
I finished up the veneer work today, finished painting the back of the cabinets, and put the first coat of oil on the veneer.
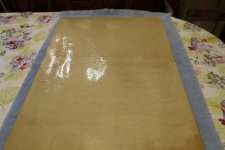
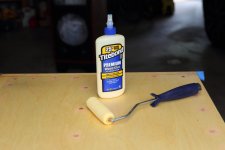
The veneer got one fairly heavy coat of glue and the cabinet got two coats of glue, allowing it to thoroughly dry between coats. I taped up the edges of the panel, laid down some glue, and then rolled it out with a 1" foam brush until the whole surface had a nice eggshell texture to it. After everything was dry, the sheet of veneer for the cabinet top was ironed down. For some reason, one or two spots around the edge didn't stick this time, so I diluted a little bit of glue with a drop of water and used a syringe to get it under the veneer and hit it with the iron again.
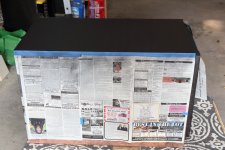
Next up, the rear of the cabinets got a few more coats of primer, followed by a gentle sanding, several coats of flat black paint, sanding before the last coat, and finally 4 or 5 coats of matte finish clear paint, again sanded before the last coat.
The veneer got one fairly heavy coat of glue and the cabinet got two coats of glue, allowing it to thoroughly dry between coats. I taped up the edges of the panel, laid down some glue, and then rolled it out with a 1" foam brush until the whole surface had a nice eggshell texture to it. After everything was dry, the sheet of veneer for the cabinet top was ironed down. For some reason, one or two spots around the edge didn't stick this time, so I diluted a little bit of glue with a drop of water and used a syringe to get it under the veneer and hit it with the iron again.
Next up, the rear of the cabinets got a few more coats of primer, followed by a gentle sanding, several coats of flat black paint, sanding before the last coat, and finally 4 or 5 coats of matte finish clear paint, again sanded before the last coat.
Attachments


Pass DIY Addict
Joined 2000
Paid Member
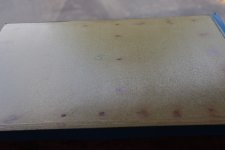
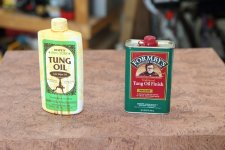
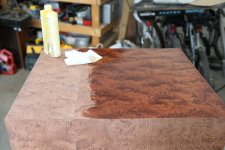
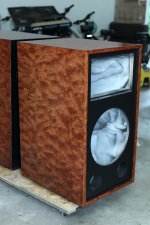
My goal is to make these match the center speaker that I already have, so I sanded the veneer with 120 and 220 grit paper and spread a coat of pure tung oil. Here is an image of one cabinet that has been oiled and one that hasn't so you can see the difference. The pure tung oil adds a bit of contrast to the grain. It doesn't really "dry" but after a few days it soaks in enough that it can be top coated with some Formby's Tung Oil Finish.
Ironically, I don't think the Formby's actually has any tung oil in it at all 😕 It builds up layer by layer and after 3-4 applications the grain gets sealed off and it starts to build a nice shine. For the final finish, I prefer the "low gloss" variety of Formby's, so I use the "high gloss" to build up the first few layers and seal off all of the pores, then I switch to the low gloss and add the final 1 or 2 top coats.
Ironically, I don't think the Formby's actually has any tung oil in it at all 😕 It builds up layer by layer and after 3-4 applications the grain gets sealed off and it starts to build a nice shine. For the final finish, I prefer the "low gloss" variety of Formby's, so I use the "high gloss" to build up the first few layers and seal off all of the pores, then I switch to the low gloss and add the final 1 or 2 top coats.
Attachments

Last edited:
Pass DIY Addict
Joined 2000
Paid Member
Any pix to share? I’m working on the finish of mine now. Not much to see that is different from what I’ve already posted. I’m also working on various ways to protect that big 15” driver and possibly a grille cloth cover. Not sure what the final form will be yet.
Pass DIY Addict
Joined 2000
Paid Member
Hey Zman! One speaker needs two more top coats of finish, then I can install the drivers. It will need another few days to finish outgassing before they are allowed in the house. The second cabinet needs one more day of sanding, then the top coats will start. Maybe a week to a week and a half… Can’t wait to hear them!
Sounds like a plan - have fun!
The cabinets are looking good btw, and from what we've seen of your previous work, these should come out as a beautiful pair once you've got them fully finished.
The cabinets are looking good btw, and from what we've seen of your previous work, these should come out as a beautiful pair once you've got them fully finished.
Pass DIY Addict
Joined 2000
Paid Member
Here's hoping the finishing process goes well. The last veneer I used was quartersawn, so it was relatively well behaved. This veneer is figured (circumference sliced as opposed to flat cut through the log), so it is behaving a bit differently. It is more prone to cracking and having minor splinters pop up even after sanding. Because of the different cut, it is also absorbing oil differently than the quartersawn stuff. All of this is causing me to rework certain sections. The 95% humidity we've been having for the past few weeks hasn't been helping things much either. There seems to be some signs that it will look nice when complete 😉
Pass DIY Addict
Joined 2000
Paid Member
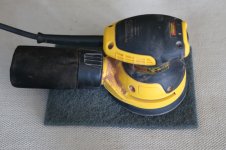
I'm still working on the finish and I came up with a new (at least to me) trick that I thought I would pass along. I'm using the Formby's Tung Oil Finish now to build up the coats of the final finish. The first coat or two tend to raise the grain a little as it soaks in, especially with the figured veneer. Also, some parts of the veneer suck up more than others, so the first few coats tend to be rather uneven when dry. I've tried a gentle sanding with fine grit sand paper, but that doesn't work so well as the paper quickly becomes clogged. So, I switched to using small pieces of abrasive "gray pad" to even out the finish. This works well, but is very labor intensive.
After working for nearly an hour and a half in the awful 95% humidity this morning to smooth out the finish by hand, I had a new idea that worked out GREAT! I stuck the 6in by 9in "gray pad" onto the bottom of my palm sander. The gray pad is a non-woven pad that is roughly equivalent to 600 grit sand paper and is about 1/4" thick. Because it is highly porous, it doesn't cause any problem with the air flow through the base of the sander and it sticks nicely to the velcro base of the sander.
This turned 90 minutes of work by hand into about 5 minutes of work with the palm sander. The resulting finish was smooth and even. A few minutes later, the cabinets were ready for another top coat. Now that the surface is nice and smooth, I'll add a few more top coats, repeat the sanding with a "white pad" (less abrasive than the gray pad), and then add a final top coat.
I probably have another week before I can install the drivers and bring them into the house.
Attachments
Eric,
Good to hear about the "breakthrough" method.
Finishing the cabinets and the wait involved is sometimes a real test of the DIYers patience. 🙂
Good to hear about the "breakthrough" method.
Finishing the cabinets and the wait involved is sometimes a real test of the DIYers patience. 🙂
Pass DIY Addict
Joined 2000
Paid Member
Absolutely! Sitting around doing nothing on a project while waiting for the finish to dry is the part that I dislike the most! I’ve always had a hard time sitting still and not doing anything…
Great build! Where did you purchase the StandartPlus Aero Bulk 4mm mat from? European based mats are impossible to get in the U.S.
Pass DIY Addict
Joined 2000
Paid Member
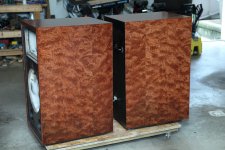
I managed to get the color/contrast to match much better after a great deal of work on one of the cabinets. Ironically, all of that work seemed to have the added benefit of acting like a grain filler for the pores in the veneer.
Still in need of more coats of finishing oil, but coming closer. One coat every 24 hours is just pure torture 😀
Still in need of more coats of finishing oil, but coming closer. One coat every 24 hours is just pure torture 😀
Attachments
Eric,
The veneer and finish is looking really good. I am sure the cabinets will look gorgeous after you've done the full job!
The hard work and the patience are yielding good results. 🙂
- Zia
The veneer and finish is looking really good. I am sure the cabinets will look gorgeous after you've done the full job!
The hard work and the patience are yielding good results. 🙂
- Zia
Last edited:
Eric!
I've been following your builds since the good old day of the Aleph X, so this looks mighty fine. I have had my reservations about the P-Audio biradial horn, I hope your impressions prove me wrong when you finally listen to these speakers.
They look gorgeous dude! Is that Bubinga? So awesome 😀
Best,
Anand.
Last edited:
Pass DIY Addict
Joined 2000
Paid Member
Thanks, Zman! Just a few more coats to go…
Anand: I hope i like their sound after all of this work, too! It’s always in interesting exercise to spend lots of time and money on something you can’t hear until the end. I’ve built some of Tony’s prior designs, so I have some confidence. Yep, it’s Bubinga. Pretty cool stuff. It has been a while since the flurry of Aleph-X builds, huh?!?
Anand: I hope i like their sound after all of this work, too! It’s always in interesting exercise to spend lots of time and money on something you can’t hear until the end. I’ve built some of Tony’s prior designs, so I have some confidence. Yep, it’s Bubinga. Pretty cool stuff. It has been a while since the flurry of Aleph-X builds, huh?!?
Pass DIY Addict
Joined 2000
Paid Member
Great build! Where did you purchase the StandartPlus Aero Bulk 4mm mat from? European based mats are impossible to get in the U.S.
Here is the link to their US distributor: STANDARTPLAST Bomb Aero | Vibration damping materials by StP It took me a while to find them.
I think they charged $30 for 13 sheets. I thought this was pretty reasonable given the weight of these damping sheets.
Thank you, Eric!👍🏼🙌 This is great to know. It has been very difficult to find bitumen sheets here in the U.S. I’ve had to resort to second rate vibration damping sheets - a waste of money.
Pass DIY Addict
Joined 2000
Paid Member
I specifically inquired with Tony about these sheets and a number of the cheaper versions available here in the US (through amazon). I asked mostly because I had never used any of them before. The key attribute is the mass per sheet. The StandartPlast sheets are 3-4 times heavier than all of the others for the same size sheet, so you’d have to stack multiple sheets of the cheaper stuff in order to achieve the same mass/damping as the good ones.
If you lay them out in the sun on your driveway, they cut very easily with a sharp utility knife. When you are all done, you’ll need a new blade in your knife - the old one will be all gooey and sticky.
Edit for above post: the $30 charge was for shipping, not the product itself…. The sheets were $15.50 each.
Last edited:
- Home
- Loudspeakers
- Multi-Way
- My Calpamos Build