Nice job Lazy 🙂
One thing we always knew was that the input cap we supplied with the kit would often be replaced. 🙂 The cap supplied while very good is not the best you can get. The best poloyprop caps are very big, and much more expensive. So we made a choice to provide something that most people would enjoy quite a lot, and those who wanted to could ugrade it easily without being out an expensive part. 🙂
Definitely I would say that what you did is a worthwhile upgrade. We expected a lot of people to try that kind of thing.
Just a note, for the next run of kits the cap we have chosen is much better than the previous Wima MKT. 🙂 I wish I could remember the exact part, I am sure Brian will chime in soon. 🙂
What kind of input cap is that?:edit: nevermind I found it. 🙂
Your amp is one to be proud of, very good work.

Cheers!
Russ
One thing we always knew was that the input cap we supplied with the kit would often be replaced. 🙂 The cap supplied while very good is not the best you can get. The best poloyprop caps are very big, and much more expensive. So we made a choice to provide something that most people would enjoy quite a lot, and those who wanted to could ugrade it easily without being out an expensive part. 🙂
Definitely I would say that what you did is a worthwhile upgrade. We expected a lot of people to try that kind of thing.
Just a note, for the next run of kits the cap we have chosen is much better than the previous Wima MKT. 🙂 I wish I could remember the exact part, I am sure Brian will chime in soon. 🙂
What kind of input cap is that?:edit: nevermind I found it. 🙂
Your amp is one to be proud of, very good work.
Cheers!
Russ
It's a Wima MKP10.
Mouser Link
Sorry for the delay. I was hanging an art show all day, then an opening. Tired now 😉
Mouser Link
Sorry for the delay. I was hanging an art show all day, then an opening. Tired now 😉
So, I got home last night, and waiting for me was a package. A package I sent to Hong Kong back in October. It was the only kit to be lost so far, because I had somehow left a line out of the address. The intended recipient got a replacement already, so now I have 2 sets of boards I need to find a home for. I also found an additional set that had been used for some photos and was in the R&D department (my other workbench).
So, three sets of RevC boards remain.
We are trying to think of something creative to do with these last boards.
Two sets have been to Honk Kong and back, and are weary from their travels. They need a good home.
The other set has been buried under 2 sets of Jens Rasmussen's Leach boards. They have been in good company, but are ready to start making music.
So, ideas so far range from just selling them, to selling a assembled and tested 6-channel amp. Or a raffle for charity (DIYAudio?)... Thoughts? Ideas?
Russ,
Re: My_Ref Rev C Ver 1.1.
Would this board be directly interchangeable with the previous Rev C board?
That is, are the board mounting holes identical, and is the LM 3886 at the exact same location on the board, so that it will mount the heatsink at the same hole?
Thanks,
Audie.
Re: My_Ref Rev C Ver 1.1.
Would this board be directly interchangeable with the previous Rev C board?
That is, are the board mounting holes identical, and is the LM 3886 at the exact same location on the board, so that it will mount the heatsink at the same hole?
Thanks,
Audie.
"So, three sets of RevC boards remain."
I'll take one for the bi-amp system I'm doing.. Still wish we could implement a high pass funtion ON BOARD.. 😀
I'll take one for the bi-amp system I'm doing.. Still wish we could implement a high pass funtion ON BOARD.. 😀
Brian,
You could offer three sets of completed and fully tested boards for sale.
I would think that there would be some that would like the idea.
Putting the amplifier together is already a big task, without the uncertainty of whether the board will work due to a poor solder joint, etc.
Of course,you may not have time for this, and even so the cost may deter some.
I'm just about to work on my mono boards after an age preparing the case. I sure wish I now had a completed and tested board I could complete the project with ,and get back to listening to music!
Audie.
billabong said:Russ,
Re: My_Ref Rev C Ver 1.1.
Would this board be directly interchangeable with the previous Rev C board?
That is, are the board mounting holes identical, and is the LM 3886 at the exact same location on the board, so that it will mount the heatsink at the same hole?
Thanks,
Audie.
Good question. 🙂
Yes, this board should be a drop in replacement if you already have a production rev C. The mounting holes are the same, and the LM3886 is in the same spot, so your existing case and mounting hardware could be reused.
It will even directly replace the pre-production(beta test) Rev C except that the LM3886 was moved a bit to get it more centered when it went final. The PCB mounting holes are the same though.
Cheers!
Russ
I just remembered something about constructing my Rev C, the wire holes for the output cables were way too thin....
Feels kinda silly to use thick speaker wire ,knowing that the first 2 inches is 22 guage anyway...
Come to think of it, had a pretty hard time getting the RG58 cable through the holes on the input side too
Feels kinda silly to use thick speaker wire ,knowing that the first 2 inches is 22 guage anyway...
Come to think of it, had a pretty hard time getting the RG58 cable through the holes on the input side too
You could offer three sets of completed and fully tested boards for sale.
I would think that there would be some that would like the idea.
We were actually thinking of offering this service for all our kits for a small additional fee. It would also affect shipping charges, I think, as the parts can no longer lay flat.
I think I will just sell the 3 sets as usual. If someone wants then pre-built, just send us an email.
Nordic said:I just remembered something about constructing my Rev C, the wire holes for the output cables were way too thin....
Thats because those aren't wire holes. 🙂 Those are Faston pads for male faston connectors. 🙂 And the input and LED connections are pin headers with pin header pads. 🙂
The pin spacing for the output fastons will allow for some types of screw down terminals too.
If poeple want them I can easily add holes for wire beside the connector(faston and pinheader) pads.
We aim to please, and are pleased to aim. 🙂
Cheers!
Russ
Would be great, only fastons I have are big, screw terminal jobbies... Its a non event for full kit buyers but us cheap skates... well, we have a more tough time.
I'm sure I can get the right fastons, but it probably requires some $100 tool to attach the wires...
I'm sure I can get the right fastons, but it probably requires some $100 tool to attach the wires...
Nordic said:Would be great, only fastons I have are big, screw terminal jobbies... Its a non event for full kit buyers but us cheap skates... well, we have a more tough time.
I'm sure I can get the right fastons, but it probably requires some $100 tool to attach the wires...
Nope, just a pair of pliers or most wirecutters/strippers have a suitable crimper. 🙂 (I just paid $2.79 for one here in the states)
Anyway its an easy thing to add, so no problem. BTW its just plain wasteful to use super thick wire for outputs inside the amp. 16-18G is way more than adequate for the run to the output connectors. Now if all you have is 14G then hey use it. 🙂
Cheers!
Google a bit on wires and gages to get an idea why it is true. A cable's current carrying ability is a function of material, length, and gage. A short length of copper wire can use much smaller gage wire than a long run. Now thats not to say you want to go too small either. There is a lot written on the subject. More than I should cover here. There is also a ton of hype. Be very critical, and use common sense.
For lengths less than 12" (1 foot) 18ga. wire is more than sufficent for the 11 amps MAX of the LM3886.
changes based on input 🙂
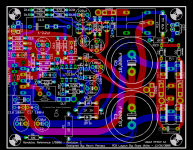
Thanks for all the good feedback. Here is what the new layout looks like right now. Just a few small things I want to do on the silk screen and it will be done. 🙂
Notice I added wire pads for the power in,led +, led -, out, out gnd, in, and in gnd. For the input and led connectors I used 5mm spacing to allow for 5mm type screw down terminal blocks.
Cheers!
Russ
[edit] forgot to finish a trace. Fixed
Attachments
Very nice. It just stuck me that you can use a componet BR or descrite diodes... Very nice indeed.
One note, not even a suggestion, is that you "could" make the ground plane under C3 and C8(?) larger such as the area under C9.
Just a note, I don't know how that would affect the different analysis you have done using the trace tools Mauro pointed out.
One note, not even a suggestion, is that you "could" make the ground plane under C3 and C8(?) larger such as the area under C9.
Just a note, I don't know how that would affect the different analysis you have done using the trace tools Mauro pointed out.
- Home
- Amplifiers
- Chip Amps
- My "audiophile" LM3886 approach