Need help:
What size 'drill bit, tap, and screw' did you use to mount the lm3886 to heatsink? I thought that info was in here,... I've been searching, can't find it.
Alex
What size 'drill bit, tap, and screw' did you use to mount the lm3886 to heatsink? I thought that info was in here,... I've been searching, can't find it.
Alex
The top hat washers are usually just big enough for a 3mm screw. (I don't think a 1/8th" screw would pass through, but might be worth trying).
You would use a 2.5mm bit to drill a 2.5mm hole. I drill a 2mm hole first and then take that out to 2.5mm.
A badly sharpened drill bit drills oversize.
A correctly sharpened drill bit (which measures very slightly less than marked size), should drill pretty close.
That difference between 2.5mm and 3mm (=0.5mm) is due to the 3mm diam 0.5mm pitch of the thread.
Last edited:
I disagree here - if you're going to tap the thread yourself you'll probably want a 2.7mm dia drill for an M3. 2.5mm drill will be very heavy going with the tap, in my experience even 2.6mm is a bit too small - though probably just about OK for self-tapping.
All the grades of aluminium that I tap work OK with 2.5mm hole for 3x0.5mm tap.
If I were tapping steel then I would increase the pilot hole size to reduce the metal that needs to be removed by the tap and decrease the engagement of the thread.
For aluminium from 2.5mm to 12mm I just subtract the pitch from the diameter and use that drill size.
If I were tapping steel then I would increase the pilot hole size to reduce the metal that needs to be removed by the tap and decrease the engagement of the thread.
For aluminium from 2.5mm to 12mm I just subtract the pitch from the diameter and use that drill size.
All the grades of aluminium that I tap work OK with 2.5mm hole for 3x0.5mm tap.
If I were tapping steel then I would increase the pilot hole size to reduce the metal that needs to be removed by the tap and decrease the engagement of the thread.
For aluminium from 2.5mm to 12mm I just subtract the pitch from the diameter and use that drill size.
Plus 1
I am an armature machinist and I agree...aluminum is ok to do 75% thread depth ...steel or stainless 60%
Lawrence
Need help:
What size 'drill bit, tap, and screw' did you use to mount the lm3886 to heatsink? I thought that info was in here,... I've been searching, can't find it.
Alex
If you are not skilled enough to tap a hole in your heatsink or other area, like me. Just drill a hole all the way through and use a long screw and nut. Of course getting in between the flanges can be tricky, but doable. I do realize on some heatsinks the flanges may be too close though.
Not everybody is an armature machinist.
just trying to help out not meant to hurt your feelings
Drill & tap sizes: There are actually tables of these things, ya know... This one is highly useful: http://www.littlemachineshop.com/reference/tapdrillsizes.pdf
For aluminum, I've always used (diameter) - (thread pitch), so 2.5 mm drill for an M3x0.5 thread. That jives well with the information given in the table as well.
You need at least four good threads for the screw to grip. For hand cut threads in soft materials, I aim for at least six good threads. So 3 mm of good threads for a 0.5 mm pitch screw. More is better.
A tapping block is your friend. A tapping block is a square hunk of metal with holes drilled to make a clearance fit around the tap. It helps you hold the tap perpendicular to the workpiece and results in considerably less wobble when you start the thread.
Another must-have is cutting fluid. Supposedly kerosene can be used for cutting aluminum. I prefer an actual cutting fluid, such as A-9, though.
Tom
Another must-have is cutting fluid. Supposedly kerosene can be used for cutting aluminum. I prefer an actual cutting fluid, such as A-9, though.
If you don't want the mess of cutting fluid, just use the slightly larger drill size that I did. Works fine.
If you don't want the mess of cutting fluid, just use the slightly larger drill size that I did. Works fine.
I've actually found that I cut cleaner threads and break fewer taps when I use cutting fluid. I have fewer burrs to clean up with the cutting fluid as well. That's my subjective experience with 6061-T6 aluminum anyway.
Drill bits and taps with titanium nitride (TiN) coating work wonders too and stay sharp longer it seems.
Tom
I don't doubt your experience - perhaps you were using the 2.5mm recommended drill size though. Since I had no suitable fluid to hand I increased my drill size to 2.7mm. I've broken no taps yet and the swarf is easier to clean away when its not coated with fluid which makes it stick to stuff.
I'd not recommend my method when there's appreciable torque to apply to the fixing bolt, but when heatsinking over-torquing is counter productive, it tends to tip the package towards the fixing bolt.
I'd not recommend my method when there's appreciable torque to apply to the fixing bolt, but when heatsinking over-torquing is counter productive, it tends to tip the package towards the fixing bolt.
Using cutting fluid protects and prolongs the life of your tools. Also will reduce clogging of tap flutes with soft metals like aluminum, yielding cleaner, stronger threads. Realistically, a chip bolted to a heat sink will see virtually no load so one can probably pretty much bugger the threads into oblivion and it will still work fine.
If you are breaking taps you might be side loading them or binding them with chips. Sometimes best to back tap out to remove debris, cut a few more threads then back out again. Don't force things.
A side note on Ti coated drill bits is they typically perform poorly on stainless, best to use black oxide or HSS if you did something horribly wrong in a previous life and somehow get stuck drilling holes holes in SS.
Since we are on the topic, I mounted the LM using 10mm M3 socket cap screws, 2.5mm tap drill, and tapped all the way through the heatsinks of a HiFi2000 Mini Dissipante. Used a drill press and Tap Magic to help out and I'm very satisfied with the result.
In addition, I added an M3 shoulder washer I threw in with a Digi-Key order. It fits perfectly with no wiggle and I feel better that I'm not bolting down directly on to the LM.
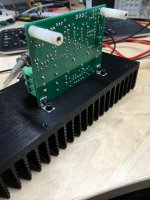
Finally, given the construction of my case, I could not place the PCB flush against the heatsink and use standoffs on the LM side of the board. The Mini Dissipante uses steel support frames to mount the heatsink and bottom and top plates and interferes with where the standoffs would be. To flush mount the PCB / LM, I bought some small angle brackets from Digi-Key. This allowed me to get everything mounted as needed.
In addition, I added an M3 shoulder washer I threw in with a Digi-Key order. It fits perfectly with no wiggle and I feel better that I'm not bolting down directly on to the LM.
Finally, given the construction of my case, I could not place the PCB flush against the heatsink and use standoffs on the LM side of the board. The Mini Dissipante uses steel support frames to mount the heatsink and bottom and top plates and interferes with where the standoffs would be. To flush mount the PCB / LM, I bought some small angle brackets from Digi-Key. This allowed me to get everything mounted as needed.
Attachments


Gtose,
that looks like the insulated version of the chipamp.
Since it is insulated you don't need the top hat washers.
You can use a steel washer and a bigger bolt/screw to clamp down the chipamp.
that looks like the insulated version of the chipamp.
Since it is insulated you don't need the top hat washers.
You can use a steel washer and a bigger bolt/screw to clamp down the chipamp.
Since it is insulated you don't need the top hat washers.
You can use a steel washer and a bigger bolt/screw to clamp down the chipamp.
Yeah, a regular flat washer will do the job. I'm not sure about the bigger bolt/screw, though. The hole in the LM3886TF is 3.84 mm ±0.05 mm, so unless you can find some M3.5 machine screws, which are not common, you're stuck with M3. In the US, you could use #6 screws. With a steel flat washer between the screw head and the LM3886, I'd argue the difference between #4, #6, M3, and M3.5 is academic at best, though.
All the theorizing about screw sizes and mounting screw torque will be for naught if you don't put some thermal goop (Wakefield 120 or 126, for example) on the IC before mounting it.
Tom
Yeah, a regular flat washer will do the job.
The only reason I went with the shoulder washer was to reduce the wiggle between the M3 and the LM's mounting hole. The top diameter of the washer I used is 7.1mm and is close to the max size you can fit flush before overlapping with the ridge of the IC (datasheet shows just under 9mm could fit).
All the theorizing about screw sizes and mounting screw torque will be for naught if you don't put some thermal goop (Wakefield 120 or 126, for example) on the IC before mounting it.
I went with Wakefield 120 over some Sil-Pad 800 I had left over. Again, I didn't need the insulation and the thermal performance of the Wakefield looked better.
I went with Wakefield 120 over some Sil-Pad 800 I had left over. Again, I didn't need the insulation and the thermal performance of the Wakefield looked better.
Good call. While the SilPad is good stuff (in particular the 1500ST), it does add significantly to the thermal resistance compared to the thermal goop. I tried mounting the LM3886TF (insulated package) with a thermal pad between it and the heat sink and found I couldn't get the specified output power without tripping the thermal protection of the LM3886. I had no issues when using Wakefield 120.
If I recall correctly, I performed this experiment on a rather small heat sink. I'm pretty sure I used the Pentium Pro heat sink I have sitting around.
My point is: Let the insulated package do its job.
Tom
Thanks, I should have found the table on my own I guess. I was incorrectly thinking M6, and therefore my searches didn't return anything.
M3, okay, now I know what to look for. It's a drive to a hardware store, so I want to call ahead and know what to ask for. I have the Wakefield, and I won't forget the cutting lubricant. I think I'll visit my buddy this weekend, so I can make the pilot holes on the drill press he has. I'm sure that will help in keeping everything square. We can probably make a cutting block too.
Cheers
A drill press usually has a depth stop. That comes in real handy for drilling blind holes. That way you can get threads where you need them without letting the holes show on the other side of the heat sink.
If you're in the Seattle area, Tacoma Screw is your source for machine screws, taps, A-9, drill bits, etc. In fact, my bottle of A-9 comes from their store on Port of Tacoma Road on the tide flats in T-town. They have a store in the SODO/Georgetown area as well.
Online, I go through McMaster-Carr for hardware.
Tom
- Home
- Amplifiers
- Chip Amps
- Modulus-86 build thread