The Mean Well RPS can be connected in series for a split supply. Simply connect V- on Supply #1 to V+ on Supply #2 and call that ground. Then V+ on Supply #1 is VCC and V- on Supply #2 is VEE.
Then control the mains power to them with the ISS. That gives you same functionality as the Mean Well control and adds some other nice features as well.
I haven't tried the RP-series, but the Mean Well supplies I've used so far: IRM, MPM, RPS, SE have all been happy when connected in series. Beware that some of the medical ones (like the MPM) can sometimes result in a slight hum under some conditions (yes, vague I'm not to the bottom of that issue).
Tom
And another one ...
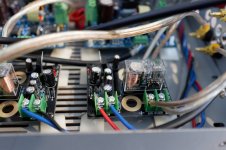
I just finished my dual mono Modulus-86. The casing and heatsinks are the leftovers of a dead Yamaha AX-10 integrated amplifier, 28 cm in width. The transformers are 160 VA CT, fully potted and shielded. The PSUs you may know from here. The volume pot and source switch are left just to hold the knobs.


Now as before I am still amazed of the Modulus' sound. I built and bought so many amplifiers and spent a fortune for those over my decades of audio addiction, but never before I was that satisfied. The spatiality is superb and actually in some pieces of music I discovered some previously unknown details. Somehow the Modulus-86 has more control over the speakers than other amplifiers. Thank you, Tomchr!
I just finished my dual mono Modulus-86. The casing and heatsinks are the leftovers of a dead Yamaha AX-10 integrated amplifier, 28 cm in width. The transformers are 160 VA CT, fully potted and shielded. The PSUs you may know from here. The volume pot and source switch are left just to hold the knobs.
Now as before I am still amazed of the Modulus' sound. I built and bought so many amplifiers and spent a fortune for those over my decades of audio addiction, but never before I was that satisfied. The spatiality is superb and actually in some pieces of music I discovered some previously unknown details. Somehow the Modulus-86 has more control over the speakers than other amplifiers. Thank you, Tomchr!
Last edited:
Groundloops,
You have nicely repurposed the chassis of the old amplifier - well done!
My impressions about the Modulus-86 are also similar. The amp spends a lot of time in my system, and have been enjoying it a lot over the past few years.
You have nicely repurposed the chassis of the old amplifier - well done!
My impressions about the Modulus-86 are also similar. The amp spends a lot of time in my system, and have been enjoying it a lot over the past few years.
I love the repurposed chassis. Nicely done, Sir! Nice and compact build too.
I'm glad to hear that your build came together nicely for you and that you're impressed with the result.
Tom
I'm glad to hear that your build came together nicely for you and that you're impressed with the result.
Tom
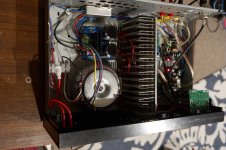
I bought this small case, the plan was to use a SMPS240QR. It turned out to be way too noisy, so I had a bit of trouble fitting that toroid... had to shrink the PSU board...

It works well and sounds really good. +1 happy customer, would recommend to a friend.
Build notes:
- Added volume control (cut trace between THAT1200 and LME49710)
- GELID thermal interface material has excellent thermal conductivity, but doesn't hold itself together like glass fiber reinforced silpads... it's single use only, comes into pieces if you disassemble. So, while the thermal conductivity is great, I'm not sure I'd buy it again.
- LM3886 clamped on heat sink with aluminium L profile. Mostly because the M3 tap broke in a heatsink (it's still stuck in there), so I had to do with a M4 tap, which is too big for the hole in LM3886... But I can pretend it's about better thermals 😀
- The case (wow the price went up a lot since I bought it) looks nice but the screws to take off the front panel are on the back of the front panel, unreachable once the case is full of stuff...
- I'm not sure what the purpose of the 0R1 resistor in series with the output is...
Last edited:
HmmmAdded volume control (cut trace between THAT1200 and LME49710)
 Good idea! I have a fancy 10kΩ TKD CP-2500-M motorized potentiometer on the shelf ... 🙄
@tomchr: What do you think about that?
Happend to me too not only once. Now I use 3 mm self-tapping screws in 2,7mm holes, works like a charm.... because the M3 tap broke in a heatsink ...
Me too ...I'm not sure what the purpose of the 0R1 resistor in series with the output is...
I've added a 50R in series with the output of THAT1200 to protect it from the capacitance of the (tiny) cable to the pot, and I will add a 100-220k resistor between the input of the LME and GND so the output doesn't go DC if/when the pot loses contact.
Good advice, thanks!I've added a 50R in series with the output of THAT1200 to protect it from the capacitance of the (tiny) cable to the pot, and I will add a 100-220k resistor between the input of the LME and GND so the output doesn't go DC if/when the pot loses contact.
Hmmm
@tomchr: What do you think about that?
I think that's fine. I'm pretty sure I was the one who started the rumour that you could do that. 🙂
Tom
Hello all.
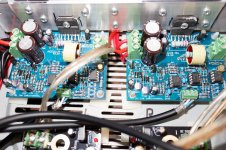
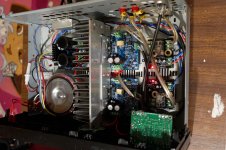
I have just finished a build with these amps, I'm really impressed. Clean and plenty of power. Awesome sound and sound stage. Best kitset amp I've ever built, and I've made maybe a dozen over the years.
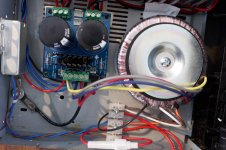
I repurposed an old Onkyo amp for the case, had to shorten and reseat the heatsink and bore out new holes etc.
I used a 225VA Hammond xformer so this should never run out of oomph.
I used the balanced volume control that Alexcp made (Anyone tried that vs Tom's one?)
I used to work in Pro audio, I saw plenty of amps like this, sleepers that were shoehorned into any old case and sounded amazing. I've always meant to put one together.
Worked first time, perfectly.
Love this thing, and love your work, Tom. Building a composite amp like this (well, making it stable) sounds pretty daunting to me.
I have just finished a build with these amps, I'm really impressed. Clean and plenty of power. Awesome sound and sound stage. Best kitset amp I've ever built, and I've made maybe a dozen over the years.
I repurposed an old Onkyo amp for the case, had to shorten and reseat the heatsink and bore out new holes etc.
I used a 225VA Hammond xformer so this should never run out of oomph.
I used the balanced volume control that Alexcp made (Anyone tried that vs Tom's one?)
I used to work in Pro audio, I saw plenty of amps like this, sleepers that were shoehorned into any old case and sounded amazing. I've always meant to put one together.
Worked first time, perfectly.
Love this thing, and love your work, Tom. Building a composite amp like this (well, making it stable) sounds pretty daunting to me.
Attachments
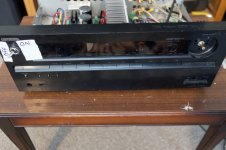
Nice work, probably the best use for an old HT receiver chassis 🙂
I did same but different, good to see another successful build in NZ too.
I did same but different, good to see another successful build in NZ too.
Hi MrCray,
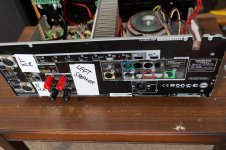
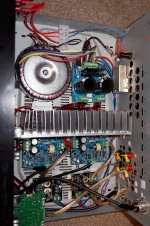
Good use of the old chassis. But I have to agree with livistubby, that low voltage fuse holder give me the willies! I'm use to 120 VAC and you're at 240 VAC aren't you?
Please, use a chassis mount fuse rated for your mains voltage. At least you did use a fuse.
-Chris
Good use of the old chassis. But I have to agree with livistubby, that low voltage fuse holder give me the willies! I'm use to 120 VAC and you're at 240 VAC aren't you?
Please, use a chassis mount fuse rated for your mains voltage. At least you did use a fuse.
-Chris
Mouser P/N 112-R3-12-12-B would work for the fuse holder.

I like the chassis reuse, though. That saves a lot of work. I'm glad to hear the build came together nicely for you.
Tom
I like the chassis reuse, though. That saves a lot of work. I'm glad to hear the build came together nicely for you.
Tom
I’m a big fan of IEC AC connections as well. Note that if there is a future rebuild of this, or other projects, there are IEC input blocks that incorporate switches and or fuses in one fairly tidy module.
Tom, should I be concerned that the Modulus 286 kit didn’t include an external fuse, or is there a reasonably accessible one in the Connex SMPS?
Tom, should I be concerned that the Modulus 286 kit didn’t include an external fuse, or is there a reasonably accessible one in the Connex SMPS?
The Connex SMPS300 in the Modulus-286 Kit LE has an on-board fuse. It sits in a regular 5x20mm fuse holder and is easy to access.
Tom
Tom
- Home
- Amplifiers
- Chip Amps
- Modulus-86 build thread