wcwc - as slick a piece as it is, isn’t that Neutrik combo jack for 1/4” phone plugs, as one would often find employed with musical instrument/ PA gear? Forget the switches, etc - for a Hypex UCD build about a year ago, I used XLRs on the amp and either home made pseudo-balanced cables per Tom’s drawings (actually not new art there 😉 ), or a pair of XLR/RCA adapters, easily sourced musical instrument houses, or online.
Attachments
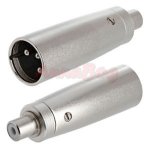
Yes, they use the 1/4" jacks. Since I plan to completely eliminate RCA jacks I don't really want to buy a bunch of cables. So I was planning to use something like this to use my existing RCA cables until the components are switched over to all XLR.
Amazon.com: RCA to 1/4 Adapter,CableCreation 6.35mm TS Mono Plug Male to RCA Female Audio Adapter, Gold Plated: Home Audio & Theater
Amazon.com: RCA to 1/4 Adapter,CableCreation 6.35mm TS Mono Plug Male to RCA Female Audio Adapter, Gold Plated: Home Audio & Theater
For everything cables and connectors, as well as other professional audio components, I suggest you use Markertek. They have a wide array of connectors, cables etc. at good prices.
Mostly not "audiophile" nonsense; just good stuff, including Neutrik.
Mostly not "audiophile" nonsense; just good stuff, including Neutrik.
Yes, Markertek has Neutrik as well as by-the-foot Canare and Mogami 'star quad' mic cables which make great audio interconnects.
daansan,
Holy crap! What a superb build with execution! Really happy and proud of you! Enjoy the fruits of your efforts and get yourself a serious dac!
Do you mind posting a pic with the power on?
Best,
Anand.
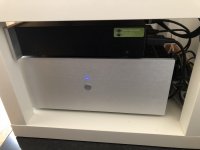
The amp is in a temporary enclosure but i’ve made two pics:
- one in standby
- one with the amp on
But i must say the blue led doesn’t show well on the pictures
Attachments

Any issue with us making our own inductors? I will have quite a bit of magnet wire left over after I build the inductors for my Mod86 boards.
If I remember correctly, Tom has specs for the coils in his construction manual. Winding them is a bit of a pain, but still readily done.
Make a couple of practice inductors you intend to discard, before starting on the for-real, it-goes-in-the-audio-equipment inductors.
Teach yourself how to wind tightly on the coil former you've chosen. Teach yourself how to secure the windings while still on the coil former, so they don't flop apart when removed from the former. If you choose an adhesive, be sure it's rated to operate at a temperature above 105C without deforming or losing its "grip" or catching fire. Same recommendation if you choose an adhesive tape.
Teach yourself how much wire you'll need to wind the coil. Teach yourself how to remove the insulation from the ends of the wire, all 360 degrees around the wire, so it can be soldered in place. Teach yourself how to do this without deforming the coil in the process.
Then measure a practice coil on an LCR meter and verify you're getting what you expect from those Wheeler Inductance Calculator websites that amateur radio operators have helpfully sprinkled around the web.
Then make the coils you need for your actual audio build. Consider making a couple of extras, spares which you store in pill bottles so they won't be deformed by the weight of other random junk in your Spare Parts box.
Now you know why I chose to sink money into having inductors professionally wound. You can find them on my website: Output Inductor
If you'd rather wind your own, I suggest winding about twice the number of turns you need. At least for me, the last turns always turn out better than the first. Then just unspool the unneeded turns by pulling on the wire and letting the inductor rotate around the coil former. It works well enough.
I've built quite a few Modulus-86 boards through the years and consistently find that winding the inductors takes about one third to half of the total build time. So I chose to outsource that.
These professionally made inductors are made in the US.
Tom
Attachments

You could also use a Neutrik combo connector in lieu of a switch. Only one type could be used at a time. This is what I am planning to use.
That's still a balanced connector. The TRS plug connects the Tip, Ring, and Sleeve to the XLR pins. You'd have to use a 1/4" phone jack rather than an RCA.
If you're using an adaptor, I suggest using a male RCA to male XLR adapter. That'll convert to XLR at the source and allow you to run an XLR cable from there to the amp. That'd replicate the pseudo-differential cable. The Neutrik NA2MPMM is an example.

I really dislike RCA connectors. 🙂
I'm not a fan either. There are so many crappy RCA connectors out there - and the cost of the connector is often not an indicator of quality. The best RCA connectors I've found to date are the Neutrik ones.
Is mounting boards upside down OK from a thermal point of view?
Sure.
Tom
Last edited:
Winding the inductors is not as complex as Mark intimates. Tom tells you what to wind on (a AA battery. last time I checked) and how many turns of what gauge. Yes, it's worth doing a couple practice runs to get the hang of it. There's no reason to hunt down an LCR bridge to measure. The exact value of the inductor is not that critical and the laws of physics dictate it based on the physical dimensions. If you get the right number of turns of the correct gauge wire around the battery and those turns are reasonably 'tight' to each other and fit between the mounting holes on the PCB, you should be just fine.
Yes, it is somewhat of a hassle and takes a little manual dexterity. If you do more than a couple, you may come up with a few tricks to get them more uniform. But, this is DIY after all! Yes, your coil may not look as beautiful as Tom's pre-made ones (which are a good value), but will be entirely serviceable.
Yes, it is somewhat of a hassle and takes a little manual dexterity. If you do more than a couple, you may come up with a few tricks to get them more uniform. But, this is DIY after all! Yes, your coil may not look as beautiful as Tom's pre-made ones (which are a good value), but will be entirely serviceable.
Well I have built all 4 of my Mod 86 channels built except for the inductors and the amp chips. So I will find out how much I like making the inductors this weekend. 🙂
That's still a balanced connector. The TRS plug connects the Tip, Ring, and Sleeve to the XLR pins. You'd have to use a 1/4" phone jack rather than an RCA.
The best RCA connectors I've found to date are the Neutrik ones.
Combo Jacks also can use TS (Tip-Shield) plugs which are unbalanced. I like the 1/4" phono jacks much better than RCA's. I have to every so often jiggle the RCA connectors to make contact from my Marantz AVR to my ACA amps because I lost a signal from one of my channels.
I was planning on using those Neutrik RCA panel connectors on my phono preamp.
If you're using an adaptor, I suggest using a male RCA to male XLR adapter. That'll convert to XLR at the source and allow you to run an XLR cable from there to the amp. That'd replicate the pseudo-differential cable. The Neutrik NA2MPMM is an example.
In PA applications, I've learned to intensely dislike those neutrik adapters (as well as the xlr-jack ones). They're not only very heavy by themselves, which is not good for the panel mounted connectors, they are also long (when combined to another xlr connector) and create a nice lever effect if you hit them, easily damaging stuff. Much better to have properly terminated cables. They won't cost you any more than those neutrik adapters anyway.
Last edited:
I find it's actually pretty easy to wind coils number 7 thru 15, after discovering pitfalls and learning techniques on coils 1 thru 6. I recommend asking yourself: what tool do I wish I owned, to perform the step I'm doing right now? Then buy that tool. Move on to the next step and repeat the question. Same goes for toolrests, workpiece supports, vise jaw slippers, little well-shaped jigs, and so on. What 3D mechanical shape do you wish you had, to make this step easier? Then fabricate that, or feces-bodge up a close approximation from handy bits already on the bench.
In PA applications, I've learned to intensely dislike those neutrik adapters (as well as the xlr-jack ones). They're not only very heavy by themselves, which is not good for the panel mounted connectors, they are also long (when combined to another xlr connector) and create a nice lever effect if you hit them, easily damaging stuff.
Yeah. There is that. I mostly use adapters for testing.
Much better to have properly terminated cables.
I wholeheartedly agree.
Tom
Winding the inductors is not as complex as Mark intimates. [...]
Yes, it is somewhat of a hassle and takes a little manual dexterity. If you do more than a couple, you may come up with a few tricks to get them more uniform. But, this is DIY after all! Yes, your coil may not look as beautiful as Tom's pre-made ones (which are a good value), but will be entirely serviceable.
All true. It took me a few years of building Modulus boards before I finally had enough of winding coils. Also, for the professionally assembled modules, I need to provide my assembly house with components. Delivering a spool of wire and coil former won't go over well. Or maybe it will. They'll just charge more. 🙂
Judging by the number of people who order inductors with their Modulus boards, quite a few seem to realize the convenience of ready made components.
Tom
Last edited:
Finally i completed the last things in my build of the Modulus 686 and it is time to share some pictures and experiences.
Thank you very much for posting. It looks like a very nice build. I'm glad it came together nicely despite hitting the Mean Well 'speed bump' along the way.
To make these build experiences, reviews, and build pictures easier to find, I have started a list in Post #1. The list is not a comprehensive one. I just cruised through the last 20-30 pages of this thread and fished out the builds.
- One flat headed blue led flush mounted in the front panel. This led is driven by the (way too) large rectifier bridge that you can see in the pictures. This connects to both of the ISS’s led outputs and I use different resistor values for on and standby. The led shines more brightly when on.
That's a pretty neat trick. Nice touch! I do agree that using a 25 A diode bridge for the ~5 mA LED current is a bit overkill, but hey... at least it mounts easily in the chassis.
Tom has provided amazing support throught the whole process. This already started at the time of ordering. [...]
When i finally started the build and screwed up a few times Tom was always there to help troubleshoot and figure out what could be wrong. I learned a good lesson again that wiring up a supply that can provide the amount of power that this setup asks for things can go haywire pretty quickly - i fried a meanwell supply probably by having swapped two sense wires.. who knows.
Then the whole meanwell whine issue: Tom was also involved in this and gave a few hints that lead to finally finding the issue here.
Thank you for including this. I really appreciate it. It's easy to provide good service when everything goes well. A much better indicator of the level of customer service of a business is the service received when something doesn't go according to plan. I'm glad I was able to nudge you along the way in your successful completion of your Modulus-686 build. My goal is always a successful build.
The current setup of my audio set consists of a pair of DIY scanspeak vertigo speakers, a GamuT D200 amp (which will be replaced by the Mod686), a Marsh Sound preamp and a Bluesound streamer.
I’m missing a good DAC in this system, which is limiting somewhat in truly assesing it’s performance. But the first listening impressions of the Mod686 have been very good.
This got confirmed when i took the Modulus 686 to another friend who has an identical setup and has a good ESS9016 based DAC. There we could really A/B test the Mod686 amp versus hos GamuT D200 mk3. What we both felt about this comparison was:
- the Mod686 sounds a little more open, calm and detailed.. as if one just got rid of a filter in the sound
- with that, the soundstage became a bit wider as well. The GamuT has a very nice and particularly intimate soundstage it sets. With the Mod686 we felt we lost a bit of this intimacy but got a lot in return.. it reveals more of the music, separating small details
- swift changes in the rhythm of the music and very low basses prove to be no problem for the Mod686
Ad a conclusion: we were both amazed to see this Mod686 amp - on which i spent close to 1500 euro worth of parts - outperform this GamuT D200 with a value of currently 12K euro.
That's awesome. 12k Euro. Dang... It's good to know that the Modulus-686 can play confidently with the big boys.
For me it is a keeper, and as a DIY enthusiast it makes me happy that yet another component in my set was assembled by myself.
Sweet. Congratulations on a build well done.
Tom, thanks for all of your support along the way, it has been an amazing ride. If I ever get to travel to the Vancouver area again I’ll buy you a nice IPA 🙂
You're very welcome. I'll take you up on that IPA - especially if I can convince you to check out Calgary. We have 5-6 of Canada's national parks within a reasonable drive and I'll be happy to help you set up another road trip. 🙂
Tom
- Home
- Vendor's Bazaar
- Modulus-686: 380W (4Ω); 220W (8Ω) Balanced Composite Power Amp with extremely low THD