Another update!
I managed to fit the volume pot the correct way up and use very short wire links to connect to the PCB. I glued a small wooden block to the bottom of the pot to support it in exactly the right position so I could remove the front panel and wire the pot in from the front.
Fiddly work but well worth it. The amp sounds fantastic now so that's how I'm going to leave it for the time being.
I took some photos if anyone out there is interested?
Re: Well boys... have schematic for uncle Charlie?
hi Carlos, do you know his other designs?
I saw the circuit for the a500, cambridge, and that looked JUST like a self design, but I was told it isn't.
I am confused which are, anyone clarify please? thanks
destroyer X said:
This is Doctor Self last design...and they guy use to do good things...
Carlos
hi Carlos, do you know his other designs?
I saw the circuit for the a500, cambridge, and that looked JUST like a self design, but I was told it isn't.
I am confused which are, anyone clarify please? thanks
Stream said:
Very interested 🙂
Me too....
A pic showing the pot wiring would be nice.
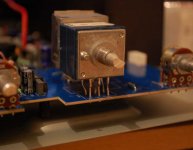
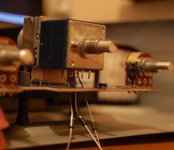
Here's a photo of the pot after I'd soldered in onto the PCB.
You can just see the small wooden block at the back of the pot. This was glued onto the flat section of the gear housing part of the pot. I applied glue to the PCB then refitted the pot into the front panel so when the glue dried it would be in exactly the right position. After the glue had dried I then removed the front panel and wired the pot to the PCB.
You can just see the small wooden block at the back of the pot. This was glued onto the flat section of the gear housing part of the pot. I applied glue to the PCB then refitted the pot into the front panel so when the glue dried it would be in exactly the right position. After the glue had dried I then removed the front panel and wired the pot to the PCB.
Attachments

Thanks for the pics and great work on the new pot. I think I'll be doing the same to my 340A shortly. How much was the Alps pot and where did you get it?
(Where abouts in Hampshire? I'm from a certain Naval city down there...)
PS: Any chance of a plan shot of the assembled amp internals?
(Where abouts in Hampshire? I'm from a certain Naval city down there...)
PS: Any chance of a plan shot of the assembled amp internals?
Thanks! 😀
It was about £28 from an eBay seller called Familygate. It's an ALPS RK27112MC Blue Velvet. He has a datasheet in his advert.
I'm guessing you're in either Portsmouth or Southampton? I'm in the town where Jeremy Clarkson raced a Fiesta inside our shopping mall.
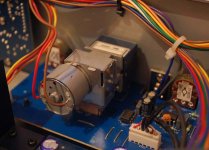
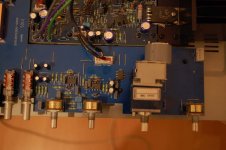
Here's the plan view shot you wanted... the photo's are a bit blurry as it was gone midnight when I took them, I really wanted to get it all done this weekend!
It was about £28 from an eBay seller called Familygate. It's an ALPS RK27112MC Blue Velvet. He has a datasheet in his advert.
I'm guessing you're in either Portsmouth or Southampton? I'm in the town where Jeremy Clarkson raced a Fiesta inside our shopping mall.
Here's the plan view shot you wanted... the photo's are a bit blurry as it was gone midnight when I took them, I really wanted to get it all done this weekend!
Attachments
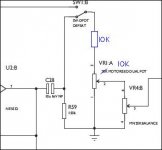
skidude said:The original pot was a 20K log but the Alps came in either 10K or 50K log so I went with 10K and fitted 10K series resistors.
Thats the way I'd have to do it in my 340. Thanks for the pics. Pompey by the way 😉 The place where the top side on the south coast play their home games.
I know the video you mean but I cant say I recognize that shopping center. http://www.topgear.com/au/videos/the-sensible-fiesta
Haha, Clarkson didn't mention it during that episode but at the end of the previous episode he said he'd be driving a Fiesta in Basingstoke, it was Festival Place.
Good luck doing the mod.
Good luck doing the mod.
Nice mod.
I also was interested on installing ALPS blue velved, because stock pot has very bad balance on low volume levels...
1. Any problems with lower value?
2. What about balance on low volume? Very low... about "8 hour" and lower...
I also was interested on installing ALPS blue velved, because stock pot has very bad balance on low volume levels...
1. Any problems with lower value?
2. What about balance on low volume? Very low... about "8 hour" and lower...
Hi Stream,
No problems with the lower value pot. With the 10k series resistors the previous buffer stage (U3) see's the same resistance.
The balance between channels is very good, there's no noticable difference between left and right speakers.
In terms of response to the volume control, you have to turn the knob round a little bit more to achieve the same volume compared with the old pot.
As a rough guide to volume achieved;
Old pot 9 o'clock = Alps pot 10 o'clock.
I prefer this as it gives a bit more fine control, useful when using the remote control as it has quite large volume steps!
Thats good news. This "feature" will be useful, because I usually listen to music on low volume...
Maybe I'll replace pot in my 340a too...
Maybe I'll replace pot in my 340a too...
I forgot to mention, the hole in the front panel is too small so needs drilling out to 8mm and the small locating hole beside it needs a bit of work with a needle file. You'll see what I mean when you have the parts in your hands, it's all easy stuff.
The best tip I can give is make your spacer (wood block in my case) just the right thickness so it slots underneath the pot when it's secured in the front panel. That way, when it's glued in place the Alps pot will be in just the right place for soldering the new legs in place.
Good luck and let us know how you got on.
Hey all, thanks for the great thread.
I bought my 640a in 2008 so assume it will be the V2?
If anybody is keen to email me a list of mods and parts I would be very grateful.
thunk303@hotmail.com
I bought my 640a in 2008 so assume it will be the V2?
If anybody is keen to email me a list of mods and parts I would be very grateful.
thunk303@hotmail.com
Did somebody have the 640 v2 service manual. The link before in this thread was for 640a and I already have it.
Thanks.
Thanks.
Sorry, I've had a good search but not managed to find a service manual for the V2 version.
Looking at photo's of the V2 version it looks as though most of the changes are in the power supply. The power amp itself looks very similar, presumably they got rid of those nasty 12 wires under the amplifer PCB!
The V2 has a far better heatsink than the V1 which should help reliability.
Looking at photo's of the V2 version it looks as though most of the changes are in the power supply. The power amp itself looks very similar, presumably they got rid of those nasty 12 wires under the amplifer PCB!
The V2 has a far better heatsink than the V1 which should help reliability.
- Home
- Amplifiers
- Solid State
- Modding Azur 640A