Yea I just 3d printed some jigs. Quick and easy when u do alot of cad and printing anyways.
Yea I saved some pics on dampening.
Yea I saved some pics on dampening.
I have used DSP or passive filters to get my preferred FR on them (and every other design I made or owned).
To date, I have never heard a design that matched what my ears prefer... which is a 5 to 8 dBs descending slope between lowest bass and highest treble... and the least amount of bumps and dips between them.
I have not been shy on using tools that are available for a better listening experience.
To date, I have never heard a design that matched what my ears prefer... which is a 5 to 8 dBs descending slope between lowest bass and highest treble... and the least amount of bumps and dips between them.
I have not been shy on using tools that are available for a better listening experience.
On 8ohm speakers, a basic BSC to start with is 1mH coil parallel with circa 3.3R to 10R, adjust R to your taste or distance from back wall.
On 4ohm speakers use 0.5mH coil.
Add 1uF film cap for more highs.
An 18ga air core is more than enough. Even 20ga is fine.
On 4ohm speakers use 0.5mH coil.
Add 1uF film cap for more highs.
An 18ga air core is more than enough. Even 20ga is fine.
I have used DSP or passive filters to get my preferred FR on them (and every other design I made or owned).
To date, I have never heard a design that matched what my ears prefer... which is a 5 to 8 dBs descending slope between lowest bass and highest treble... and the least amount of bumps and dips between them.
I have not been shy on using tools that are available for a better listening experience.
Using equalizerapo I got it sounding just right for me with just minor tweak. But I do not want to have to play from my PC to sound like that
Time to experiment lol
I read the karlsonator design advantages and I was wondering if the aperture can fix the harshness due to cone break up of an aluminium driver.I'm talking about peerless 830985 which has a nasty freq chart after 10000hz but also a qts of 0.54 which -I think- can qualify for a 0.4x karlsonator enclosure...any ideas, please?
The aperture can sort of reshape rather mid range forward drivers like the CHN-70. Aluminum cone breakup at 10kHz is an intrinsic sound of the driver. It can be attenuated somewhat with an aperture but I font expect to go away completely. Playing around with different foam core apertures by starting small and enlarging the aperture and listen and repeat, if necessary.
The aperture can sort of reshape rather mid range forward drivers like the CHN-70. Aluminum cone breakup at 10kHz is an intrinsic sound of the driver. It can be attenuated somewhat with an aperture but I font expect to go away completely. Playing around with different foam core apertures by starting small and enlarging the aperture and listen and repeat, if necessary.
Thank you.If it doesn't work, maybe it is better to finally cut it at 10000hz with a low pass, but it is to be tried.
Try adding a thin layer of rubber cement paper glue to the aluminum cone at the interface of the dust cap and cone. It’s removable. More permanent might be RTV.
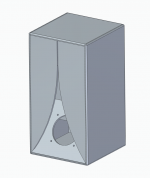
I put together a quick 3D model of the 0.40x Karlsonator with 3FE22 and Speakon connector cut outs. I would not print this as it definitely needs some optimization. If I try to slice the full model, it asks for 400 - 500 m of filament with low infill density. It would also need a perfectly adjusted printer able to do long bridges. I added a model without the side walls which in theory should be printable with just one 1kg filament spool.
It is made in Fusion 360, so I can export in F3D or STEP if anyone would like to modify it. Any ideas for improvements are welcome, maybe we can make this together into a printable Karlsonator🙂
It is made in Fusion 360, so I can export in F3D or STEP if anyone would like to modify it. Any ideas for improvements are welcome, maybe we can make this together into a printable Karlsonator🙂
Attachments
Hello Pelanj,
I think the trick is to make use of what the printer is good at. I saw you made jigs as well and for those purposes it is terrific, but making dense material sheets is not one of them.
Keeping the original design of the Karlssonator i think a combination of the two i think would be the best, Like 30 Printing the internals, and keping the external box in foam or wood.
Although, going for a complete 3d printable design i would be interesting, not having any limitations what so ever on plane surfaces 🙂
I put together a quick 3D model of the 0.40x Karlsonator with 3FE22 and Speakon connector cut outs. I would not print this as it definitely needs some optimization. If I try to slice the full model, it asks for 400 - 500 m of filament with low infill density. It would also need a perfectly adjusted printer able to do long bridges. I added a model without the side walls which in theory should be printable with just one 1kg filament spool.
It is made in Fusion 360, so I can export in F3D or STEP if anyone would like to modify it. Any ideas for improvements are welcome, maybe we can make this together into a printable Karlsonator
Hi Pelanj, thanks for the model. I'd be keen to get it into Solidworks, could you do a STEP file? DXFs or DWGs of the flat parts would also be useful, or anything you can make that would import better into SW than an STL.
Hi Pelanj, thanks for the model. I'd be keen to get it into Solidworks, could you do a STEP file? DXFs or DWGs of the flat parts would also be useful, or anything you can make that would import better into SW than an STL.
Here you have a 0,4 scale in STEP with all individual cabinet parts
Attachments
I made a 3d printable concept here https://www.diyaudio.com/forums/full-range/342699-desktop-tl-blh-3fe25-3.html#post6103242, although it's as small as a 0,25 style karlsonator
Does not seem to be talked about much. I notice this shelf is attached to front panel on .40 karl foamboard. On wood Karl's it seems it attaches to baffle. So on a wood .40 Karlsonator where is best place to put it and how does size of it affect the sound.
Does not seem to be talked about much. I notice this shelf is attached to front panel on .40 karl foamboard.
On foam core, it is bracing to reduce the two aperture wings from flapping around, more than as an acoustic flow director shelf. With a wooden aperture, it is stiff enough not toi need it. Also, if you use multiple layers of foamcore on the aperture, it may be stiff enough not to need it.
On foam core, it is bracing to reduce the two aperture wings from flapping around, more than as an acoustic flow director shelf. With a wooden aperture, it is stiff enough not toi need it. Also, if you use multiple layers of foamcore on the aperture, it may be stiff enough not to need it.
Yea on foamboard I figured. Just notice some woodbuilds use them.
By the way the foam board one sounds way better than this wood one. I did not get the foam pads put in it yet. Just polyfill till pads come in. However speaker going back in foamboard ones till then.
- Home
- Loudspeakers
- Full Range
- Mini Karlsonator (0.53X) with Dual TC9FDs