Thanks Simon and Brent,
so I'll have to change the connector, maybe one side solder a ribbon cable like a PC IDE one, and other side the same with between an ugly plug type like a DB25... or just solid solder on both sides. And of course the coax mod 😉
The harder for this task is... to find again the posts wich explain where and how to!
Whatever I'll order a spare VAM12.1 in case of (is that correct?), Thanks again!
Well you could just start with the HF/coax mod! This is important for sound quality too, so a good start. A new mech won't hurt and could even help sound quality that little extra bit.
Simon
Simon
Ya and with my already fully modded PCB as Ray's list, It's ready to take full advantage of my flea and Audiocom super regs! It should remove a couple of veil again 🙂
It won't remove any veils, sorry. It will just take some roughness out of the top end and midrange. It's important though, if subtle.
Yeah I've read that's the final touch wich remove the digital sound more to analog one.
Thanks for support Simon!
Thanks for support Simon!
TDLofCC said:What is the HF Coax mod ?
Any links on howto do this ?
I've been meaning to post about this myself. I've got a half drawn picture for proof reading which I'll try to finish off.
Sorry for the bump (repeat), but I'd really like to clear this up before we start ruining the main board. We have built 5 raygulators, 2 x 12V (+/-) and 3 x +5V. This Q is only for the 12V ones.
I first started looking at just putting the 12V Raygulators in the original "drop-in" locations of the 7812 and 7912 (CD67SE btw), like in this pic from Ray back at Post # 1981. Then I started reading and reading and it seems like these ones are "better placed closer to the opamps".
e.g. Peter's comment above and
If I do this, does that mean I REMOVE the 7812 and 7912's at Q801 and Q802 and do what Rowey recommended to Aussie Simon? i.e.
(Presumably the same goes for any 7805 regs for the 5V rails). I'll need to ask for details on exactly "how to" do that later (with pics).
I first started looking at just putting the 12V Raygulators in the original "drop-in" locations of the 7812 and 7912 (CD67SE btw), like in this pic from Ray back at Post # 1981. Then I started reading and reading and it seems like these ones are "better placed closer to the opamps".
e.g. Peter's comment above and
If I do this, does that mean I REMOVE the 7812 and 7912's at Q801 and Q802 and do what Rowey recommended to Aussie Simon? i.e.
Remove R613-R616. Make a note of which resistor has +12V and -12V. Solder both regs into two of the holes (+/-) at the opamp side of the removed resistors. Then once these are in bridge with some wire from one reg to the appropriate spot so the other opamp can recieve the same voltage IE +12v reg soldered into R613 and then bridged to R614 (solder -ve reg into R616). For now you can use the +/- 20V from C803/C804 and maybe upgrade at a later date. Remove C806 and C805 as these are not used now. Before you switch on I would recommend removing the opamps so when you power it up you can check the voltages with out any damaged caused to them if you have done it wrong. PIN 8 = +12V & PIN 4 = -12V"
(Presumably the same goes for any 7805 regs for the 5V rails). I'll need to ask for details on exactly "how to" do that later (with pics).
Alright, here's a fairly poor diagram of what I think the coax mod entails.
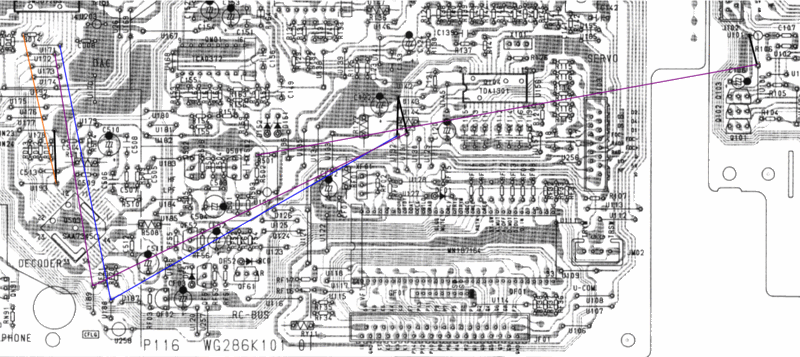
The attractive colours are for each run of coax. The black lines are for the shield to attach to ground.
I assume for this mod you remove the following:
U100
U131
U132
U171
U172
U188
U189
U193
RD14 (aka C521)
R501
Can one of the experts please tell me if this is correct? If not I'll update it and it can be a reference for other pilgrims.
Thanks,
Simon (Oz)
BTW, I just replaced C803/4 with Panasonic FC 2200uF and the 5V regulator with a Super-Raygulator.
The positive thing is, the CD player is still working.
The sound definitely didn't get any worse, and it sounds good.
It's a bit hard to tell if there are any improvements. Waiting for my Black Gates to arrive from America for the separate power supplies.
The positive thing is, the CD player is still working.
The sound definitely didn't get any worse, and it sounds good.
It's a bit hard to tell if there are any improvements. Waiting for my Black Gates to arrive from America for the separate power supplies.
JK,
I was going to draw a picture for the opamp reg placement for vetting as well.
I'm trying to get my -12V Super-Raygulator to output -12V instead of -8.2V first.
Simon (Oz)
I was going to draw a picture for the opamp reg placement for vetting as well.
I'm trying to get my -12V Super-Raygulator to output -12V instead of -8.2V first.
Simon (Oz)
The "Coax mod" we refer to is just from the RF pcb to the HF circuit near the decoder. IE U100 to R505.
Now the other coax mods are generally not refered to has its a much more complex job. Here is a caop and paste from my mods list.
U100 CONNECTED TO R501 - RF TO HF
U193 CONNECTED TO C521 - DAC CLOCK OUT TO DECODER CLOCK IN
U132 CONNECTED TO U188 AND THEN U171 - SIDA DATA
U131 CONNECTED TO U189 AND THEN U172 - SICK DATA
Remember to cut the tracks so the signal no longer runs down them.
Brent
Here is an old piccy of my cd player. You can see roughly where the coax cables are situated
Brent
An externally hosted image should be here but it was not working when we last tested it.
Brent
TDLofCC said:Thanks for the replies. One more Q though, what does this coax mod do for the sound/player ?
Hi.
What you have to remember ( and something that is often overlooked ) is that a CD player is largely ANALOG, albeit at RF frequencies.
If you look at the circuit tracks from the laser module connector to the HF amplifier, it runs past the very noisy cpu chip. Bypassing this track with coax cleans up the RF signal by preventing the pickup of noise. The servos, which are also analog, and the rest of the system can operate better. A side benefit is that RF noise is not injected into other circuits.
Andy
It takes away the digital nastyness you get in the treble. Basically the treble improves by sounding more natural.
It stops the delicate RF signal from picking up noise and also stops the RF signal from being emited onto the rest of the pcb.
The RF to HF coax mod is so easy to do its silly not to do it.
Solder the coax to U100 on cd mech pcb (cd63) U101 (cd67) and ground the coax braid to the earth of the same pcb. Now solder the other end to R505 (cd63) you dont need to gnd at this end as its always best to gnd at the source end. Also just snip R505 (at its input end) and lift, solder coax to this point and use a little silicon or hot glue to secure. Solder to R105 for cd67.
Brent
TDLofCC said:Thanks for the replies. One more Q though, what does this coax mod do for the sound/player ?
To reiterate: for me it made the treble less splashy and rough. It has become more fluid and smooth. In two words: "less digital".
A teaser of what these players can do
For those who complain the CD63/7 is not detailed enough, perform the following mods:
1 - Reclock DAC and servo
2 - Install LM4562
3 - Bypass HDAM
4 - Separate regs for each 5v rail
4b - Use as many low noise regs as possible!
5 - Separate transformer for ana and dig
When you've done all these (and the more minor mods) you can sit back and marvel at the amazing amount of information on every CD you own!
More minor mods:
1 - Star earthing
2 - Local decoupling caps
3 - Schottky diodes in original supplies
4 - Custom power cord, isolation transformer etc.
5 - Nice isolated sockets
6 - Shielding of ICs
7 - Coax swaps
8 - Signal resistors and caps
9 - HF and servo resistors and caps
With these mods the sound will be laid back and natural, with a sweet and fluid top end and amazing bass. Control is superb.
Essential:
Replace feet!
Without a little damping and new (cone) feet you'll still probably have a thumpy "hi-fi" bass and poor sense of timing. You know what to do, get to work!
There are still more mods, and you know where to look for those - Brent's list for the ultimate mods or Ray's list for the most cost-effective value mods.
Simon
LOL
That is pretty much on the button!
Also as a rule I use good big caps after bridge (of course uber caps like BG would be even better) and smaller uber quality caps after regs.
P.S Quality regs transform your modded player from something good to something high end by comparison.
Brent
That is pretty much on the button!
Also as a rule I use good big caps after bridge (of course uber caps like BG would be even better) and smaller uber quality caps after regs.
P.S Quality regs transform your modded player from something good to something high end by comparison.
Brent
- Home
- Source & Line
- Digital Source
- Marantz CD63 & CD67 mods list