Preamp Pics
An externally hosted image should be here but it was not working when we last tested it.
An externally hosted image should be here but it was not working when we last tested it.
An externally hosted image should be here but it was not working when we last tested it.
Mic preamp kits and PCB's are now on the website to order:
http://www.madaboutsound.com/prod.asp?pname=MPK
UK orders: please order via the madaboutsound.com website.
Overseas orders:
Payment by Paypal: sales@madaboutsound.com
Delivery for 1 kit: £6.00 (+ VAT)
Delivery for PCB's: £3.00 (+ VAT)
Please note when making payment:
For all customers within the EU, VAT will be charged at the rate of 17.5%
For all customers outside the EU, VAT will not be charged. (use the ex. VAT price shown on madaboutsound.com)
I will create a seperate ordering page this weekend to make it easier to place non UK orders.
I've updated the website to accept worldwide orders and show the corresponding carriage and tax charges where applicable.
I've relaxed the postcode rules for international orders - now min requirement is 2 characters.Beau said:Thanks, still no joy, the postcode wont enter...Let me know when you get it rectified.
Thanks Beau
Sorry about that oversight. 😉
I've added some loudspeaker binding posts and the Panasonic WM-61A electrets to the website.
All outstanding mic pre orders have been dispatched.
All outstanding mic pre orders have been dispatched.
I got the preamp today. It looks very good. 🙂 The only one thing that I would put on the wish list is a connector hole drilling template to make it easier to determine where to drill the holes. A simple printed template that shows the case end outline with hole centermarks would do.
Hi, here's the the hole drilling template I used 😉
This one was created with two RCA's in mind. The profile of the BNC is slightly different but I still managed to squeeze it through on the prototype.
And check your LED size before drilling the hole for it (future kits will come with 3mm instead of 5mm LED's).
This one was created with two RCA's in mind. The profile of the BNC is slightly different but I still managed to squeeze it through on the prototype.
And check your LED size before drilling the hole for it (future kits will come with 3mm instead of 5mm LED's).
Attachments
Vikash said:Hi, here's the the hole drilling template I used 😉
This one was created with two RCA's in mind. The profile of the BNC is slightly different but I still managed to squeeze it through on the prototype.
And check your LED size before drilling the hole for it (future kits will come with 3mm instead of 5mm LED's).
The switch uses a 6mm hole and needs be have the bottom of the hole lined up with the bottom of the RCA and BNC holes to make it perfect. 13mm RCA and BNC holes would make it easier to get the connectors through the holes. The template hole centers are otherwise perfect.
Mic preamp PCB quality is excellent
Today I received from Vikash a PCB for the Mic Preamp. I must say that the quality of the PCB is impeccable. I'm most impressed! I have bought quite a few kits here in Australia over the years from Dick Smith and Jaycar, and this pcb leaves anything I have ever got from them for dead.
Aesthetically it is very nice (and the silk screening is so much better than what I am used to), I think the thing that struck me the most is that the holes for the PCB pins/wire entry are the right size 😉 I know that sounds silly but it is the first pcb I have got that doesn't just use standard size holes where you want to install pcb pins (usually requiring drilling out).
I just wish I had access to one of these when I made my original preamp 2 (on an ic experimenter board).... would have saved me a whole heap of trouble and time 🙂
Good work Brian and Vikash!
Tony.
Those that have purchased the Mic preamp PCB's will notice that the LED is on all the time which is incorrect as it is supposed to be a clipping indicator. Thanks to Tony (aka Wintermute) for pointing this out and finding a quick fix. Note that this doesn't appear to affect the functioning of the preamp:
Mic Preamp Rev 1 fixes
As a result I have slashed the prices of these Rev 1 PCB's and kits: http://www.madaboutsound.com/prod_det.asp?product_id=4
Mic Preamp Rev 1 fixes
As a result I have slashed the prices of these Rev 1 PCB's and kits: http://www.madaboutsound.com/prod_det.asp?product_id=4
I'm now distributing the CSS FR125S fullrange driver with XBL2 motor:
http://www.madaboutsound.com/prod_det.asp?product_id=13
http://www.madaboutsound.com/prod_det.asp?product_id=13
Interested!
Hi Vikash
can you let us have approx dimensions and an idea of cost for the heatsinks / chassis - looks verey interesting to me
thanks
Dave
Hi Vikash
can you let us have approx dimensions and an idea of cost for the heatsinks / chassis - looks verey interesting to me
thanks
Dave
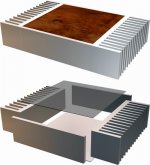
I am working on three at the moment. They are based around the heatsink sizes I've ordered so only the height and depth are decided at the moment.
1) 50h x 100d
2) 50h x 160d
4) 75h x 160d
All heatsinks are 50mm wide with a ~10mm base.
The image in the previous post is to scale and uses the 50h x 160d heatisnk with the internal chassis length of 150mm.
The two 50h enclosures will be perfect for power chip amps, and I've thrown in the 75h so I can squeeze a toroid in to make an integrated. The top/bottom/front/back can be aluminium, plastic (like TATCA), wood, or a mixture.
These are preliminary ideas based on the protoypes I'm planning, but do let me know what you're most interested in. 😉
As for costs I can only pull numbers out of the air atm, but I would imagine between 50 - 100 UKP.
I'd be interested. Might be logical to offer the larger one as you already sell a toroid to suit.
Colin
Colin
- Status
- Not open for further replies.
- Home
- Vendor's Bazaar
- Mad About Sound