
Fak that's a mess  Maybe do a couple of shots of your favorite high proof beverage then numb up the thumb in a shot glass of this stuff so you can break out a fresh tooth brush and get it CLEAN. Try and get the bits and pieces organised as close to original NOW so the healing process can be undisturbed and you get less of the frankenthumb™ effect.
Adding a fresh bottle of this to my mental shopping list.
Maybe do a couple of shots of your favorite high proof beverage then numb up the thumb in a shot glass of this stuff so you can break out a fresh tooth brush and get it CLEAN. Try and get the bits and pieces organised as close to original NOW so the healing process can be undisturbed and you get less of the frankenthumb™ effect.
Adding a fresh bottle of this to my mental shopping list.
So while I'm waiting for my amoxicillin to get filled...
Is it worth it to run a bead of silicon along all the inside seems after its been glued just for some double insurance on the horn parts?
Is it worth it to run a bead of silicon along all the inside seems after its been glued just for some double insurance on the horn parts?
If you assemble with ample amounts of PL Premium (and you should be, it's the gold standard for DIY subs), there will be no need.
I tend to use more than strictly necessary so there's a decent amount of squeeze-out. Then I run my finger over it to make a fillet in the corner. But that's just me. Glue is cheap so I don't mind overdoing it.
Loctite PL Premium Polyurethane Construction Adhesive from Loctite Adhesives
I tend to use more than strictly necessary so there's a decent amount of squeeze-out. Then I run my finger over it to make a fillet in the corner. But that's just me. Glue is cheap so I don't mind overdoing it.
Loctite PL Premium Polyurethane Construction Adhesive from Loctite Adhesives
Last edited:
+1!!!!!!!!!!!!!!!!!!!!!!
Since I play music, I take extra care to preserve my digits. I use a "shoe" or other jigs when working close to the blade. Push Stick for the Tablesaw | Startwoodworking.com While I am at it, never keep the blade set to full height (like my Dad). It should only protrude the stock being cut 1/8"-1/4".
This place is long overdue for good stickies and a safety sticky would be priority one.
Heal up fast B!
Yes.So while I'm waiting for my amoxicillin to get filled...
Is it worth it to run a bead of silicon along all the inside seems after its been glued just for some double insurance on the horn parts?
I use paintable caulk and paint anything that is visible through the grill.

If stitcher’s are an option, choose to have them, they give a lot cleaner and smaller scar later. Big lumps of scar tissue on fingers and thumbs are annoying for years and years. If its a deep cut then oral antibiotics are a good choice as infection can lead to the larger scaring I just spoke about. This is just my personal experience, I am not a doctor.
KEYSTONE NATURAL HORN (MODIFIED)
TAPPED NATURAL HORN WITH MEASURES OF KEYSTONE KEYSTONE PROJECT BUT NOT OUT .

TAPPED NATURAL HORN WITH MEASURES OF KEYSTONE KEYSTONE PROJECT BUT NOT OUT .
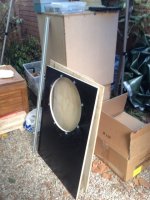
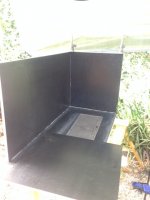
So tomorrow I finally have some help to assemble the enclosures. Still another few weeks before I can use my hand. Studying the schematics it seems I would be best to build inside out. Starting with the horn and it's braces. Once the horn is shaped I was going to line it up on one side panel, trace its border, then clamp the 2 sides to each other a predrill then So the positions are identical. Then fasten the horn to the first side. Assembly the rest of the panels and finally add the second side. Install driver...then mouth panel. Any thoughts on this?
Sounds similar to the assembly I did, but I first loft the cabinet design full size on a sheet of cardboard so all parts can be checked for size and position. Drill holes in the cardboard for all the screw positions and use it for marking the left and right sides. Assemble the interior horn parts and braces, then attach the left side, top, bottom and front, then braces, then put on the right side.Once the horn is shaped I was going to line it up on one side panel, trace its border, then clamp the 2 sides to each other a predrill then So the positions are identical. Then fasten the horn to the first side. Assembly the rest of the panels and finally add the second side. Install driver...then mouth panel. Any thoughts on this?
Thanks for the advice. I also picked up the dsp you suggested and it's running 24/7 with a low input into the drivers to get them a little ready.
Photos of the cabinet interior are in Post #99 and clarification of the 9 braces used in #206 and #451.
Underway
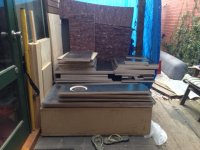
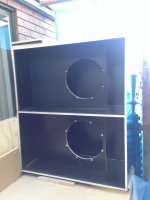
So picked up my BB Ply on the Friday night and started work.
I'm also building a set of sealed 18" mid bass drivers and a set of full range speakers (for a friends wedding gift) so lots to do.
Rowan
So picked up my BB Ply on the Friday night and started work.
I'm also building a set of sealed 18" mid bass drivers and a set of full range speakers (for a friends wedding gift) so lots to do.
Rowan
Attachments
So picked up my BB Ply on the Friday night and started work.
I'm also building a set of sealed 18" mid bass drivers and a set of full range speakers (for a friends wedding gift) so lots to do.
Rowan
What's the size of the speaker cutout in the baffle?
- Home
- Loudspeakers
- Subwoofers
- Keystone Sub Using 18, 15, & 12 Inch Speakers