All,
I wanted to thank everyone for their contributions and especially Per for starting this amazing thread!
I began my DIY audio journey several years ago wanting to upgrade my B&W 601 S2 crossovers to tame those tweeters and end listening fatigue. A few component replacements and additions for an upgraded filter circuit resulted in a far smoother sound which was finally enjoyable hours on end.
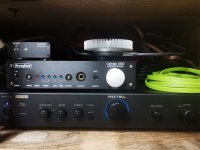
I had already upgraded cables, connectors, power filtering, DAC, subwoofer, etc. yet always felt there was muddiness remaining in the mids. I knew this muddiness came from my Rotel RA-04 SE, so was already on a path to upgrade the amp, but before doing so, I thought, why not check if any mods/upgrades exist? And that is how I landed on this thread!
I began taking extensive notes, completed some background research (even contacted Rotel engineers to confirm a couple of things) and prepared myself for the upgrade. Last weekend, after receiving all the components, I completed the following maintenance/upgrade:
Capacitor shopping list
Upgrade notes
Results
Lows do seem faster, tighter and better controlled (but it’s not night and day thanks to my Rel T7i which handles bass excellently).
Mids have lost their muddiness, clarity and separation have increased. I am delighted. However I ran a frequency sweep and noticed that this upgrade resulted in a 5-10db gain 800Hz and above (or a 5-10db reduction 800Hz and below) which might explain why clarity seems better or bass is more controlled.
Highs do sound better, but I wouldn’t put my hand on the fire here.
However, the biggest change, which I noticed immediately when listening to my sampling tracks, is how much LARGER the speakers sound compared to before. Difficult to explain. It’s not the horizontal soundstage but vertical. My small B&Ws bookshelves seriously sound 5 times larger as if I had huge floor standers in the living room. The best analogy I can give is like going from an ultrawide 64” TV to a full 1:1 ratio wall of sound. I close my eyes and have difficulty believing so much spatial volume is coming from the two little speakers.
So thank you all for contributing to this thread and making me a very happy listener indeed!
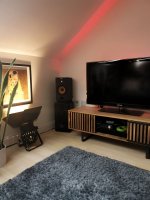
A few photos attached.
Alex
I wanted to thank everyone for their contributions and especially Per for starting this amazing thread!
I began my DIY audio journey several years ago wanting to upgrade my B&W 601 S2 crossovers to tame those tweeters and end listening fatigue. A few component replacements and additions for an upgraded filter circuit resulted in a far smoother sound which was finally enjoyable hours on end.
I had already upgraded cables, connectors, power filtering, DAC, subwoofer, etc. yet always felt there was muddiness remaining in the mids. I knew this muddiness came from my Rotel RA-04 SE, so was already on a path to upgrade the amp, but before doing so, I thought, why not check if any mods/upgrades exist? And that is how I landed on this thread!
I began taking extensive notes, completed some background research (even contacted Rotel engineers to confirm a couple of things) and prepared myself for the upgrade. Last weekend, after receiving all the components, I completed the following maintenance/upgrade:
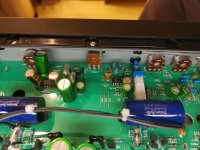
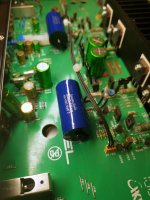
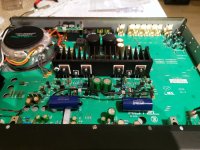
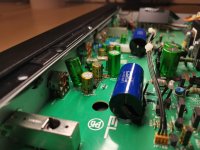
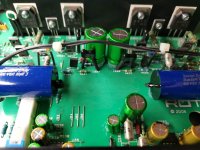
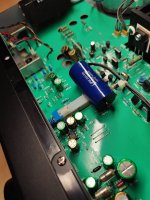
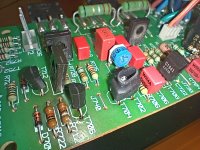
- Replaced all the electrolytic caps (except in the phono stage as I’ve never used this and unlikely to do so in the future) and four polyester caps, with values covered in this thread (full shopping list below).
- Glued down all the new caps with Chipquick electronics grade silicon.
- Sprayed the hell out of all the knobs with WD40 specialist fast drying contact cleaner (made a huge difference to how smoothly the knobs now physically turn and crackling when playing with the L/R balance dial has completely gone).
- Finally, I tweaked the bias which now perfectly sits at 6.5mV after hours of listening, and the amp is not any warmer than before (I will monitor this in the hotter summer months though)
Capacitor shopping list
| Capacitor | Path | uF | V | Replacement | uF | V | Cost |
| C501 | Signal | 10 | 35 | Nichicon ES type | 10 | 50 | £0.25 |
| C502 | Signal | 10 | 35 | Nichicon ES type | 10 | 50 | £0.25 |
| C505 | Power | 220 | 25 | Nichicon FG type | 220 | 25 | £0.89 |
| C506 | Power | 220 | 25 | Nichicon FG type | 220 | 25 | £0.89 |
| C515 | Signal | 100 | 25 | Nichicon ES type | 100 | 50 | £0.45 |
| C516 | Signal | 100 | 25 | Nichicon ES type | 100 | 50 | £0.45 |
| C523 | Signal | 10 | 50 | Nichicon ES type | 10 | 50 | £0.25 |
| C524 | Signal | 10 | 50 | Nichicon ES type | 10 | 50 | £0.25 |
| C527 | Signal | 10 | 50 | Nichicon ES type | 10 | 50 | £0.25 |
| C528 | Signal | 10 | 50 | Nichicon ES type | 10 | 50 | £0.25 |
| C529 | Power | 100 | 25 | Nichicon FG type | 100 | 25 | £0.66 |
| C530 | Power | 100 | 25 | Nichicon FG type | 100 | 25 | £0.66 |
| C601 | Signal | 10 | 35 | Jantzen Standard Z-Cap | 10 | 400 | £6.94 |
| C602 | Signal | 10 | 35 | Jantzen Standard Z-Cap | 10 | 400 | £6.94 |
| C605 | Signal | 100 | 50 | Nichicon ES type | 220 | 50 | £1.18 |
| C606 | Signal | 100 | 50 | Nichicon ES type | 220 | 50 | £1.18 |
| C607 | Signal | 330pF | Silver Mica | 220pF | 500 | £2.00 | |
| C608 | Signal | 330pF | Silver Mica | 220pF | 500 | £2.00 | |
| C609 | Signal | 150pF | Silver Mica | 150pF | 500 | £2.00 | |
| C610 | Signal | 150pF | Silver Mica | 150pF | 500 | £2.00 | |
| C651 | Power | 10 | 50 | Nichicon FG type | 10 | 50 | £0.67 |
| C652 | Power | 10 | 50 | Nichicon FG type | 10 | 50 | £0.67 |
| C653 | Power | 100 | 25 | Nichicon FG type | 100 | 25 | £0.66 |
| C654 | Power | 47 | 25 | Nichicon FG type | 47 | 63 | £0.37 |
| C906 | Power | 6800 | 50 | Cornell-Dubilier | 10000 | 50 | £6.48 |
| C907 | Power | 6800 | 50 | Cornell-Dubilier | 10000 | 50 | £6.48 |
| C910 | Power | 10 | 50 | Nichicon FG type | 10 | 50 | £0.67 |
| C918 | Power | 1000 | 35 | Nichicon FG type | 1000 | 35 | £1.52 |
| C919 | Power | 1000 | 35 | Nichicon FG type | 1000 | 35 | £1.52 |
| C920 | Power | 100 | 25 | Nichicon FG type | 100 | 25 | £0.66 |
| C921 | Power | 100 | 25 | Nichicon FG type | 100 | 25 | £0.66 |
| TOTAL | £50.10 |
Upgrade notes
- Whilst input DC from my DAC is 0.1mV (limits of my voltmeter), I wanted to stay safe and did not shorting the opamp’s input/output coupling caps (C501/502 C515/516) as was discussed on this thread. I left them in place and kept electrolytics as I couldn’t source film caps (e.g. Wimas) for a reasonable price. I will likely upgrade these in the future unless someone can convince me that shorting is definitely the way to go 😊. Note that currently output DC to the speakers is 32mV.
- There was no stock available for smaller voltage C501/502 caps so had to get the 50V which was a bit of a tight fit.
- Removing the 6,800uF Rubycons stuck down with strong glue was a real pita!
Results
Lows do seem faster, tighter and better controlled (but it’s not night and day thanks to my Rel T7i which handles bass excellently).
Mids have lost their muddiness, clarity and separation have increased. I am delighted. However I ran a frequency sweep and noticed that this upgrade resulted in a 5-10db gain 800Hz and above (or a 5-10db reduction 800Hz and below) which might explain why clarity seems better or bass is more controlled.
Highs do sound better, but I wouldn’t put my hand on the fire here.
However, the biggest change, which I noticed immediately when listening to my sampling tracks, is how much LARGER the speakers sound compared to before. Difficult to explain. It’s not the horizontal soundstage but vertical. My small B&Ws bookshelves seriously sound 5 times larger as if I had huge floor standers in the living room. The best analogy I can give is like going from an ultrawide 64” TV to a full 1:1 ratio wall of sound. I close my eyes and have difficulty believing so much spatial volume is coming from the two little speakers.
So thank you all for contributing to this thread and making me a very happy listener indeed!
A few photos attached.
Alex
Attachments
-
 IMG_20230310_183051.jpg492.8 KB · Views: 167
 -
 IMG_20230310_182912.jpg389.2 KB · Views: 158
 -
 IMG_20230310_182825-01.jpeg329.3 KB · Views: 175
 -
 IMG_20230310_182809-01.jpeg330.9 KB · Views: 197
 -
 IMG_20230310_182658-01.jpeg427.4 KB · Views: 187
 -
 IMG_20230305_180908.jpg325.6 KB · Views: 175
 -
 IMG_20230305_180845.jpg381.2 KB · Views: 203
 -
 IMG_20230305_180821-01.jpeg376.4 KB · Views: 180
 -
 IMG_20230311_131145-01.jpeg318.6 KB · Views: 179
 -
 IMG_20230311_131233-01.jpeg389.3 KB · Views: 193

My apologies, in my excitement and haste to share my Rotel's upgrade results, I posted this statement on 5-10db gain, which I myself was surprised by, so checked again the frequency sweep a few moments ago using a different sample track and wish to confirm the response curve is totally flat. So please ignore this previous statement!resulted in a 5-10db gain 800Hz and above (or a 5-10db reduction 800Hz and below)
Well done, Alex.
If you are interested in completely getting rid of the Rotel "muddiness", I would highly recommend to upgrade with current mirrors and new VAS modules.
Per
If you are interested in completely getting rid of the Rotel "muddiness", I would highly recommend to upgrade with current mirrors and new VAS modules.
Per
Hi there Alex,
Well executed upgrade 😍
I hope you enjoy your new Rotel sound for a long time but I believe that Per has more for you in store 😉
Paulus
Well executed upgrade 😍
I hope you enjoy your new Rotel sound for a long time but I believe that Per has more for you in store 😉
Paulus
@AngelP @Smartdriver thank you so much for your feedback!
I actually rather enjoy the Rotel sound signature. My previous amplifier, an old Technics SU-X302 bought in 1992, which I loved dearly and got blown up during a house party in 2007, was incredibly transparent, and whilst I remember its sound signature well, I do like the slightly more "grungy" Rotel sound signature, especially when combined with my B&W speakers (metal coated tweeters).
I might experiment in the near future shorting the op amp's input/output caps to get an idea of how much clearer the sound can be, or sourcing suitably cheap Wima capacitors which I don't need to buy in bulk.
3 questions though:
1. Are there any other components you recommend replacing along the signal path (e.g. wire-wound resistors? it seems the RA04SE already has some pretty beefy resistors in the signal path)
2. Any suitable direct drop-in opamp replacements? I read something in this forum about the MUSES8920? Is such an upgrade worth it? If so, which opamp?
3. My amplifier has some cross-channel bleed (set a different input source, turn volume to very loud, and you can hear some of the audio from the other source). It's not really a problem as I only have a single input, but was wondering what this is due to? Long parallel PCB tracks rear to front for all input sources?
Thanks again for all your help!
I'm realy slow with my progress on RB-976 MK2, good it's not my source of income. Yesterday I was dealing with LTP. Whole board contains eight 2SA1016K so I desolidered them and tried to match in pairs. I was able to select two pairs with HFE in range of 1. "Glued" them together with heatshrink, so first phase with refresh only is on place. Now time to test and listen it a bit. Next phase will be current mirrors.
Attachments
Last edited:
As long as it gets you to where your heading it doesn't matter, does it 😉I'm realy slow with my progress.....
Talk about slow: time to come clean here, Februari '22 I blew up both of my RB-991's big time due to a very stupid and rookie mistake which I won't explain such is my embarrassment 😏
Anyway, after very long troubleshooting and replacing a lot of damaged components with BIGTIME assistance from Per via Email and even sending him pcb's for some real professional intervention we managed to get them in working order again, finally!
I can honestly say that it took almost a year before both where working again, it was Januari of this year 🙁
I'm enjoying the might of the both of them right now in driving my Chario Acadamy 3's and probably this summer I'm taking them apart again for Per's ltest trick, replacing the LTP's for new matched pairs with EDR's.
After that they will be screwed shut and never to be opened up again, I hope, fingers crossed!
Best,
Paulus
Yes but for you 991 has only two channels. 976 has six and I managed to work on first pcb for two channels. So for "screwed shut and never to be opened up again" phase it's realy long time from me 😀.Talk about slow
I'm realy slow with my progress on RB-976 MK2, good it's not my source of income. Yesterday I was dealing with LTP. Whole board contains eight 2SA1016K so I desolidered them and tried to match in pairs. I was able to select two pairs with HFE in range of 1. "Glued" them together with heatshrink, so first phase with refresh only is on place. Now time to test and listen it a bit. Next phase will be current mirrors.
The main trick to match transistors is to keep them precisely at the same temperature during measurement. I use a small vice that can grip four transistors on the tape and has enough thermal mass to get reproducible measurements after about five seconds.
And as can be seen, I use the Peak DCA55 which I find is a real gem of an analyser. Then I note the hFE on the tape for easy picking of matches.
No, it is not exactly matching at the amp final operational current or temperature, but from experience it comes pretty darn close.
If you want to speed up things, I can offer you to buy matched and wrapped LTPs and current mirror modules from me.
Best,
Per
Vice it's nice trick. I did it in free air but I was using tweezers and did not touched transistors. Also was waiting some time before taking measurement.If you want to speed up things, I can offer you to buy matched and wrapped LTPs and current mirror modules from me.
If this project will prove promising for sure I will perform more precise matching procedure.
I'm not in rush but thank you for your offer. This part I want to do by my own. But for sure I'll be interested in your VAS modules. I'll contact you later on PW about those.
Good morning from Italy!
I’ve been reading for months the excellent work that has been done to upgrade our beloved Rotel amps. After so much reading I took the trouble to buy two old RB-956AX to repair and update them. The goal is to create a home theater system that sounds good even musically using all high efficiency Fostex horn speakers, so I need little power but high quality.
After a lot of reading, however, I still can not isolate which components would be changed and those to be eliminated in my case, since I do not have a preamp section. I have seen that the pattern is very similar to other amps (RA-820AX) but checking well there are slight differences. Is there any kind soul who could make me a list of components and clear instructions for changes?
Thank you so much!!
Hi Dani, welcome to the fabulous world of Rotel upgrading! Your ears will thank you for the efforts.
You are absolutely right, the basic topology in the RB-956AX is the same as in eg. the 820 and 931, etc. - except that you now have got three channels in each of the amps. So, as they say - you have got some 'donkey work' to do.😉
But it is relatively straightforward if you choose to use my drop-in modules. If so, I can definitely give you the requested list and instructions.
Per
Thanks for the answer AngelP! I tried to write you in private but I’m under moderation. I would be interested to evaluate the purchase if you ship to Italy. The important thing will also be the price, since I have 2 amplifiers 6 channels to change....
If you can contact me in private I would be grateful!
If you can contact me in private I would be grateful!
Did anyone try to change an EI core transformer to a toroidal one? I think that alone would improve performance of the older Rotels. I did it once after a transoformer burnt out, sounded pretty good afterwards, but I didn't make any measurements, so I can't say for sure if it was an improvement.
You really shouldn't do this. WD40, even Kontakt 600 is certain irreparable longterm death of every pot, there's no non killing contact cleaner. Only more or less aggressive ones. It's better to disassemble and clean them properly only with isopropyl and some vaseline or CO70.Sprayed the hell out of all the knobs with WD40 specialist fast drying contact cleaner (made a huge difference to how smoothly the knobs now physically turn and crackling when playing with the L/R balance dial has completely gone).
WD40 leaves very aggressive residue, you can't clean that up without opening up the pots.
I'll give you my latest before and after example of a 30 year old SSSR26:
Attachments
Thanks for the advice @BeyondStupid. I'll just buy new pots in the future if the contact cleaner kills them, but honestly given the value of the amp and specifically the pots, it didn't make sense to spend time desoldering and disassembling them for cleaning. But will definitely take on your advice if ever I own high end pots in the future!
Makes sense, it's always a huge time investment taking out a pot. A last thing I can recommend you if you ever open up the amp or any amp again regarding pots is replacing the Bias Pots. I had so much problems with them I change them out without checking if they still work nowadays. It's a quick and cheap preventive measure to safe a lot of eventual pain later.
I couldn’t reuse the original driver transistors, so I tried the new(ish) Toshiba TTC004/TTA004. I must say, Toshiba seems to have picked some of the best of each of their existing silicon processes into these devices and started a refreshing new part designation. High voltage, decent current capability and hFE, modest capacitance and price in a pair of new nicely linear, isolated TO-126N package devices – what’s not to like?
Safe Operating Area.
Hi Sam,
I believe that the SOA is mainly determined by the transistor package and thus the max size of the chip inside.
TTC004's SOA is not much different from other TO-126 driver trannies, like eg. 2SC3902, BD139 etc. - and at times even better
Anyway, I agree that you should never use components running anywhere close to their SOA limits - unless you like to live dangerously.
I my experience the main SOA rescue factor is to keep the chip temperature down - and for us mortals this means the case temperature if the electrical specs are given.
In use as a driver transistor in a domestic audio amplifier, a 10W type should be plenty ok - with proper heat sinking that is.
And here is why I like the fully, high TC epoxy isolated TO-126N (or ML or other manufacturers' suffixes).
I then use an ultra thin layer of Thermagic ZF-12 thermal compound (other good brands are available) between the tranny and its heat sink.
It has a thermal conductivity of 12 W/m.K - if you believe the datasheet. That is over 15 times that of std. white Al2O3 filled silicone compound.
Either way, thinner is better - not the other way round. You just have to fill any microscopic interface voids with a high TC interface compound.
I have seen too many transistor repairs literally smothered in the greasy white stuff. Yikes!
Per
- Home
- Amplifiers
- Solid State
- Improve a Rotel amp THD by 20dB!