Nice arrangement!
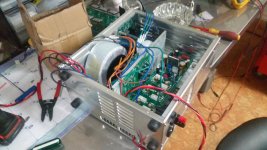
Thanks. I've put a lot of time into the layout of this amp. It should look pretty good inside when finished. The whole control system will mount into this module yet.
Here's how I'd like the final configuration to be. Main transformers will mount to the front cover. Supplies will tuck up to the transformers. Power relays will be under the power supplies. All high power wiring will be in the front of the amp and down through the center at the bottom. The input sections will be at the top rear, with onboard RCA connectors poking through the rear cover eliminating input signal wiring. The only part I don't like is the position of the control transformer.
Attachments
Don't you love it when a plan comes together. All your careful work shows. I'm excited to get valery's Ns ops running myself. If history repeats it should sound great.
Who's the brave soul that's going to try a dead short rail to rail to test the disconnects?
Who's the brave soul that's going to try a dead short rail to rail to test the disconnects?
There's no current sensing on the supply. These are just solid state shut off relays. A dead short would blow the rail fuses on the supply though.Don't you love it when a plan comes together. All your careful work shows. I'm excited to get valery's Ns ops running myself. If history repeats it should sound great.
Who's the brave soul that's going to try a dead short rail to rail to test the disconnects?
So the relays would help limit collateral damage to the amps if something goes wrong.
I recently dropped a small piece of wire across the power supply of one of my amps..the fuse blew but the charge in the caps vaporized the wire... Stern reminder to be more careful.
Have you chosen your speaker connectors? I really like the speakon Connectors.
I recently dropped a small piece of wire across the power supply of one of my amps..the fuse blew but the charge in the caps vaporized the wire... Stern reminder to be more careful.
Have you chosen your speaker connectors? I really like the speakon Connectors.
Yes the relays are to lessen collateral damage and the terrible smell when a set of output transistors expire.
I like Speakon connectors, but I move my amps around a lot and try them out on buddies systems, so 5 way binding posts make the most sense for me.
I like Speakon connectors, but I move my amps around a lot and try them out on buddies systems, so 5 way binding posts make the most sense for me.
JW,
I'm surprised that you didn't build this around the Slewmonster MT-200 output section. Any reason for that or you just wanted to build one of Valery's designs? Very nice packaging by the way.
I'm surprised that you didn't build this around the Slewmonster MT-200 output section. Any reason for that or you just wanted to build one of Valery's designs? Very nice packaging by the way.
JW,
I'm surprised that you didn't build this around the Slewmonster MT-200 output section. Any reason for that or you just wanted to build one of Valery's designs? Very nice packaging by the way.
I'm waiting for Pete to release his Slewmonster/Kypton-ND integrated boards.
I think there are a bunch of us waiting for that. I just wish we knew what was happening with him and that he is okay.
Nice box. Are you sure you have Enough Parts in there.
Everything but a Flux capacitor it seems 🙂
Everything but a Flux capacitor it seems 🙂
Nice box. Are you sure you have Enough Parts in there.
Everything but a Flux capacitor it seems 🙂
Yes there's a whole amplifier wedged in there. I designed it in modules so it's not bad to work on.
JW,
Is that all billet aluminum or is some of that folded? Very nice machine work if you did that yourself. I see it is designed as a vertical enclosure like a computer case.
Is that all billet aluminum or is some of that folded? Very nice machine work if you did that yourself. I see it is designed as a vertical enclosure like a computer case.
JW,
Is that all billet aluminum or is some of that folded? Very nice machine work if you did that yourself. I see it is designed as a vertical enclosure like a computer case.
That was 4 twelve hour days of milling. It's all billet.
4 twelve hours days tells me you must have run the mill manually. At least you didn't start off with a solid billet and hogged it out of one piece!
Yes manual mills. I've learned to leave the backs and bottoms for last, so when my brain turns to jello from staring at the readout for too long, I only screw them up. This is still scrap Dehavilland wing stamping dies. My free aluminum pile is almost gone though.
JW,
I think the skill of running a mill manually shows what you can do. CNC is nice for production but takes all the skill out of it. I've done some pretty complex tooling on a manual mill with nothing but a bunch of number coordinates, it can get crazy trying to keep track of where you are but I always put a location hole just in case I lose my place and have to go back to the original origin or with an older mill the slack in the screw when you change directions and have to pick up where you truly are when you can't go by the veneer scales on the handles. Of course glass scales take care of that but I've done it with nothing but the mill no readouts.
Nice work, it looked like sheet aluminum and a louver press could make something similar if you had a brake and louver press.
I've got a brake and shear, and access to a CNC punch. These cases have mounting bosses all over the interior. That's why I use billet.
That's when you break out the Tig welder! Nice work. Are you going to leave the AL raw or paint it or anodize the finish?
You always see some distortion in the surface when you weld. It you try to sand it out, there's a mush spat that galls where the weld is.
I'm going to anodize these once I get my constant current supply done.
I'm going to anodize these once I get my constant current supply done.
- Home
- Amplifiers
- Solid State
- How to build a 21st century protection board