Maybe compare it to Unibox.
Thanks for the suggestion.
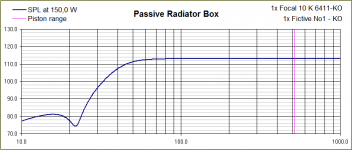
Attachment 1 shows the UniBox result, and Attachment 2 shows the Hornresp result for the same system. The Hornresp data was exported and plotted in a chart of similar size and scale to the UniBox one, for ease of comparison.
Attachments

Thanks for the suggestion.
Attachment 1 shows the UniBox result, and Attachment 2 shows the Hornresp result for the same system. The Hornresp data was exported and plotted in a chart of similar size and scale to the UniBox one, for ease of comparison.
Sometimes I am even slightly helpful 😀
Ok, it has taken me a long time to muster the courage to ask for help. I like to think of myself as capable of figuring stuff out given enough time but HornResp has simply got me stumped.
I first started messing with it when this thread started but all my speaker projects were OB, Sealed, or Vented boxes so I didn't really need to use it.
I have read all I can about HornResp but just can't figure out how to use it.
I bought a pair of 10" full range field coil drivers and as much as I paid for them and the power supply, I want to really nail a transmission line cabinet for them.
I could really use help with this program/project.
Thank you in advance, Dennis.
Ok, it has taken me a long time to muster the courage to ask for help.
I could really use help with this program/project.
Thank you in advance, Dennis.
Hi Dennis,
Basically its "quite simple" despite all my questions above. It´s just that one need to come into the mode and thinking behind it.
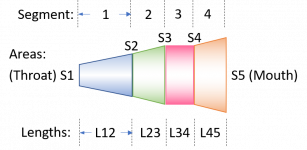
Think about the whole set-up as you are dealing with a tube that you can play around with (to get it to sound great). A tube with three to four segments. See the enclosed picture (that I will paste into the manual). The driver(s) are "mounted" in the position between segment one and two. If you have for example a vent it is "mounted" in the position between segment three and four.
You design the different segments one by one (lenght, starting width, end width), which is actually the physical design. Then you add on the damping, section by section. This is the fundamental way to design.
Remember also that it is sort of two softwares in one. First the input menu, then the design menues. What you do in the input menu is just "get started". Then you go on with the other menues.
First of all you need to include the driver(s) into the design - then you are ready to go. Written by a Newbie that suddenly thought it was not so hard anymore.
Just input something and start playing. 🙂
Attachments
Last edited:
Thanks Sharky. when I look at the picture a couple questions come to mind.
At some point do you translate those section dimensions into a physical horn?
That picture looks like to horn is expanding and I thought TLs are either straight or tappering down to the mouth.
How is that picture folded?
Dennis
At some point do you translate those section dimensions into a physical horn?
That picture looks like to horn is expanding and I thought TLs are either straight or tappering down to the mouth.
How is that picture folded?
Dennis
Hi,I bought a pair of 10" full range field coil drivers and as much as I paid for them and the power supply, I want to really nail a transmission line cabinet for them.
I could really use help with this program/project.
Thank you in advance, Dennis.
This might help!
The Subwoofer DIY Page - Horn Folding
At some point do you translate those section dimensions into a physical horn?
The previous post give you help. There are also others. Start simple is my suggestion. The principle is to use the length from Hornresp and se that the same length is reflected at the middle/centre of the pipe through out the length in the drawing.
That picture looks like to horn is expanding and I thought TLs are either straight or tappering down to the mouth.
How is that picture folded?
Dennis
All different ways of designing pipes are used. Just google around and you will soon find out.
The more complicated design the more complicated to fold it to an actual physical speaker.
Thanks Sharky. when I look at the picture a couple questions come to mind.
At some point do you translate those section dimensions into a physical horn?
That picture looks like to horn is expanding and I thought TLs are either straight or tappering down to the mouth.
How is that picture folded?
Dennis
Hello Dennis.
The shape of the segments is up to you. You can make them an equal area all along. The areas are the "S" numbers. The lengths of each section are the "L" numbers. If you take a corner, you create a line down the centre of the bend and determine the length used up as you go along the bend.
The folding worksheets that were posted are pretty good to use. they can help quite a bit is spitting out a cut list for you to.
Thanks Mark. So is the "s" is 10 does that mean 10 square in and if the "L" is 10" long does that mean that section 100 square inches regardless of how I shape it?
Thanks Mark. So is the "s" is 10 does that mean 10 square in and if the "L" is 10" long does that mean that section 100 square inches regardless of how I shape it?
Think centimetres my friend.
You are in one of two countries that are still officially imperial inches.
S10 is 10 square centimetres regardless of shape. L 10 means that section is 10 centimetres long.
2.54 cm equals an inch. Google will help you out if you are afraid of the math.
Hi Denis,
on Brian's lovely The Subwoofer DIY Page he has a page dedicated to modelling each kind of box alignment from sealed to tapped horn in Hornresp. When I was first getting started I worked my way right through DIYsubwoofers.org and came out the other end an almost expert at Hornresp!
Also of note is that detailed how to instructions are right at the bottom of the horn folding (Boxplan xls) page that I missed on first visit.
I have built 4 tapped horns now and the Boxplan experience was the best by far.
Hornresp + DIY subwoofers.org = Heaven (my kind anyways)
Good luck!
Last edited:
Hi Mazza. Timing is everything! I found that page on the TL and read troughton it twice. I feel a great sense of relief because I know sooo much more and have a much more solid understanding of what's- what.
I'm going to walk through the steps tomorrow using my TS parameters and will post the results.
I'm going to walk through the steps tomorrow using my TS parameters and will post the results.
Hornresp + DIY subwoofers.org = Heaven (my kind anyways)
I still use Brian's bandpass.xls spreadsheet with all my builds. I just like to see how it compares to HR and WINiSD.
The shape of the segments is up to you. You can make them an equal area all along.
Let's say S=500, a box is build with a S-shape of a circle/cylinder with a diameter about 25, and another box is build with S-shape of a rectangle with 10x50.
Is the shape negligible in terms of added resonances?
I want to really nail a transmission line cabinet for them.
Hi Dennis,
To get started, you could perhaps try using the Input Wizard accessed from under the Help menu on the main Input Parameters window, to specify a "representative" transmission line system that can then be tweaked in the Loudspeaker Wizard to suit your requirements.
Select: Help > Input Wizard > Half Space > Direct Radiator > Transmission Line > ...
You are then given the choice of specifying a normal, mass loaded or offset port TL design. Check out all three types to understand the differences as seen by Hornresp - being able to navigate back and forth through the Input Wizard makes it very easy to do this.
Kind regards,
David
Is the shape negligible in terms of added resonances?
For the example you give, I would think so over the frequency range of interest.
- Home
- Loudspeakers
- Subwoofers
- Hornresp