Ihave but four words for ya Trev ... "Come Back To OZ!" haha we have plentifull supplies of tap and dies mate 😛
race
I have a handicap, too: I can't get the glass I ordered for another 8 hours, or so...
While I was thinking about the assembly order, I thought of another method: Start with two pieces of thick polycarbonate sized to fit the light path halfway between your condensor and LCD. (ie. 4 mm by 6" by 8" for me) Glue some very precise spacers between the sheets at the corners. So you get a ridgid Lexan sandwich with about 2 cm between the sheets. Then wrap mylar around one of the edges of the sandwich so it makes a mold for liquid epoxy/hardener mixture. Put the sandwich down on the bench with this mold on the bottom and pour the mixed epoxy in so it fills the mold about 1 cm high. (Try not to splash any on the center area of the Lexan.) Let it setup and then repeat the process for two more sides. The last side is a bit trickier since you should embed the plumbing into the epoxy. So you can just get some female-to-female couplers that your barb fittings will fit, close up one end with some tape, then set them closed-end down into the mold before pouring the epoxy.
Put it in a frame that protects the epoxy edges from direct exposure to the light. The Lexan will never get above 100 C, so it should do fine. I think Lexan will be better than glass for this method, since it's coefficient of thermal expansion is much closer to the epoxy.
not doing this but I think the uv rays themselves will keep the water clear as long as there are no contaminates. People use uv filters for fish tanks to kill of algie. I think the water you put into batteries to top them up will do the trick cant remember the name for it right now.
If im not mistaken dazzla the uv from the lamp will take care of the bugs in the water... Ace however with his fandangled uv stop on his lamp wont have this luxury 😛 Watercooling fellas have used all sorts of additives in their puta cooling ... one in particular that comes to mind that would be of use for projector watercooling would be alcohol (Trev being an Aussie might not be able to resist the urge to crack the glass and drink it though 😛) Personally i use Toilet Duck in mine but its a bright blue colour...looks good in the tubes but would be useless in the projector cooling... Additives for waterbeds can also be used ... minute amounts to kill bugs and they are clear .... metholated spirits keroscene or mineral turpintine in small amounts added to the water might also be options 🙂
Guy/Ace,
Anti fungal in distilled water, uv may kill bugs but it dont kill algae not that i know of anyway, afteral, isnt uv needed for photosynsis?
Trev 🙂
Hi Trev,
Well off topic but...
UV does not kill algae but causes them to stick together.
That's the way pond filters work, pass the water trough strong uv lamps so they get in bunches big enough to be capture by the filters, although once exposed to sun light they break up again...go figure!!!
Teo
Well off topic but...
UV does not kill algae but causes them to stick together.
That's the way pond filters work, pass the water trough strong uv lamps so they get in bunches big enough to be capture by the filters, although once exposed to sun light they break up again...go figure!!!
Teo
ok so the best bet seems to be doing everything to make sure that there is nothing hidden in the water in the first place maybe nuking it in the microwave before using would help?
just found this site http://camping.about.com/cs/generalinformation/ht/cleanwater.htm which suggests chlorine bleach and leaving it to stand for 30 minutes so I assume the bleach just evaporates away after that time.
just found this site http://camping.about.com/cs/generalinformation/ht/cleanwater.htm which suggests chlorine bleach and leaving it to stand for 30 minutes so I assume the bleach just evaporates away after that time.
A couple of those little snails might do the trick, just have to train them to move out of the way when the movie is on🙂
keeping the water clear
I was kind of thinking that heating the water up over 120 degrees F for several hours per day would probably keep the microbial growth down. I plan to use a 250 Watt MH lamp to supply the heat. 😀
Meanwhile, I found out that getting the aluminum channel TIG welded will cost me way too much. So I will just glue the four pieces of aluminum together with epoxy designed for aluminum bonding, and I will also glue on some right-angle brackets made from thin Al sheet metal, at the corners.
On the inside, I have some epoxy paint for the exposed aluminum channel, some flexible marine epoxy to seal the aluminum channel seams, and Silicone II "gutter and downspout formula" to glue the glass to the aluminum.
Now I have to figure out how big to make the aluminum frame, so I can glue and seal it all together BEFORE I put the glass in. I looked for Z-shaped extrusion at the metal shop, but they didn't have any that was thick enough. With that, I could have built the filter in two halves with glass mounted in each, and then glued & bolted the two halves together.
Tuga said:Hi Trev,
Well off topic but...
UV does not kill algae but causes them to stick together.
That's the way pond filters work, pass the water trough strong uv lamps so they get in bunches big enough to be capture by the filters, although once exposed to sun light they break up again...go figure!!!
Teo
Heya Teo, thanks for that mate, i know that they used UV light in fish tanks (mainly for coral groth) but wasnt too sure on the effects of algae, i couldnt see it killing it.
Trev🙂
Hi!!!
I was wondering about something about destilated water......I once heard that the destilated water is non-cunductiv, and thats why they use it in watercooling. Is that really true?. If it is..... then it wouldn't be fatal with a leek in a projector or???? what is the destilated water really for???? I'm a bit confused..........😕
I was wondering about something about destilated water......I once heard that the destilated water is non-cunductiv, and thats why they use it in watercooling. Is that really true?. If it is..... then it wouldn't be fatal with a leek in a projector or???? what is the destilated water really for???? I'm a bit confused..........😕
Water (Shaken not stirred)
Guys,
I can't imagine water losing its conductive property via simple distilation. You might have seen tyhat you get distilled water for irons - this is only becaise the minerals in the water acculmulate and gum up the works.
...but fewer bugs yes.😉
Guys,
I can't imagine water losing its conductive property via simple distilation. You might have seen tyhat you get distilled water for irons - this is only becaise the minerals in the water acculmulate and gum up the works.
...but fewer bugs yes.😉
Its actually the oposite after a while acording to this article:
"Cooling has come a long way in the past few years. Air cooling has gotten better and better, however, it has gotten fierce competition in the form of liquid or water cooling. Some 4-5 years ago, water cooling was more a hobby of the extreme overclocker than a mainstream venue and we had heated discussions about the optimal transfer media, ranging from glycol to oil and different purity gradients of water. Regarding the latter, the main idea was that distilled water, which is electrically non-conductive could be a safety net for a potential leak. Alas, distilled water is also chemically extremely reactive and dissolves most metals until it reaches a chemical equilibrium. This means that not only the container is compromised but also that after the metals have been dissolved, the water carries enough ions to become highly conductive. In other words, distilled water is exactly the opposite of an optimal cooling media. "
Trev🙂

Thanks Ace!!,
Thats the atricle i once gott it from, but i must have missed the end of it tough......well I gues I'll go for the regular water with the antialg-liquid addition then....😀
Thats the atricle i once gott it from, but i must have missed the end of it tough......well I gues I'll go for the regular water with the antialg-liquid addition then....😀
I have done a little research and I now understand why its important to use distilled water and perhaps anti-algal agent.
What I don't get is how does the water draw the heat away from the glass in an even way?
Is it "pie in the sky" (had to put a reference in somewhere) that the heat exchanger water reservoir could be a shaped perspex container, when full of water performs the triple function of condensing lens, UV filter and heat exchanger reservoir in one?
Thanks in advance,
Thommo
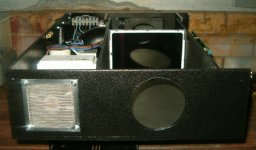
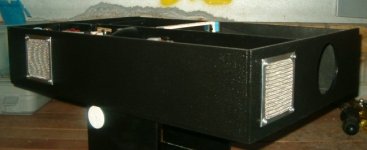
Bit of an update on my projector fellas...I pulled it apart and painted it, have decided to go with black instead of the silver (silver didnt look good was different colour than cap on the can) I have used a fine sponge roller to paint it and it has given a hammer tone finish to it..looks good i think. Borrowed ma buddies camera again and took some pics for you all too see. I have also got the LCD mounted now, the fan surround at rear is also finished...unfortuneatley though...am still waiting on the lenses, i got a feeeling this might be the week they arrive, fingures crossed 🙂
Anyways here's some pics of her all painted up and pruuurty like hehe
Anyways here's some pics of her all painted up and pruuurty like hehe
Attachments
- Status
- Not open for further replies.
- Home
- General Interest
- Everything Else
- The Moving Image
- DIY Projectors
- HiLLBiLLY'S 7" Lilliput Projector