Cheers Ancorp 🙂
Yup certainly have a speed control mate for all 3 fans set at appox 3/4 speed the PJ is remarkably quiet. PJ will most likely sit on a table definately not on the roof though.
more to come soon.....
Yup certainly have a speed control mate for all 3 fans set at appox 3/4 speed the PJ is remarkably quiet. PJ will most likely sit on a table definately not on the roof though.
more to come soon.....
Well lil' Ancorp I did ma best bud but fell short, was a looooong hot day here in OZ today, was up at 7.00am working on the PJ, shes 95% done mate just the wiring to do now but I have had it for the day soz bud :-(
I took more pictures of what I got done today for you all to checkout.
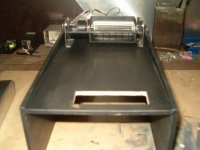
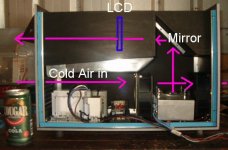
First few pictures show the fan duct I made from 1mm aluminium plate for the cooliing of the LCD, Im using a 100cfm "blower" fan I used on the light box on the last PJ... The ducting is bent and epoxied on all corners and fixed to the LCD chamber via doubleside adhesive rubber.
First pic chamber in upside down postion and blower fan in place...
I took more pictures of what I got done today for you all to checkout.
First few pictures show the fan duct I made from 1mm aluminium plate for the cooliing of the LCD, Im using a 100cfm "blower" fan I used on the light box on the last PJ... The ducting is bent and epoxied on all corners and fixed to the LCD chamber via doubleside adhesive rubber.
First pic chamber in upside down postion and blower fan in place...
Attachments
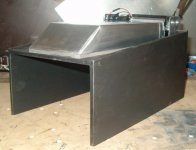


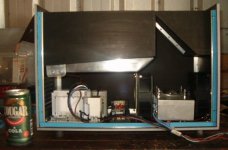
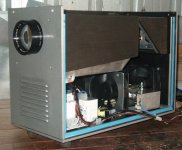
Front/side shot of whole PJ...this is where I stopped for the day...soz guys, the heat and a long day just got too much, I have the wiring too complete and really don't want to rush this and its best i'm fresh when i start on it, so for today i'm afraid this is it... 🙂
Hope everyone that views the pics finds them of some interest, I can't see any reason why It wont be complete tomorrow, fingures crossed all goes well, shall borrow my friends camer during the week and post some screen shots of the totally finished interior, and what Ancorp next to myself has been most anxious too see shots of the projector in action....hehe
Till then is ciao for now folks 🙂
Attachments
looks very nice
Is the MDF reinforced with aluminum extruded angle shape along each joint?
I have one suggestion:
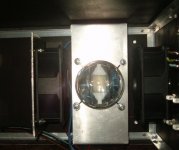
If you moved the fan to the other side of the light engine, then it could pull air through it, past the bulb and condensor lens, before dumping it outside the box. Right now it looks like some of the air heated by the bulb will head up to the LCD area. Not a very good way to control the heat!
Is the MDF reinforced with aluminum extruded angle shape along each joint?
I have one suggestion:
If you moved the fan to the other side of the light engine, then it could pull air through it, past the bulb and condensor lens, before dumping it outside the box. Right now it looks like some of the air heated by the bulb will head up to the LCD area. Not a very good way to control the heat!
Hrm dunno what you see there Guy but in the pics its preeeetty easy to see there is aluminium angle on the joints, as for the fans set up it is set up in a push pull so cold air is sucked in the front of the case blown over the condensor lens and bulb before exiting the case! Where do you propose I move the fan? I totally don't follow what you are on about bud...might wanna take a look at the setup again mate 🙂
Attachments

OK, Now I see it!
I couldn't see the second fan on the other side of the light engine, until that last photo. Very nice. Although, I wonder if you really need the pusher fan. I guess you could try it with and without, if you added yet another switch!
I asked about the aluminum angle reinforcement, because I wasn't sure if you used it at every joint. I considered doing that with MDF & aluminum, but I thought it would be easier to screw & glue wood to wood. So I used 6 mm plywood with 1" by 2" wood glued along each joint. The 1 by 2 rails make it easy to mount stuff in the box.
Those Lilliputs certainly make for nice small boxes. My box is 19" by 14" by 33"!
precision work!
Those are great mitres on the aluminum. Mine always come out a bit off. What are you using to cut it?
Those are great mitres on the aluminum. Mine always come out a bit off. What are you using to cut it?
🙂 No probs there Guy, possibly one 120mm would do it, but after the last PJ heating issues im covering my bases on this one so too speak hehe, I have a fan speed control lined up to control all the fans so they wont need to be at full speed, I guess with the two the air flow direction will be very precise and maximum cool air will be forced across the light engine and pulled and vented directly out the back 🙂
The Aluminium is used on every joint of the outer box and the mirror box Guy, I like using this for the strength it ads plus it keeps the box square 🙂 I use only 6mm mdf for the boxes to keep weight down, screwing and glueing isn't really a way to go with mdf this thin I believe. Anything over 10mm would be ok to glue and screw I would think 🙂 Mitre joints are marked with 45 degree template and thein I use a cuttoff disk on my dremel to cut it. They sell whats called a mitre box here in Australia @ hardware stores, I presume you would have something similar in your neck of the woods, maybe you could try one of those to get your mitres precise ;-)
The Lilliputs are sweet too keep the size down no doubt and as you have seen on the forum by those that use them the quality aint all bad either, will have some screenies asap of this one in action 🙂
Thankyou for the nice comments too guy, much appreciated
mitre box
I have a mitre box that I use with a hack saw to cut the aluminum, but it is really a cheap piece of !@#$. Mitre boxes used to be made from hardwood and metal, but now all they have in places like Home Depot are made from plastic. A few mitre cuts and your box is not so precise anymore!
I guess I need to just make my own from something sturdier.
hehe Agh yes the wonders of modern technology good 'ol plastic lol ... I would have put money on a fella like you owning a dremel Guy 🙂 ... I find it extremely easy to get precise clean cuts with the cuttoff disk (have used the good 'ol dremel for years though on ma second one now wore the first one out lol) , just mark the angle accurately with a felt pen and and cut waste side of the line, if you are not confident with your accuracy, allow 1mm extra and clean it up with a fine metal file 🙂
**VERY IMPORTANT** cuttoff disk explode wear saftey glasses at all times when using any form of power tool.
**VERY IMPORTANT** cuttoff disk explode wear saftey glasses at all times when using any form of power tool.
G-day m8!😀
I know how frustrating it can get to work a lot on a hot summer day (or winter for you😉 ). Very nice look you got coming up, professional with a retro touch🙂 . I would love to see results anytime possible, but you definately shouldn't rush it!
As always - good luck on finishing up, careful with the wiring tho!
Thanks Ancorp 🙂
I figured since I live in a garage the metal finish and grills would suit hehe , and ma PC is silver so it will match up nicely with that too 🙂
Soz again I couldn't manage a screenie for ya bud :-( I know ya very keen to see it working, won't be long now though as you can see 🙂 Thanks for your encouragement and the interest you have shown throughout the thread to mate, much appreciated 🙂
Dremels are great!
You were right, I do have a Dremel. I went through about 20 cutting wheels cutting the top inch off my stainless steel quiche mold DIY spherical reflector, and a couple more cutting my fresnels down to size. It also did a great job cutting off the threaded rod I used in my light engine: So smooth, I could get nuts on and off it without any clean-up at all. I just wish they made those cutting wheels a bit stronger!
I never thought to use it for cutting aluminum angles, since the hacksaw & mitre box combination seemed like the best approach. Thanks for the tip.
- Status
- Not open for further replies.
- Home
- General Interest
- Everything Else
- The Moving Image
- DIY Projectors
- HiLLBiLLY'S 7" Lilliput Projector