fancy mirrors
How big is the mirror near your lamp? I can get a very nice 4.75" diameter cold mirror from surplusshed.com for $5. If that is big enough, then you could remove 90% of the heat for cheap!
How big is the mirror near your lamp? I can get a very nice 4.75" diameter cold mirror from surplusshed.com for $5. If that is big enough, then you could remove 90% of the heat for cheap!
Yeah that would do it Guy no doubt and its on the cards forsure ;-) Just the $$$ factor holding me back @ this point in time, all good mate, just turn the sound up a notch or two to compensate for the extra fan noise hehe 😛
I've been running my 250 Watt MH projector for a couple of days now, and I have just one 65 cfm rubber-mounted fan cooling it. I have run it for hours and the fresnels & LCD never even get warm.
Heya Guy, 2 reasons why explain those reasons.
1) The size of your lcd is much bigger hence inverse law and less light in a given area per square inch.
2) The amount of light comming from your optics is far less then hillbillies 🙂, due to the above and your condenser.
Ive got a setup here thats so bright no fan will cool the lcd properly on a 250w without dichoric coatings. Thats what happends when you condense the arc and not the reflected light, hence the much brighter image and the need for dichoric coated mirrors and reflectors.
Trev 🙂
condensing the arc
I don't understand what you mean by "condensing the reflections", as opposed to "condensing the arc".
When I put my eye in place of the lower fresnel, I can see the magnified (unlit!) arc chamber through the condensor lens. As I move my eye around to look through what will be different parts of the lower fresnel, I can still see the arc chamber through the condensor lens. That sounds to me like I have the condensor lens in the right place.
I also have a silver plated first surface spherical reflector, with the lamp arc at it's center of curvature. So I should be getting more light reflected from that, than is possible with any aluminum-based reflector. And I am seeing plenty of light on the wall.
The hot mirror really does remove a lot of the heat. In initial tests with a very hot halogen spotlight, I could feel a big difference on my hand a few cm from the spotlight when I added the hot mirror.
don't understand what you mean by "condensing the reflections", as opposed to "condensing the arc".
The difference is when you look at your frensel back to the light (when off) you see the arc chamber magnified right? when you condense the actual arc only the arc covers the total area of the frensel not anything around it and therfore you are fully condensing the arc and the image becomes 3-4x brighter. Beleive me its a very big difference and you dont get a hot spot.
I also have a silver plated first surface spherical reflector, with the lamp arc at it's center of curvature. So I should be getting more light reflected from that, than is possible with any aluminum-based reflector. And I am seeing plenty of light on the wall.
Thats incorrect, enhanced aluminium has the highest reflectability , its 98 point somthing % and higher. If you wer to run them side by side and if the silver looked brighter (very possible), this doesnt meant its brighter, its an hilusination ( sorry spelling?) to your eyes as the light being reflected from the silver is of somewhat a different colour temp then the enhanced aluminium.
You could even run a soup laddel against a proper spherical reflector and see the soup laddel as brighter, its not the case. The soup laddels light is difused somewhat (due to poor guidence and coating), the sphericals light isnt, so your black levels will look brighter on the soup laddel then the spherical. Any light not hitting your panel in a paralelle manner will wash out your blacks.
As a word of caution, dont ever go on black level being brighter on one reflector to another to see if a reflector is brighter over another because that is wrong. Go on the brightness of the pixels illuminated only and you will get a more acurate result. Once you have the darkest blacks possible and the pixels as bright as can be along with a fully focused image pixel perfect from side to side you have it made, your light engine is acurate.
Trev🙂
aluminum versus silver
Everything I have ever found on material reflectivity says silver is always better than aluminum for visible light.
Here is the first hit on a google search of ( reflectivity "enhanced aluminum" silver ):
http://www.optosigma.com/miva/merch...&Product_Code=pg122-123&Category_Code=Mirrors
Every other reflectivity spectrum I have seen shows the same relationship. All the manufacturers specs for their mirrors also say the same thing: Aluminum is around 90%, enhanced aluminum 95%, silver >98% reflectivity.
As for changing the condensor optics: Right now each part of the lower fresnel "sees" all the light as coming from a small part of the condensor lens. If I changed to a higher power condensor lens, then the image of the arc would get bigger. Each part of the fresnel would see light coming from the full width of the condensor lens. So the light source would be much bigger, and light would be traveling at more diverse angles. Wouldn't that give me more scattered pixel images on the screen? Isn't that the exact opposite of what we want: A point-source light?
Everything I have ever found on material reflectivity says silver is always better than aluminum for visible light.
Fair enough you proved your point 🙂 I must have gotten mixed up with the two. If i wer you, id be inclinded to watch my bulb on it though as it reflects a very high amount of IR aswell, (probally why they arent common for a spherical reflector being used on a light source, normally used for solar energy collection, telescopes ect).
As for changing the condensor optics: Right now each part of the lower fresnel "sees" all the light as coming from a small part of the condensor lens. If I changed to a higher power condensor lens, then the image of the arc would get bigger. Each part of the fresnel would see light coming from the full width of the condensor lens. So the light source would be much bigger, and light would be traveling at more diverse angles. Wouldn't that give me more scattered pixel images on the screen? Isn't that the exact opposite of what we want: A point-source light?
Take your projection lens out and place your eye at the top frensels focal and tell me what you see. The higher the power is of the condenser lens the closer it must go to the bulb, hence why ive been telling you why we cant do this on our bulbs as they are just simply too big to get the arc close enough to the condenser in another thread. We need an arc of no bigger then 2mm and a clearence of 8mm and yess there are bulbs for us available.
From looking at just the condenser and the bulb on its own the bulb shouldnt be magnified in anyway. I dont have any problem with this setup, infact i got the idea out of a pro projector (Infocus LP220) with a spherical design. I wouldnt turn back because the image in this configeration simply just surpasses the old configeration by far in all areas that i study, including contrast.
If i had a decent cam i would show you the difference in pictures, but at this stage i dont.
Trev🙂
what do I see
When iI take out my projection lens, and put my eye at the top frensel's focal point, I see a blindingly bright upside down LCD image. It is pretty evenly lit. Good thing I had my sunglasses on!
When I hold a piece of white paper at the top fresnel's focal point, I see a projected image of the lamp arc. It is about 4 inches wide and 1.5 inches high. I see why my projected image looks a lot brighter with a wide diameter lens: The fresnels can only do so much with a 24 mm long lamp arc. One of those high-priced short arc bulbs could use a much smaller diameter projection lens, since all the light would be condensed to a smaller area.
Fortunately, I just got a 571 mm fl 5.75" diameter positive meniscus lens in the mail. The projected image is beautiful!
When iI take out my projection lens, and put my eye at the top frensel's focal point, I see a blindingly bright upside down LCD image. It is pretty evenly lit. Good thing I had my sunglasses on!
Thats nutz lol, with the lcd out and with the light off!!
The fresnels can only do so much with a 24 mm long lamp arc.
True but a frensel is a lens that has focal that goes to a point, anything with a 5mm or bigger arc is a waste.
Trev🙂
Well...Little behind schedule but things are comming along nicely with my new PJ, and I did tell ma 'thrifty' lil' Canadian bud Ancorp I would have some pics for him by the weekend, he has been following my projector from day dot so I have a few little 'teaser' photos of the construction of the new box...no screen shots, I have the camera though till 5pm tomorrow and the projector I envisage will be completed by mid-afternoon...So I will post some screeni shots of the projected image along with the interior layout etc of the PJ...for now, this is what and where im @ and what I have pics of...Hope they are of interest to you Ancorp...and of course others on the forum 🙂
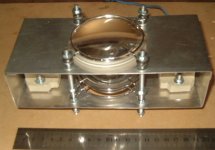
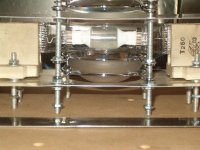
First pic is of the light engine arrangement, not fully adjusted at this point...tweaking of distance will come tomorrow, it is as you can see fully adjustable
First pic is of the light engine arrangement, not fully adjusted at this point...tweaking of distance will come tomorrow, it is as you can see fully adjustable
Attachments
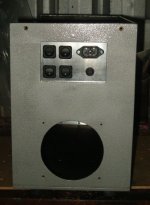
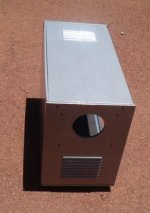
Heres a pic of the rear of the box...top rectangle is for the switch and power supply oh and of course s-video connection... lower hole is for the exhaust 120mm fan, I have a chrome fan grill for this also...Ill just ad, the box has not been assembled and tightend so you will see some gaps, they aren't there when fully assembled, I have added rubber insulation tape to all angles, the blue tape will be removed when PJ is assembled tomorrow...The rubber makes the box air tight, thus all air will ducted into case via the grills witch will have fan filters....
Attachments
Close up of rear, with switches mounted, pic doesn't show this well, but the alumiimium is on the interior side of the mdf thus switches etc are recessed...For those wondering why 4 switches...top left is main power...second is fan...third is light and last is for the LCD...a timer control for fan will also be added down the track
Attachments
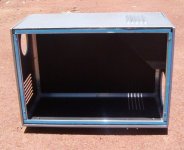
Ok...guess you want a squizz at whats inside hehe, as with the last PJ I made I have again incorporated alumiinium angle into the constrution of this box, again all joints are mitred, Interior is flat black 850 degree heat resistant paint... the box in the right is for the mirror, the electrics will also be housed behind this, not in photo is the LCD chamber ...that comes later... lol
Attachments
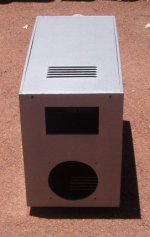
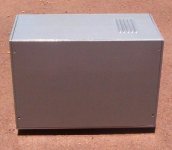
best ad a pic of the front to...the two vents have been recessed into the mdf, filled, filed and sanded so they are completely flush, will take some closeups tomorrow of the completed interior along with some screen shots of the projected image...hope this tides ya over for now Ancorp hehe ...
Till tomorrow folks thats it for now....
Till tomorrow folks thats it for now....
Attachments
Amazing!😱
I love the very solid construction! And the cool lil light box!😀
If only I had the skills to do that🙄 ...🙂 Respect!🙂
Will be anticipating the results, and the final build!😉
Jus curious - will there be any fan speed adjustments?
And will you mount it onto the ceiling, or keep it on a table or sometin?
Good luck on finishing up😀
Hey anyone know what time 5pm tomorrow in Australia is here in Toronto?
- Status
- Not open for further replies.
- Home
- General Interest
- Everything Else
- The Moving Image
- DIY Projectors
- HiLLBiLLY'S 7" Lilliput Projector