I think I will go with 1.6mm thick since it’s only 100mm square. I will keep 2oz copper for electrical performance, and ENIG finish as that’s just what I like have for a nice looking quality product. Pricing will be $20ea.
I can’t get blue lately. They want to charge a premium and add an extra 7 days for blue because no one else gets blue and ENIG anymore.
No one goes for blue?
Who are these people? Have they no sense of tradition? 😱
I'm a function 1st, form 2nd kind of guy. As long as it works and you're confident with the end product, which is why it makes sense from what I can see for you to stick with your typical construction spec as you sound like you're doing.
$20'ish should be accommodated by most budgets. Thanks for your effort.
Hi Folks,
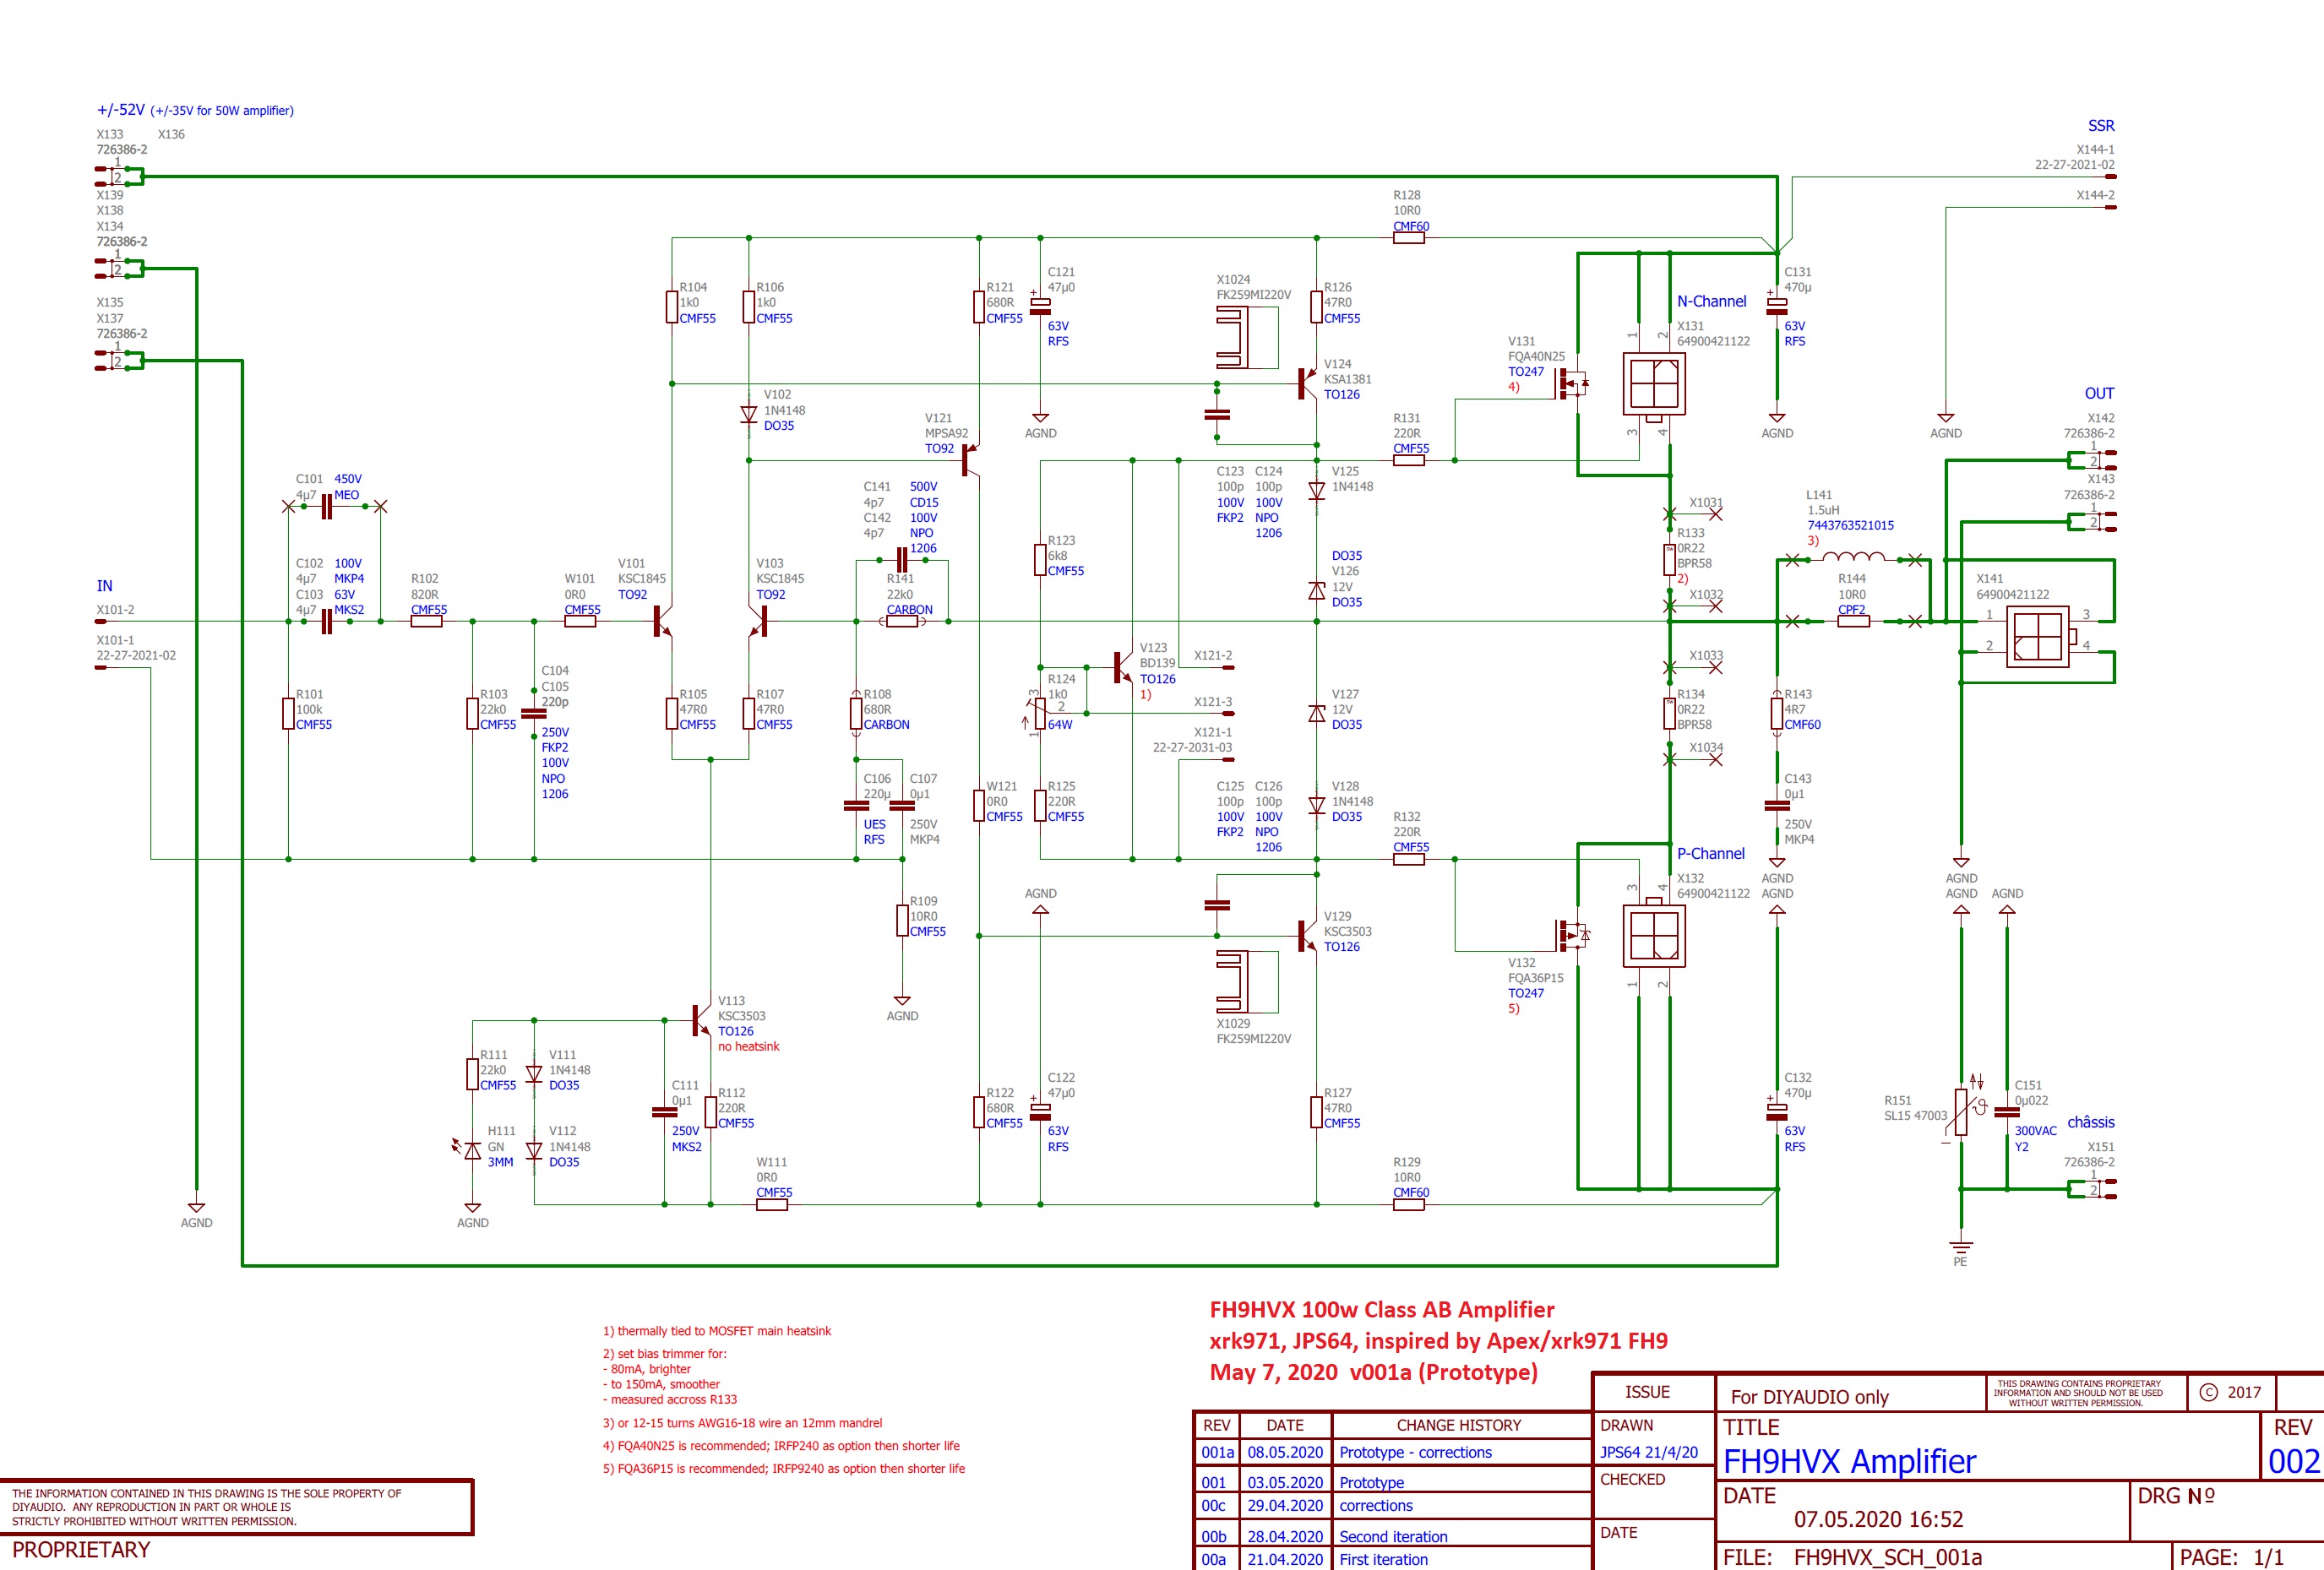
Here is the updated schematic and BOM, now with the optional caps on the drivers. Nominally, I would leave these unpopulated and only use them if you experience oscillation. You can start as low as 15pF and work your way up, using only as much as needed. The BOM has a 100pF value and part selected. JPS64 did a great job in putting optionally the use of either 5mm through hole Wima FKP 100pF 100v box cap or a 1206 size 100pF 100v NP0/C0G SMT cap.
Here is the revised schematic (attached as PDF) and BOM (attached as zipped XLSX file).
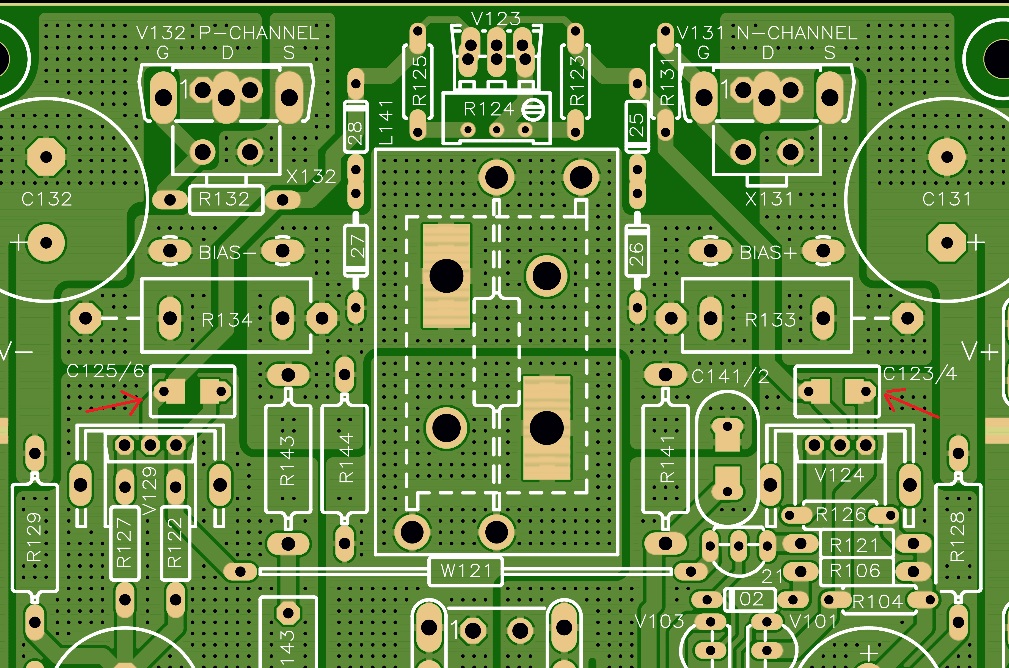
Here is a closeup of the cap location on the layout:
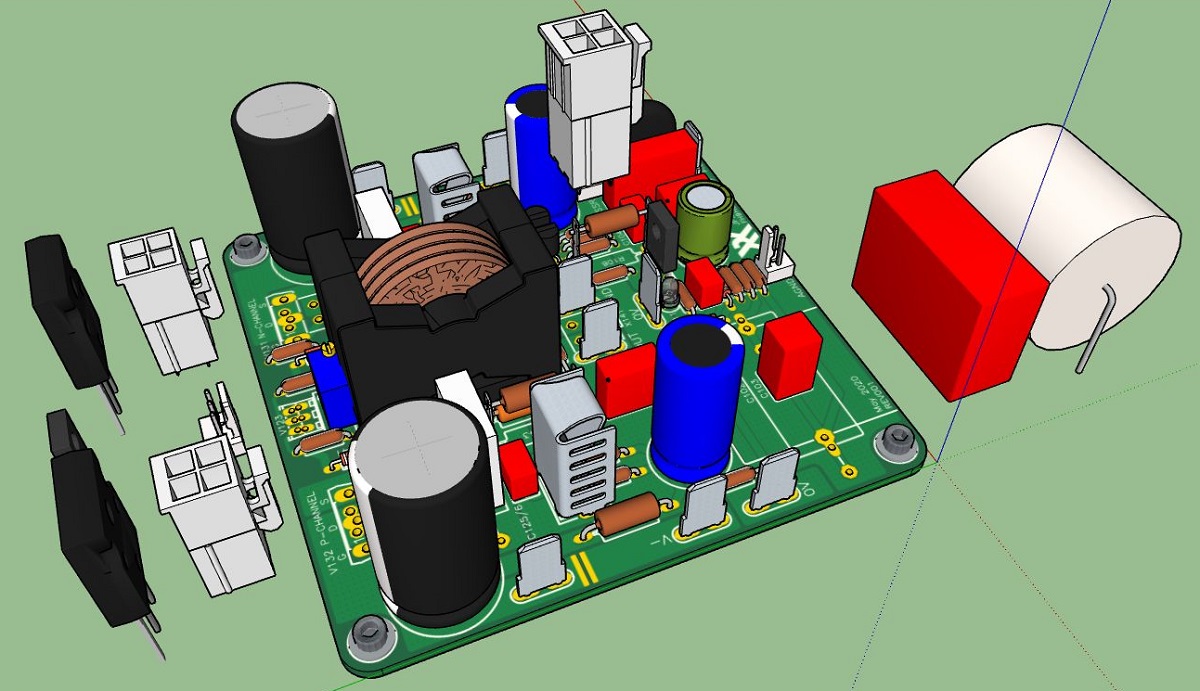
3d Rendered View:
BOM zip file
Here is the updated schematic and BOM, now with the optional caps on the drivers. Nominally, I would leave these unpopulated and only use them if you experience oscillation. You can start as low as 15pF and work your way up, using only as much as needed. The BOM has a 100pF value and part selected. JPS64 did a great job in putting optionally the use of either 5mm through hole Wima FKP 100pF 100v box cap or a 1206 size 100pF 100v NP0/C0G SMT cap.
Here is the revised schematic (attached as PDF) and BOM (attached as zipped XLSX file).
Here is a closeup of the cap location on the layout:
3d Rendered View:
BOM zip file
Attachments


....JPS64 did a great job in putting optionally the use of either 5mm through hole Wima FKP 100pF 100v box cap or a 1206 size 100pF 100v NP0/C0G SMT cap.
Here is the revised schematic (attached as PDF) and BOM (attached as zipped XLSX.
Wonderful! Thanks X and especially JPS64 for the xtra work in offering a through hole option.
Yes, just basic transistor tester and match Hfe as close as possible. That will help keep DC offset to a minimum. There is no DC offset adjust on this amp simply by picking similar Hfe input BJTs.
Hi All,
I’ve been working out two parts options for the FH9HVX amplifier to help from digging too deep into the $pocket$
A Premium Bom or Basic BOM.
The premium option will have the Wurth inductor, a fancier input capacitor, Molex parts to utilize flying leads for remote mosfet mounting and a few other items.
X will add them in the first post so they are easy to find.
You’ll enjoy this build, it’s highly satisfying 😀
So PCBs will be $40/pair.
The no frills BOM will be $32 per channel so total amp minus PSU and chassis is potentially $104. This is for genuine high quality parts from Mouser.
The premium BOM is $55/ch or $160 for the PCB and parts minus PSU and chassis. Still a great price for a discrete 100w Class AB that sounds great.
If you went the cheapo route, you could source your no name resistors and caps from China/eBay/AliExpress etc and the BOM might be about $15 per channel with genuine actives but no name passives.
You’ll enjoy this build, it’s highly satisfying 😀
Vunce, that sounds tempting...!
Hi Folks,
Here are the links to the Mouser shopping carts for the BOM's. Please save as your own project before modifying it by adding or deleting items.
Basic (but still great sounding) BOM $32:
Mouser Electronics
Premium BOM $56 (with input film cap, Wurth inductor, Molex Minifit connectors, etc):
Mouser Electronics
Note that this is for one channel, order 2 of these carts for a stereo pair.
Thank you, Vunce!
Hi Folks,
Here are the links to the Mouser shopping carts for the BOM's. Please save as your own project before modifying it by adding or deleting items.
Basic (but still great sounding) BOM $32:
Mouser Electronics
Premium BOM $56 (with input film cap, Wurth inductor, Molex Minifit connectors, etc):
Mouser Electronics
Note that this is for one channel, order 2 of these carts for a stereo pair.
Thank you, Vunce!
Yes - thanks guys! This is a nifty project made really easy because of your hard work. Hats off!

Hi Vunce,
Can you share with us what you used for a Power supply in testing this amp and what were the DC voltage rails?
Can you share with us what you used for a Power supply in testing this amp and what were the DC voltage rails?
Vunce used the 225w +/-52v Abletec SMPS mentioned in post 1. They were available for $20 to $25 a few years ago during a blowout sale at Parts Express. We loaded up.
Another option are 48v (adjustable time 51v) SMPS. Put two in series for dual rail. They are quite compact and cost effective. Four of them will give you dual mono.
Another option are 48v (adjustable time 51v) SMPS. Put two in series for dual rail. They are quite compact and cost effective. Four of them will give you dual mono.
Last edited:
Hi GaryS,
I hope all is well with you Down Unda’ 🙂
Like X just said, I’m currently using an Abletec SMPS. But during testing I also used a linear supply using one of Prasi’s CRC psu boards. That worked great also, no noise or hum. But the enclosure I’m using is on the small side and would not fit the trafo and psu board. That’s why the Abletec is the power plant now.
I do have room to fit some “extra” capacitance between the Abletec output and amp boards. That will be my next move 😉
- Home
- Group Buys
- FH9HVX - Budget Conscious 100w Class AB for Lean Times