Actives ordered last night from Mouser and arriving today. One of those bennies of living right down the road from Mouser. So I'm in good shape and the unobtainium troll well handled.
Actives ordered last night from Mouser and arriving today. One of those bennies of living right down the road from Mouser. So I'm in good shape and the unobtainium troll well handled.
Congratulations on the unobtainum solution. I'm jealous of your Mouser response time.
Jac
One Done
It seems like a long time ago when JP (paraphrasing) said 'Here are the boards. Lets see some builds. It took a while, but here is my build and it's as far as it's going to go for now. Thanks to SY for a really nice design and for all the help and suggestions during my build.
In my build, the raw power supply is complete and the preamp is done and working, but it's going to stay on a piece of plywood for a while. The plywood sure was handy when I was diagnosing problems. I have been using that piece of plywood since 2009. It used to be the ceiling of my front porch and has served as the basis for every audio project since then.
The future plan is to build a DIY turntable and stand. But I haven't decided what shape that will be, so since the preamp enclosure should match the stand (maybe 3 legs and a triangle?), I will decide about the enclosure design later.
Build
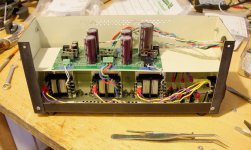
Following in SY's footsteps, I used a separate enclosure for the raw power supply and the preamp. For the raw power supply, I used 3 Triad transformers, one each for B+, B-, and heater. I used MUR840 diodes (860's for B+) because they are pretty smooth and I had them in the drawer. The first stage of filtering is in the raw supply along with the bleed resistors.
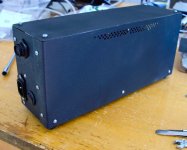
The enclosure is made from 20 gauge mild steel. The steel is slightly better for shielding, is easy to work with, and I had it in the basement. The paint on the outside was an attempt at an old leather look which could have turned out better, but it doesn't matter too much because the raw supply will live on a bottom shelf out of sight.
The umbilical cord uses Conxall industrial plastic 8 pin connetors. I used 8 pins because I wanted the safety ground for the preamp enclosure to run to ground through the raw power supply.
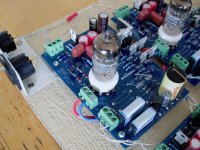
I used CRC filters for each power supply with the RC portion on the power board at the top of the preamp. The heater has LM317/337 regulators there as well. Of course, the B+ and B- regulators are the ones on the board.
The JP/Didden boards have a ground connection at a terminal strip on the upper left of the board that is intended for use with the B+ and B- power supply connections. You will note that I am not using it. After several suggestions from SY, I ended up with a star ground that is off board with only signal grounds running in and out of each board. If a future update of the board design is attempted, I would like to see an attempt to separate the power supply ground/return and the signal ground, if that's even possible. If not, the ground connection on the upper left isn't really needed.
Everything ended up running cool. The power supply board heatsinks are all running at 60 degC or less. I put a little piece of aluminum angle on the TIP50 and it now runs about 40 degC.
Once I solved my DN2540 problem, the unit runs quiet.
It seems like a long time ago when JP (paraphrasing) said 'Here are the boards. Lets see some builds. It took a while, but here is my build and it's as far as it's going to go for now. Thanks to SY for a really nice design and for all the help and suggestions during my build.
In my build, the raw power supply is complete and the preamp is done and working, but it's going to stay on a piece of plywood for a while. The plywood sure was handy when I was diagnosing problems. I have been using that piece of plywood since 2009. It used to be the ceiling of my front porch and has served as the basis for every audio project since then.
The future plan is to build a DIY turntable and stand. But I haven't decided what shape that will be, so since the preamp enclosure should match the stand (maybe 3 legs and a triangle?), I will decide about the enclosure design later.
Build
Following in SY's footsteps, I used a separate enclosure for the raw power supply and the preamp. For the raw power supply, I used 3 Triad transformers, one each for B+, B-, and heater. I used MUR840 diodes (860's for B+) because they are pretty smooth and I had them in the drawer. The first stage of filtering is in the raw supply along with the bleed resistors.
The enclosure is made from 20 gauge mild steel. The steel is slightly better for shielding, is easy to work with, and I had it in the basement. The paint on the outside was an attempt at an old leather look which could have turned out better, but it doesn't matter too much because the raw supply will live on a bottom shelf out of sight.
The umbilical cord uses Conxall industrial plastic 8 pin connetors. I used 8 pins because I wanted the safety ground for the preamp enclosure to run to ground through the raw power supply.
I used CRC filters for each power supply with the RC portion on the power board at the top of the preamp. The heater has LM317/337 regulators there as well. Of course, the B+ and B- regulators are the ones on the board.
The JP/Didden boards have a ground connection at a terminal strip on the upper left of the board that is intended for use with the B+ and B- power supply connections. You will note that I am not using it. After several suggestions from SY, I ended up with a star ground that is off board with only signal grounds running in and out of each board. If a future update of the board design is attempted, I would like to see an attempt to separate the power supply ground/return and the signal ground, if that's even possible. If not, the ground connection on the upper left isn't really needed.
Everything ended up running cool. The power supply board heatsinks are all running at 60 degC or less. I put a little piece of aluminum angle on the TIP50 and it now runs about 40 degC.
Once I solved my DN2540 problem, the unit runs quiet.
Attachments


Build Notes
Things to buy early
The JFETs are good to get early. So are the DN2540s. Hopefully, no one else gets a bad one like me. I recommend checking the Vgs(th) because my bad ones never shut off. But even if they are all good, selecting matched pairs and breadboarding the CCS to find out what control resistor value to use is worthwhile early. In the end, I recommend double checking the CCS with the actual power supply components, just to be certain you know what you have. I just stuck a 10k resistor in the tube socket and measured the current coming out of the resistor to ground.
If you are going to use the Triad transformers, you might want to buy them early. I never could find a regulation spec for the Triad's and I found the regulation was higher than assumed on my heater supply. I would estimate the regulation at around 50% on that transformer which meant I had to replace it with a higher voltage transformer because I couldn't put enough voltage into the regulators. There is a catch 22 here. It is probably best to have extra voltage available but that means you are putting more heat into your LM317/337, so a heatsink may be called for.
I had an LM329 that was bad out of the box. I recommend that you breadboard and check that they work properly before you solder them in. It's possible that the bad parts were something I was doing wrong, but I have done multiple other projects without issues, so I'm not sure what I would have done.
Things to watch out for
For the B- on-board regulator, the diagram and the BOM show R30 and R31 as 1.2k and 120R for a resistor ratio of 10. If your target is -15 VDC for B-, you need a resistor ratio of 11. Check the datasheet. I used a 1.1k and a left over 100R to get the targeted -15 VDC.
Also, be careful of the pin number on the LM337 in the diagram. The in, adj, and out are correct, but don't match the correct numbers for the LM337. This should be no issue because the board is built correctly.
Although the schematic doesn't show ground reference resistors at the input of the second gain block, SY suggested it and I found that it made a useful reduction in noise. Basically, just use R1 and R2 in well matched pairs on all 4 boards with the best matched pairs in the first gain blocks.
C22 is tight on the board. What you need for C22 is a 220 uF, 25V with 5 mm lead spacing and a max diameter of 8 mm. A 10 mm diameter may fit, but you would need to shave off a bit of your terminal block and the cap may be a bit crooked.
R51 and R52 are not shown in the schematic in the article but do show on other schematics. They are also listed in the BOM and are on the board. They are 100R in series with the LEDs D1 and D2.
The schematics in the article use different labeling of components than the BOM and the board. I made a little pdf table attached below to help translate between the two.
It is a relatively complex project, so don't be surprised if it takes you some time. It was on my bench for 4 months, although 1 of those months was diagnosing the noise. Best of luck on your build.
Attachments
When I did the article for LA, I predicted that not many would build it, despite the high performance. Hat's off to you for not only getting past the degree-of-difficulty barrier, but making things easier for those coming after you.
Thanks. I enjoyed the process.
One thing that I forgot to mention. Builders will want to experiment with input capacitance as one of the first things they do when they get it running. My cartridge supplier (Music Maker III, a moving iron design) recommended 100pF and even suggested that I play with lower input resistances down to 35k. He said it affects the flavoring.
Out of the box, with no additional input capacitance, the preamp sounds good, but perhaps a little thin on top, at least in my system. I tried a couple of different levels but ended up with adding a 47 and a 22 pF styrene in parallel to the input terminals. Using SY's 22 pF for the amp itself, that comes up to 91 or pretty close to the maker's recommendation.
The capacitance had a clear effect on frequency balance, getting brighter with more capacitance as predicted in the article. I tried lower resistance by paralleling a couple of 100k resistors to the input and like the 47k combo better.
Pull the Cork out of the Bottle and the Music Pours Out
Naturally, some of you guys want to know what it sounds like. SY is never going to say anything because it's his own work. I guess that means that you are stuck with my impressions.
First, I should explain where my analog set-up was coming from. Although I have been playing with other aspects of my system for a while, I hadn't really even looked at my analog system until about a year ago. At that point, it consisted of a vintage Technics SL-5300 direct drive turntable, a low level AT440 cartridge, and the preamp built into an old receiver. I hadn't been listening to records because it didn't sound nearly as good as digital. But I kept reading about higher end analog systems that sounded as good or better than digital, so I knew I was missing something.
Last year, I upgraded the preamp to a DB Systems DB-8 which is a low cost (~$200) solid state preamp that has a good reputation for the sub-$500 price class. Later, I added a gently used Music Maker III cartridge. At this point, the sound was clear with a reasonably quiet background, but there wasn't much in the way of imaging, nor very lifelike sounding. The Technics is good for speed control, but the 5300 is a consumer level table with a plastic plinth and a cheaper S tone arm. I knew there was room for improvement there, but I decided to build the Equal Opportunity MM preamp first.
To convert the table to balanced connections, I left the tonearm wiring as found and braided up some teflon insulated CAT5 wire as balanced connections in place of the RCA wires.
Subjective Impressions
The Equal Opportunity MM Preamp was a much bigger improvement in sound quality than I expected. The sound quality is equal but a little different than my digital sound quality. It is totally worth the trip.
1. Background noise is MUCH lower than before. Clarity is very much better. For example, I have an old recording of Copland's Appalachian Spring. There is a place where the oboe picks up the Simple Gifts theme. I had never heard it before, but there are handbells playing along with the oboe. Nice. This experience is repeated frequently.
2. Imaging is at a very good level. If it's in the recording, the soundstage has width beyond the speakers and definable depth. Very comparable to a good digital level, although I can't compare directly to the same piece of music.
3. I'm not sure how this is possible, but the dust pops and clicks are significantly less. Even scratched records are manageable. I'm putting this down to the extra linear range that the tube provides per the article, but I would be curious to know if this is the reason.
4. Somewhat dependent on component selection, music is dynamic in a way that I didn't know was possible from an LP. Quiet passages seem quieter and when the musician attacks a note at a louder level, the response is tight with recording in a way that sounds very lifelike. This effect appears in places that I didn't expect. You might expect a symphony to have a dramatic swell of sound, but I find it in small folk groups playing, in vocals, lots of place that I never heard before in the very same records.
Overall, I think SY met all of his design targets and then some. This thing not only measures well, it is subjectively a big step up, at least in my system. I think I need to buy some new records.
If this sounds good to you, then get busy building your own. Unless you already have amazing sound from your analog system, you won't be disappointed.
Passive Component Selection
I have a confession to make. I am a cap roller.
If you are of the opinion that passives don't affect how your system sounds, then I respect your opinion, but you probably won't be happy with the rest of this post. I invite you to just skip this post. This is one of the arguments that nobody wins. If, on the other hand, you are open to passive component selection as a topic, then read on.
I am of the belief that a good circuit design is the most important thing, but that you can tailor your system with component choices. They don't make a bad system great, they are more of the last percent kind of tuning. So I tend to set aside some time to try a few caps before soldering the system together. I suspect that tubes have a similar choice available, but I'm new to tubes, so I leave that for another day.
For the record, I am using PCC88 or 7DJ8 tubes that are a 7 volt version of 6DJ8 tubes. I chose Matsushita for the first stage and Tungsram for the second stage.
For capacitors in the signal path, I tried a few in each position. C4 and C5 have the biggest effect on sound character. After that, C3 and C7 were influential. I didn't see much difference between C2 caps, but perhaps the caps that I had on hand to try were too much alike.
For C4 and C5, I was surprised to find that a polyester cap worked the best for me. The Amtrans AMCO is very clear with clean attack and excellent dynamics. It is probably a touch brighter than a polypropylene cap, but my system is laided back enough to handle it.
I also tried the Wima MKP10 and Sonicap Gen 1. Between these two, the Sonicap was very balanced and clear, only falling behind the Amtrans in dynamics. Last I looked, the Sonicap was available on closeout. The Wima isn't bad, but sometimes a little lacking clarity. Good price though.
For C3, the 33 nF RIAA cap, I used a NOS Siemens KP D7 polypropylene cap. Again, it excelled at clarity and dynamics. If someone wants to try these, they should still be available from a reliable ebay seller at pretty cheap prices. Let me know. I'll point you in the right direction.
I had another NOS cap (BMZ) in my drawer that just didn't work. The next best bet that I found was a Rohm polystyrene cap that I got for $0.50 each from Parts Connexion. These are the typical clear shrink wrapped styrene caps you find from multiple sources in the US and Europe.
I found that C7 (1 nF RIAA cap) was effective in tuning sparkle on top. That had some effect on detail and imaging too. The best I found was the Rel-cap RTE polystyrene/tin with excellent imaging and clarity. It also was very helpful in improving dynamics.
A close second is a bit of a weird choice, a Russian K71-7 polystyrene. It has great imaging and clarity the same as the RTE, but gives up a little in dynamics. On piece cost, the K71-7 is pretty cheap, but it gets more expensive if you have to buy quantities and ship them from Russia.
I also tried an Amtrans AMCH polypropylene cap that I have used before with good success. Alas, it wasn't so happy in this application and was less clarity than desired.
Finally, C2 is another element of the RIAA (0.1 uF). I tried 3 different caps and used the Rel-cap PCU polypropylene/copper but the difference wasn't great. I also tried a Mundorf ZN (from my parts drawer) and a Wima MKP4, 250V. For many systems, especially those that are a little bright, the MKP4 is a good choice. Imaging, clarity and frequency balance are all good. Maybe a bit more and looser bass than the other choices. Still, it's cheap and available and sounds very close to the other caps.
Have fun. Try a few different parts if you feel like it. Let me know if you want me to point you to sources for some the obscure choices that I made.
Jac
Appreciate the kind words.
I think that both headroom and attention to overload recovery are important in minimizing the effects of pops and clicks from dirt and vinyl defects. I have no good data to support that belief, but nonetheless, I use that as a fundamental design criterion.
I think that both headroom and attention to overload recovery are important in minimizing the effects of pops and clicks from dirt and vinyl defects. I have no good data to support that belief, but nonetheless, I use that as a fundamental design criterion.
It will work fine if you have an input transformer. Without one, the noise would be more than I'd be happy with.
edit: the transformer's secondary should be balanced, e.g., a Sowter 8055.
edit: the transformer's secondary should be balanced, e.g., a Sowter 8055.
Man this thing sounds good!
I've been browsing through my old records and some of them sound fantastic. The dynamic punch when a player attacks a guitar string is amazing. I just listened to Alex De Grassi on guitar, then separate album, Mike Auldridge on Dobro. When they strike a string and stretch it, then back off, it sounds like he is right in front of you.
Thank you SY.
Jac
It will work fine if you have an input transformer. Without one, the noise would be more than I'd be happy with.
edit: the transformer's secondary should be balanced, e.g., a Sowter 8055.
I was going to ask which transformer would work best so glad that has been answered. Those Sowters are spendy tho 🙁
They're actually not that bad at all- if memory serves, the're something like 80 quid per, which is a fraction of the cost of the equivalent Jensen or Lundahl or Vanderveen.
I'm delighted that at least one other person has managed to hurdle the barriers of getting this admittedly complex project working.
I'm delighted that at least one other person has managed to hurdle the barriers of getting this admittedly complex project working.
Those Sowters are spendy tho 🙁
Only curiousity on my part, but in the "His Master's Noise" article SY wrote, "after bending over for the unfavorable dollar/pound exchange rate, then paying shipping and duty, the Jensen equivalents start looking much better." Happily, he was able to find a Sowter, but how much risk in the cheaper alternatives?
Jac
Never mind. I see that SY addressed this.
Last edited:
with tax a round £100 per for us in yoorp. Not silly, but not an impulse buy either. But I realise I am an edge case whose erm, life decisions have left them with minimal disposable income. AKA the bitches have bled me dry. It would be cheaper for me to accept the AT150 is a better cartridge than my Benz 🙂
Only curiousity on my part, but in the "His Master's Noise" article SY wrote, "after bending over for the unfavorable dollar/pound exchange rate, then paying shipping and duty, the Jensen equivalents start looking much better." Happily, he was able to find a Sowter, but how much risk in the cheaper alternatives?
Jac
Comes down to the country you are in of course. Jensen are in CA. Sowter are old skool flat cap brigade from the fens of England. Lundahl are Swedish so hand made by gnomes and trolls.
But I realise I am an edge case whose erm, life decisions have left them with minimal disposable income. AKA the bitches have bled me dry.
Ditto. I feel for you.
Comes down to the country you are in of course. Jensen are in CA. Sowter are old skool flat cap brigade from the fens of England. Lundahl are Swedish so hand made by gnomes and trolls.
Here in Michigan, we have two peninsula connected by a bridge. So all of us that live in the lower peninsula are called trolls because we live under the bridge. 🙂 Of course, we don't make quality transformers.
Jac
- Home
- Source & Line
- Analogue Source
- "Equal Opportunity" MM Pre