chrisb said:I guess I could just as easily dial the phone, but I'll ask if any progress yet on EnABL blocks to either GR or clear-coated standard Fonkens?
🙂
1st priority is getting EnABLed drivers finished and off to the UK. Then comes prep for Mr Miller coming Sunday to do the plumbing, the sub floor, and lino in the kitchen.
The clear-coat boxes still seem to be off-gassing a bit. I'll probably start masking off the GRs to-night.
dave

planet10 said:
The clear-coat boxes still seem to be off-gassing a bit.
dave
while the sun is shining, try to get them outdoors (and out of the cats' reach) - it's airflow as much as temp than completes the off-gassing and curing process on the catalyzed lacquer
planet10 said:Here are some pictures...
Scary Dave, you're getting pretty good at this. 😱
dlneubec,
On the tweeter baffle put the red lines as block rows. Also apply the pattern as you have done on the front, on the back side, if there is one to this baffle. You don't need to allow for the round tweeter mounting baffle there.
For the mid driver surfaces, I would pattern the cast frame surface, right at it's outer edge and then apply a pattern on the yellow line. This will control diffraction at the red line also. You are putting the pattern rings on the frame surface to help with the discontinuity between frame and baffle surface. There will be a lot of energy here and Raleigh waves can get going.
Other than these excellent questions, where are you being dense?
Bud
dlneubec:
taking a look at your close up photos, since you'll need to remove the drivers from the cabinets to apply the EnABL treatment, it might not hurt much to replace what appear to be either round or hex head screws with flatheads and cover any remained exposed mounting holes with something like:
http://www.fastcap.com/fastcaps.asp
these are pretty thin (approx .5mm) and readily removable for future access.
Bud, any thoughts on potential interference with EnABL functionality that large headed screws/bolts might cause?
chrisb,
All discontinuities are problems. Some are serious and others you can just coat with gloss and forget about.
Bolt heads, if they are round rather than hex, can just be coated with gloss and that will allow the patterns to keep them from ringing to an audible extent.
I will say, that as my hearing ages, I am far less manic than I was as a younger person. But then, I was involved with SS amps, built by the numbers and useful for playing music to computers, robots and microphones with test software. I still have a couple as test amps, for test signals, but neither is worth listening to for music.
So, all surfaces, including phono cartridge bodies and TT arms, hex bolts, you name it, got a pattern and gloss coating, just in an attempt to keep the harshness of the amps from exciting the discontinuities on the speakers. Big strides have been made in SS, so this relaxation of maniacal attitude may be suitable with SS amps too, nowadays.
Conversely,Gary Pimm's Tabor push pull SS amp, with interstage and OPT's and a CCS as the the input splitter is just glorious sounding. All of the things we like about tubes, with vanishingly small distortion, zero harshness and very wife compatible. I am planning on building four of these to drive the top two drivers in the ugliest speakers in the world project.
Bud
Planet10: Are you willing to share the recipie for the nice marbled black finish on those 207s?
OzMikeH said:Planet10: Are you willing to share the recipie for the nice marbled black finish on those 207s?
All the stuff i sell is always be fully described... at least when i get a chance to....
the marbled black is actually dark dark blue, and the marbling is just the way the banana paper takes the under treatment.
My experiments with the FE127 showed that the Fostex benefit from an undercoat of puzzlecoat. (on the 126 & 127 there is also a trifoil pattern in dammar under that). To get "black" i have been using some vintage Peerless black ink (left overs from the estate of the father-in-law). Instead of water to thin the PK, i used the ink... also thinned the PK more than usual so that i could get 2 coats on -- black food colouring should do the trick too. I was pleased that this worked because it means the cone can be coloured and then the rings can blend, or contrast or with 7 main rings (2 under the whizzer -- most difficult ones to apply -- aren't visible and the ones on the phase plugs are small, you could even rainbow the rings...
Then white spots and 3 50% layers of gloss on the main cone. Whizzer gets 1. Back of the whizzer ledge gets 1. Phase plugs are still being fine tuned.
dave

It's a shame your CNC lathe can't put divots in the plugs as they're being turned out. It would be relatively simple to fill the divots with paint and wipe the excess off.
Hi everybody. Hey, how come I haven't seen this interesting thread before ???
I'd have two questions:
1. I couldn't read the whole thread, but I cannot seem to find anything about the mamboni process. There's plenty of EnABLE - which I will try for sure ! - but the links to mamboni were all dead - i suppose, due to merging threads together. Can anyone please point to the page where the mamboni stuff is described ?
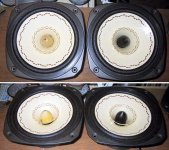
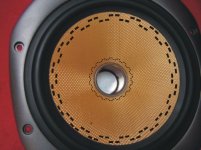
2. The driver I want to treat is a modded B&W 7" kevlar woofer from the 602S3 (I removed the dustcap and installed a phase plug- in itself a very effective mod). In the original, it was crossed over at 4kHz, now it's at 2.8 kHz.
One thing is that I could not remover the dustcap altogether (was affraid to use solvents) but only "circumcised" it, thus leaving a ring of plastic at the cone/voice coil joint. How would you suggest to apply a EnabLE treatment ? How about mamboni ?
I'd have two questions:
1. I couldn't read the whole thread, but I cannot seem to find anything about the mamboni process. There's plenty of EnABLE - which I will try for sure ! - but the links to mamboni were all dead - i suppose, due to merging threads together. Can anyone please point to the page where the mamboni stuff is described ?
2. The driver I want to treat is a modded B&W 7" kevlar woofer from the 602S3 (I removed the dustcap and installed a phase plug- in itself a very effective mod). In the original, it was crossed over at 4kHz, now it's at 2.8 kHz.
One thing is that I could not remover the dustcap altogether (was affraid to use solvents) but only "circumcised" it, thus leaving a ring of plastic at the cone/voice coil joint. How would you suggest to apply a EnabLE treatment ? How about mamboni ?
OzMikeH said:It's a shame your CNC lathe can't put divots in the plugs as they're being turned out. It would be relatively simple to fill the divots with paint and wipe the excess off.
It is important that the bumps stick out. The middle size ones were CNC, all the rest are handmade. Scott is better than the CNC operator (he was sloppy)
dave
bzfcocon
Look here for the mamboni process. They are all involved in Walsh /Ohm drivers and it has been a while since anyone posted to that thread.
http://www.diyaudio.com/forums/showthread.php?s=&threadid=100390&highlight=
Can you post a more or less face on picture of your drivers, in their current state? Maybe 20 degrees off axis, so we can get an idea of surface irregularities, please? Should be able to photo shop a pattern set or two on the picture, to show you where to position the pattern rings. Be sure to plan on patterning your phase plugs too, it becomes quite important.
Glad you are joining us.
Bud
Thanks Bud !
To avoid posting pictures twice, here's my thread with the mods to B&W:
http://www.diyaudio.com/forums/showthread.php?postid=968241#post968241
However, the plugs do not look like that anymore. At some point, I decided that they are not thick enough and, as I couldn't remove them, I "thickened" them with stripes of alu-bitum (I'll try to post a picture tomorrow). This, of course, is in itself a "treatment", since the plug surface is not smooth, but that is reversible.
bzfcocon,
Here is a pic of where the patterns should reside. I can also attach a Corel Draw 10 file of two ring patterns you can resize to use as guides, assuming you have access to Corel or Illustrator. Dave has an Auto Cad 12 pattern he hands out. Both can be dropped into gif format too. Let me know which works for you.
Bud
Attachments
gee, can't believe we're up to 800 odd posts....gonna make it hard when I have to go back and do a memory refresh aarrgghh.
NOT that I have nothing to do, but taking heed of Bud's recommendations to start el cheapo on the drivers, I realised I have some (ha!!) computer monitors that cost all of..twenty bucks. May as well get some practice on them, see if I can hear anything.
Much to my chagrin I just found out I may have some decent drivers to test this on after all, I just found a crack in a cone on one of my PHL's that I have in a monitor (focal tweeter, the inverted dome type). It must have taken a knock somewhere grrr, so I have to repair it anyway, so it will (presumably) be 'not as good' as original, so it could very well serve as a test vehicle now. Oh well, that's life, may as well get something out of the damage.
Dave (or anyone) you may very well know, it does look like an impact, the tear/split is kinda 'L' shaped, which suggests a point contact and a tear each way off it. Anyway, just shove a bit of glue in the cracks, and perhaps glue some tissue paper/light fibreglass/cloth or summat on the back for strength??...or am I on a hiding to nothing? Was thinking of the sort of glue that gets used on surrounds etc, or would there be something better?
Maybe the cloth or whatever on the back should be felt....ie as in the Mamboni part ha ha.
- Status
- Not open for further replies.
- Home
- Loudspeakers
- Multi-Way
- EnABL Processes