Now I am clearly up against the design limitations of my flat-sided DIY enclosures.
Well, maybe not quite...
Next thing is to tape EnABL the cabinet itself:
- all external edges
- all internal walls*
*Use sheets of contact paper cut to fit each wall and cover them completely with tape EnABL.
Then peel off the backing paper and stick the sheets onto the inside walls of the cabinet.
Finally, replace and re-tune the stuffing (again).
Both of these are painstaking, but it will push your perception of where the design limitations actually are. 🙂
Cheers,
Alex
Thanks to Ed for my recently received EnABL Kit. Everything arrived safely and in order 🙂
Now down to business. Is there an EnABL pattern library for specific drivers or more specifically for the MA CHR-70. I have read posts of and seen pics but i cant find anything specific and would like to follow someones else's work on the CHR's as a first run before I treat a pair of Alpairs.
Any advice or links will be greatly appreciated.
Cheers
Dean
I dont see any pattrns for that driver specifically so you might have to compare a few good results for types of cones similar to those on the CHR 70. In my own case, it was very useful to start with a set of specific objectives. I would recommend that you decide on a cabinet design and get prototypes (if not finished products) made so that you can listen to the effects of the process.
Frank
Frank
Any advice??
I assume you have looked at the Jordan info, links to which are on page two of this thread?
Hi Dean,
I have not dealt with any of the Mark Audio drivers except the Alpair 7. I suspect that the CHR 70 will require a fairly close analog of that treatment set and Dave at Planet 10 may be able to shed some light on any peculiarities.
Have you practiced patterns on any cheap drivers yet? I hope you intend to practice upon some inexpensive drivers, as the skills needed for using a calligraphy pen upside down on a bi curved surface are not instinctive.
It would be wise to read a bit in the more recent portions of this thread where "tap testing" is discussed. This is the specific tool we use to determine exactly where individual contributors to resonances, subduction, Raleigh waves and loop back phenomena that cause beaming, are on a particular cone. It does not require fancy tools, the tip of the black wand Ed sent you to hold the pen tips in is all you need, along with acute hearing and the belief that you can actually find what you are looking for.
Do please poke about and come back with questions. I am sure we will be able to help you learn what you need to know and do. I have attached a txt file with most of the important EnABL threads. Do please look at the Picassa site for pictures of completed drivers.
Bud
Dave at Planet 10 may be able to shed some light on any peculiarities.
All of the CHR that i have done were finished pre-EnABL2 so just used standard ositioning. You will need to get out your tap test and figute out where the driver is telling you to put the rings. One thing i found is that the typical mid ring on these is, because the dustcap is so wide, just outside the dustcap, so EnABL2 will probably mostly bring the outer ring in towards tha centre a bit,
Also, on the Apairs, the rings pretty much fall on the transitions from one radius to the next (these cones are formed with multiple radii) so there are some visual clues as to where to expect a ring to go.
As to pattern sets, i just use the generic sets & shrink or expand them till they are thr right size. For every pattern i use, i likely have 10 that weren't quite the right size (i always go thru the unused set looking for the right size when i need a new one).
Here are pics of EnABL1 (gen 1 CHR). This extracts a huge amount out of the CHR. I personally prefer CHR70eN to Alpair 10 (both 1st gen), and the 2nd gen gets more finessed.
dave
Here is that text file I forgot to post.
Thanks Bud,
I was wondering if my eyesight was failing me.😀
Best Regards,
Terry
I personally prefer CHR70eN to Alpair 10 (both 1st gen), and the 2nd gen gets more finessed.
That comment should not be construed to aplly to the latest CHRs & Alpairs. In fact i will probably have to quit selling CHReN as to make a reasonable return, they have to sell for what you can buy a stock Alpair7. Means that to sell the CHR price has to go down to where it is not worthwhile. And i certainly encourage anyone wiling to do up their own CHR, it is decidedly worthwhile.
dave
Sorry for the late reply lads.
Sounds like I have everything i need to get started.
My first Tap-Test was reasonably informative. A low background noise (eg.PC off) really helps to zero in when taping and a water marker for highlighted areas on the cones wipes straight off.
Thank you bud (+others of course) for the text/posts.
Dean
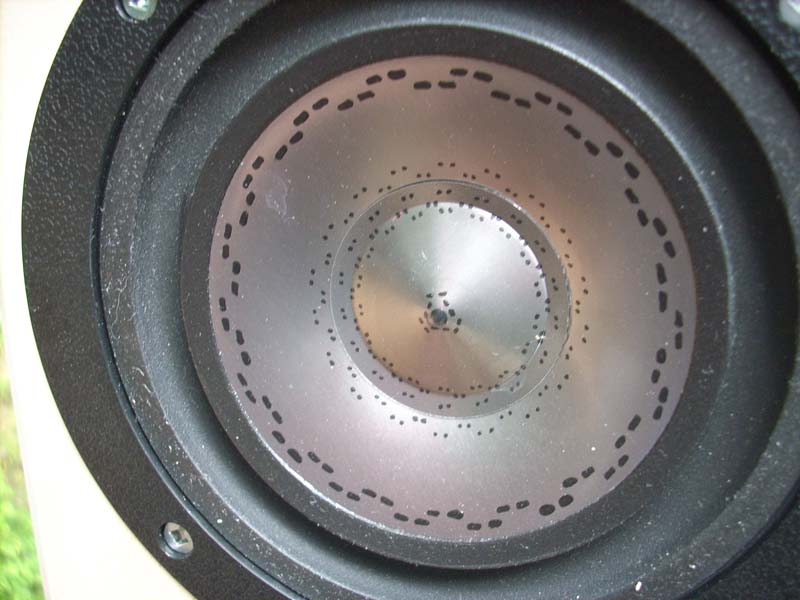
The Polk system should respond well. I suspect that the differences will be subtle, more to the depth of detail and coherence side of things, rather than dispersing more or less gross resonances.
The woofer looks pretty straight forward and I would expect to find three sets of rings needed on the cone. Since I am expecting this to be slanted towards detail retention I would expect a three sector ring set, split between dome and cone across that joint, one out just before the surround glue joint and a third around 2/3 of the way to the surround, radially. A dome tip with PVA dot will be required to spread the dispersion and loose the slight localization of images that should be arising out side of the lateral edge of the speaker face plates. If you still find some issues with female voices and mid upper piano notes, another ring on the dome may be needed and can only be found with tap testing.
The tweeter should be treated just as Frank did for his silk dome. However, due to the materials I think you will need a resonance control ring just as the dome "breaks over" from rising to curving wall, or again, about 2/3 of the way up the dome. The tweeter is going to increase in efficiency, just as Frank's did, but not to the degree. So, you will need two ring sets and the tip of dome treatment that Frank shows in his pics.
A tap test will find both of these mid diaphragm ring sets. So, you want to get Ed's kit and get your hands on the pen tip wand soonest. A pair of electron pools will be very useful with this speaker and if you want to spend the money I would recommend the Standard lugged version of Ground Control, as I don't think you will need much help with information depth from these drivers.
Bud
Last edited:
...RTi A series specific?
My only comment would merely be to have a specific objective for the modifications because (if all goes well as it did for me) achieving it/them will sharpen your ear and change everything from the impact of small details in the sound, up including the perception of recorded 'space', and perhaps ultimately the emotional impact of the music. My initial objective was to eliminate beaming from my midrange drivers. The more I learned and heard along the way, the more I began to grasp the potential of a more coherent driver. But the process involves changing the way you listen analytically, and will probably impact your sonic 'values' to some extent.
From my limited experiences, it seems every dome tweeter needs this treatment! On my tweeters I merely used the blunt end of a wooden toothpick (rather than a calligraphy tip or rapidograph pen) to apply dots of paint. These domes were more of an experiment because they are replaceable for <$20 ea. Certainly a successful experiment, as it turned out...
You haven't said which Polk model you have. Especially if they are larger, I hope you can easily remove and replace the drivers from your enclosures because you will probably want to do it several times before you are willing to say "done"!
Best wishes,
Frank
Here is the pattern guide set for Franks LE8T-H driver. Frank has not used any Micro Gloss on these drivers and I probably would use no more than two coats of a 1 to 9 part Gloss to water coating on the cone and dome. However, since I am not in charge of this driver procedure, I will stand with Frank and say, you probably don't need it. The only thing it will provide is a subtle sense of refinement and, well, glossiness.... For the rest of the treatment procedures do read Franks commentary, it is clear and concise and from how he presents what he has discovered, exactly correct. And do keep in mind that when printing from Acrobat, keep all page modifiers turned off, no scaling and no centering.
Bud
Bud
Attachments
Wonderful patterns, Bud!
A couple of comments on that proprietary white factory coating on the LE8T-H: It is fairly thick and quite hard. I feel it is significantly harder than the gloss coating that went on the 2235 woofers - probably because of the pigment. I guess the white pigment is aluminum oxide rather than titanium dioxide because of a little trick I tried. First the rationale, then the trick and finally the evidence for Al203. I thought it best to use fairly heavy paint spots because of the hardness of the white coating, which would give the outer surface very different properties from the normal paper rear layer. Sometimes those generous acrylic paint dashes would flow a bit where I didn't really want them. Solution? After the paint was dry but not cured, simply scrape it off with an Xacto knife! The white JBL substrate was immune to this scraping. In fact, it would discolor slightly due to residual steel from the Xacto knife blade showing that the pigment was abrasive. Aluminum Oxide is certainly hard enough to do this. I attached a slightly fuzzy demonstrative photo.
So if you see some 'impossibly' square ends to a few of my paint dashes, that's how they were achieved. BTW, if a dot got too much paint on it? I let it dry and then scraped the entire surface side-to-side with the knife edge of the Xacto. The paint will abrade to dust. Simple and safe...
However, I recommend extreme caution scraping against any other cone surface substrate!
Best,
Frank
Attachments

To Frank et al:
I plan to bi/tri-amp* all channels. Should I complete those mods BEFORE doing this?
* active
The speakers:
RTi A7s, L & R
RTi A1s, sides/rears*
CSi A6, center
* FXi A6 (for sides) purchase pending
I've read, elsewhere in this thread, about electron pools & ground controls. Unfortunately I don't have a firm grip on just what they are.
Drivers are easy to remove.
Thanks
I've read, elsewhere in this thread, about electron pools & ground controls. Unfortunately I don't have a firm grip on just what they are.
Hah ha ha hah, so? No one else does either! But then, a firm grip on things might preclude you from EnABL too..... certainly works for a group of others over on the debunker thread.
You can do the process at any time. The treated drivers will be more revealing of inadequacies, in whatever amplifier format you use. My loosely gripped suggestion is to do the amps first, get that situation straight, with the speakers as they are and then EnABL the drivers.
The differences between treated and untreated drivers are not like the differences between various brands of speakers. Instead, the speakers will have the same characteristic sound, which is mainly frequency response driven. What changes are all of the things that announce the sound to be from speakers. Directional emissions, that are not tied to a source within a reproduced image, of the original space. A shroud drawn across all sounds softer than about -40 db below average signal level. Completed notes, from initial transient to final decay. Specific frequency nodes that shriek when excited.
What the drivers will provide, once treated, is a clear view of the rest of the system and how that system limits the "naturalness" of the reproduction. This is where the Ground Control and to a much less effective degree the Electron Pools and the commercial copy cat's for the Ground Controls come into play. They just provide retention of the back half of the wave form information, in a coherent fashion, that aids the seeming "naturalness" of the sound. They do work without EnABL, but combined with EnABL they are oddly compelling, in that illusion of projecting the complete "truth" of the reproduced sounds.
Bud
Last edited:
Completed notes, from initial transient to final decay.
Sorry, should have said Uncompleted notes.
Bud
To Frank et al:
I plan to bi/tri-amp* all channels. Should I complete those mods BEFORE doing this?
* active
The speakers:
RTi A7s, L & R
RTi A1s, sides/rears*
CSi A6, center
* FXi A6 (for sides) purchase pending
Thanks
...just got back from out of town...
That will be a truly impressive system when all is said and done! I DO recommend getting your software and electronics squared away before hand. Surely, Bud has the experience to guide you down the path to Nirvana without ever needing to hear things personally. But one of the elements of magic in the process of gaining 'coherence' is the sudden clarity of the recorded space - the background that gives the foreground perspective. Now, if you are stretching the system to also include surround sound elements then that proposition becomes more complicated than with a simpler 'stereo' system. So to retain that element of 'space' I imagine you will need a) critical speaker placement, b) excellent 'reference' sound sources (files you really want to get happy with), and particularly c) the ability to advance/delay the side/rear/sub signals. That would mean, of course, a multichannel DAC or multiple stereo DACs. I use the latter along with PC crossover software that also does time adjustments for phase correction (so I can place my LARGE woofers more out of the way and place my small midrange/tweeter cabinets in the best place for the room acoustics). In your case, all of the different speaker-to-listener distances need to be sorted out before you can expect a flash of white light and a bejeweled genie to appear.
Your experiences with the whole process will be very interesting. Good luck!
Frank
- Home
- Loudspeakers
- Multi-Way
- EnABL - Listening impressions & techniques